
Getting started#
This chapter describes the complete configuration workflow so that you can understand how the Restore Verification objects work together. If you prefer a guided setup, Bacularis also provides the New restore verification wizard.
Let us start with a simple example in which we configure a single Restore Test for selected paths from a backup.
For this chapter, we will use the Rule-based Verification method.
In this guide, you will create the four main Restore Verification objects, connect them into a Restore Test, run the test, and review its results.
The workflow covered in this chapter looks as follows:

Restore Verification is available in Bacularis starting from version 6.5.0.
Requirements#
Bacularis web interface and API version
6.5.0or later.A test host dedicated to running restore tests.
A Bacula Client (Bacula File Daemon) configured and ready to work on the test host.
An additional Bacularis API instance version
6.5.0or later running on the test host.A Bacula Restore Job resource dedicated to Restore Verification.
Before you begin#
Before starting the configuration, make sure that:
the test File Daemon is already configured in the Bacula Director,
the Bacularis API running on the test host is connected to the central Bacularis web interface,
regular Bacula restores work correctly to the test client.
Note
Tip: Before configuring Restore Verification, make sure that Bacula can successfully restore data to the test client using the Restore Job that will be used by the Restore Test.
1. Create a Restore Destination#
A Restore Destination is a configuration object that defines the target environment where restore testing will be performed.
To create a Restore Destination, go to:
[Main menu] => [Page: Jobs] => [Tab: Restore verification] => [SubTab: Restore destinations]
and click the button for creating a new Restore Destination.
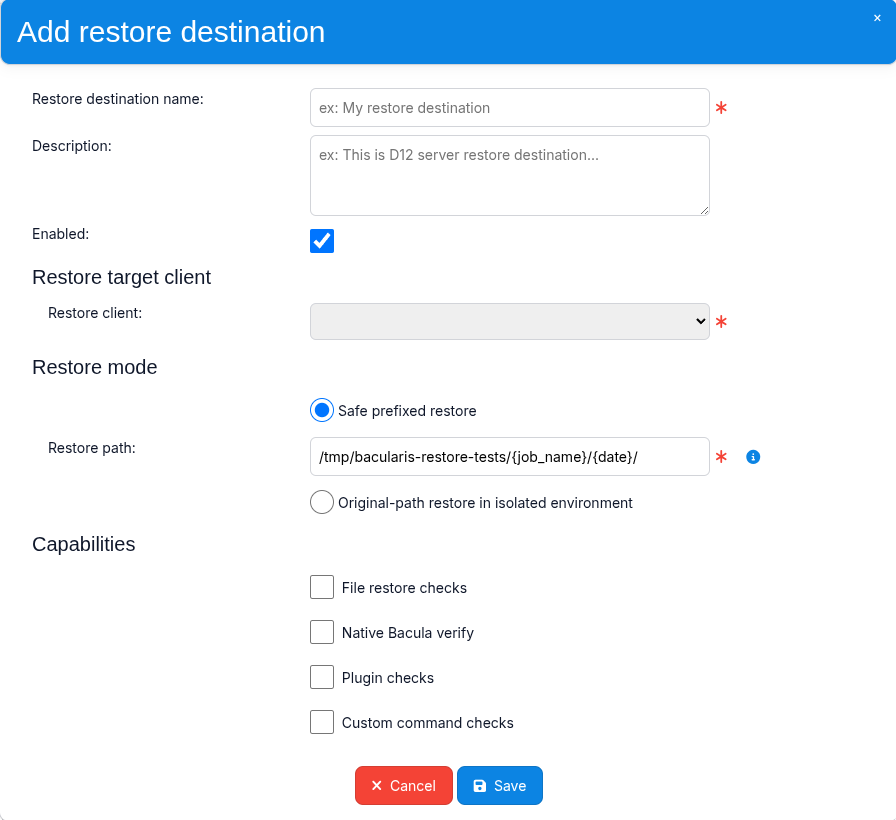
In the Restore Destination window, enter a name and, optionally, a description.
In the Restore destination name section, select the test Bacula Client in the Restore client field. This is the client where the data will be restored and tested.
In the Restore mode section, keep Safe prefixed restore enabled for the Restore path option. This mode restores test data below a dedicated prefix instead of writing it back to its original paths, which makes it the recommended mode for your first Restore Test.
In the text field below, specify the path where the restored data should be placed.
Note
The restore path can contain Restore Verification keywords that are
replaced with actual values when the restore runs. For example, {job_name}
may become BackupClient1, while {date} may become 2026-08-19_00:29:18.
More information about available keywords is provided in the help message
available through the small information icon next to the field.
Capabilities describe which types of verification the destination is prepared to perform. For this example, select File restore checks, because the restored files will be checked using file-oriented checker plugins.
Click Save to create the Restore Destination.
2. Create Verification Rules#
Verification Rules define how restored backup data should be checked.
Go to:
[Main menu] => [Page: Jobs] => [Tab: Restore verification] => [SubTab: Verification Rules]
and click the button for creating new Verification Rules.
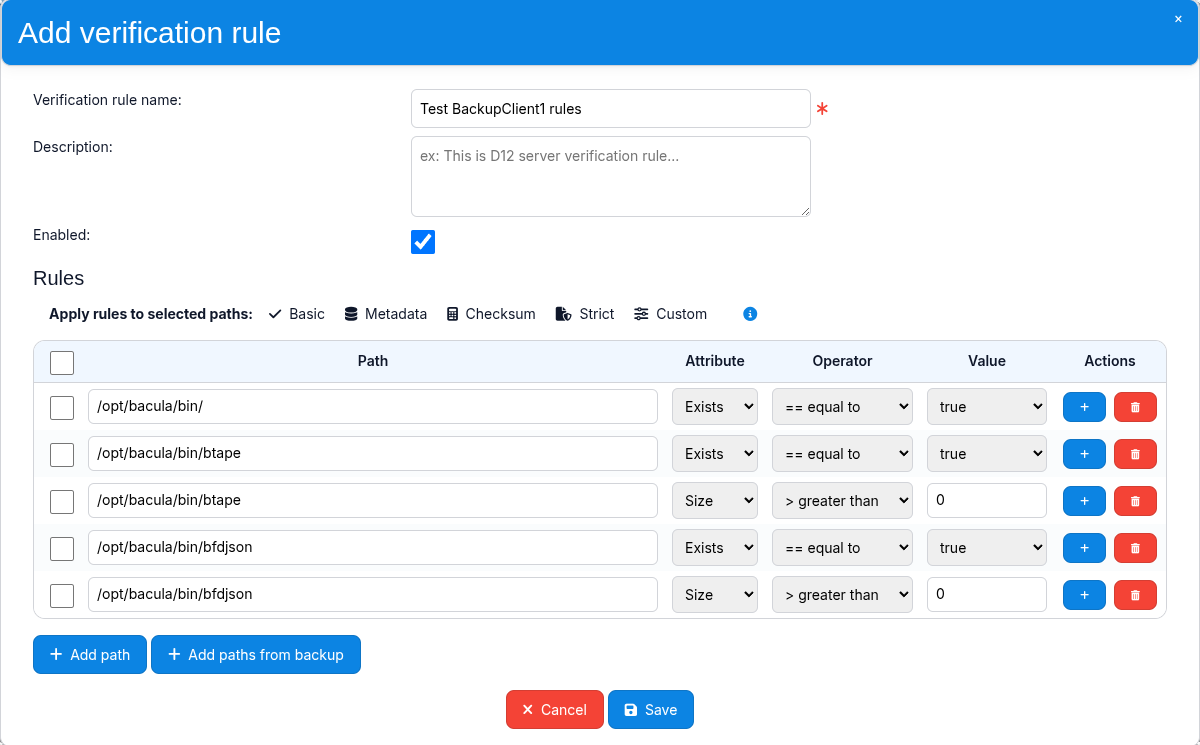
In the Verification Rules window, enter a name and, optionally, a description.
To add paths that should be verified, click Add paths from backup.
In the new dialog, use the Client and Job fields to select the Bacula Client whose data you want to verify and a specific backup from which you want to select paths.
After selecting a backup Job, you should see the list of files contained in that backup. To select particular files or directories for testing, use the Select button on the right side of each path row.
After selecting all required paths, click Use selected paths.
When you return to the main Verification Rules dialog, define which checks should be performed for each path. Use the Attribute, Operator, and Value fields.
If you want to define multiple checks for the same path, use the + button
in the corresponding row to add another rule for that path.
Tip: You can also apply one of the predefined rule sets, such as Basic, Metadata, Checksum, or Strict, to selected paths.
Note
Example
For your first test, select one directory and one regular file.
For the directory, add:
Exists == true
For the file, add:
Exists == true
and:
Size > 0
You can use more advanced checks later. For the first Restore Test, simple existence and size checks are enough to verify that the complete workflow works correctly.
After defining all required rules, click Save. The new Verification Rules configuration will be created.
3. Create a Restore Policy#
Restore Policies define how Restore Tests are started.
To create a new Restore Policy, go to:
[Main menu] => [Page: Jobs] => [Tab: Restore verification] => [SubTab: Restore Policies]
and click Add restore policy.
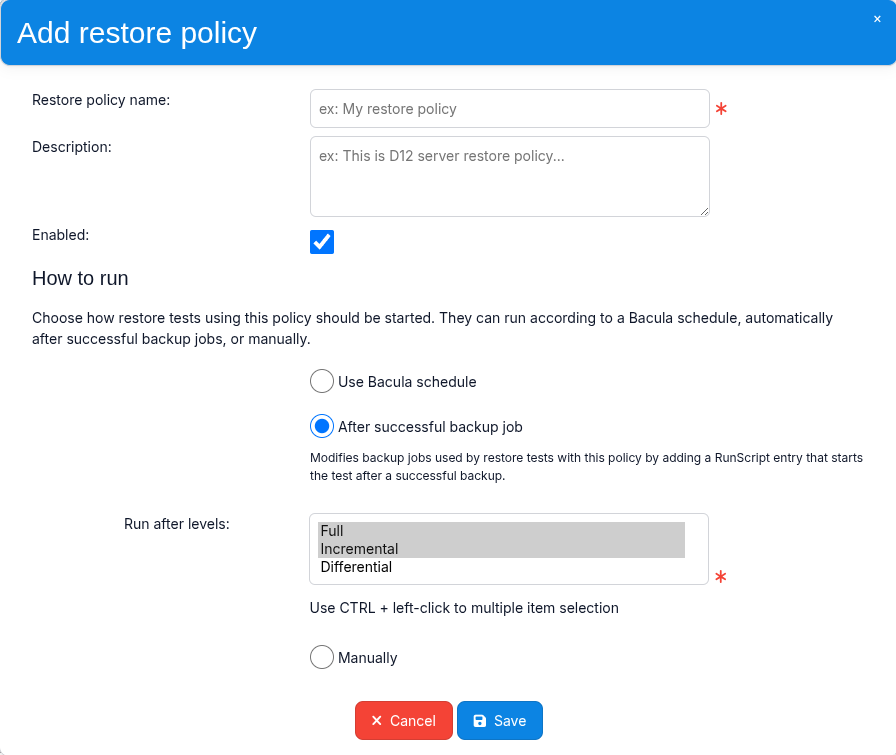
In the Restore Policy window, enter a name and, optionally, a description.
In the How to run section, select how Restore Tests should be started.
Note
Regardless of the selected run method, a Restore Test can always be started manually by running the Admin Job associated with that Restore Test.
For this example, select After successful backup job.
Important
The After successful backup job method integrates the Restore Test with
the selected backup job. When the Restore Test is saved, Bacularis adds
a RunScript entry to the backup job configuration so that the Restore Test
can be started automatically after a successful backup.
Click Save to create the Restore Policy.
4. Create a Restore Test#
A Restore Test brings together all the settings and rules required to perform a restore and verify the restored backup data.
To create a new Restore Test, go to:
[Main menu] => [Page: Jobs] => [Tab: Restore verification] => [SubTab: Restore tests]
and click Add restore test.
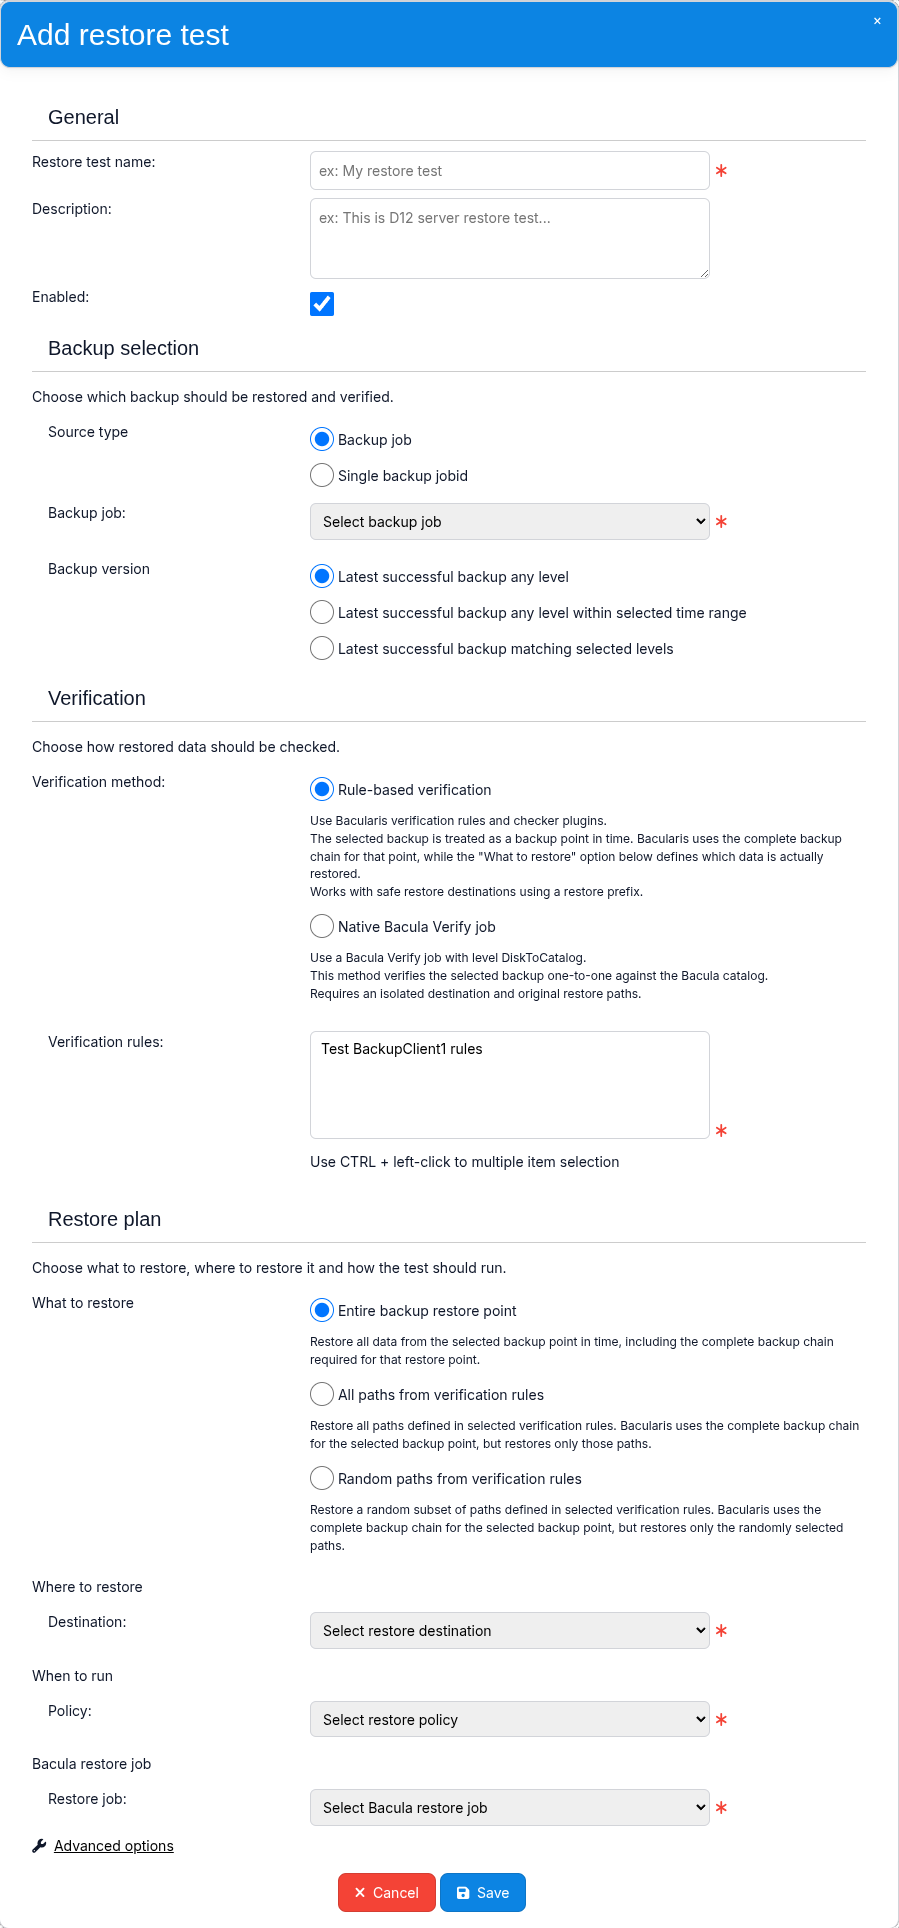
Enter a name for the Restore Test and, optionally, a description.
In the Backup selection section, keep Backup job selected.
In the Backup job field, select the backup Job whose data should be tested.
For Backup version, keep Latest successful backup any level selected.
In the Verification section, keep Rule-based verification selected as the Verification method.
In Verification Rules, select the Verification Rules configuration created earlier.
In the Restore plan section, set What to restore to All paths from Verification Rules.
With this option, Bacularis restores only the data that needs to be checked instead of restoring the entire backup. This can be especially useful for large backups when restoring all data would be unnecessary or resource-intensive.
Bacularis will still use the backup chain required to reconstruct these paths at the selected restore point.
In the Where to restore section, select the Restore Destination created earlier. This defines the environment where the data will be restored and tested.
In the When to run section, select the Restore Policy created earlier.
In the Bacula restore job section, select the Restore Job dedicated to Restore Verification.
Expand Advanced options and locate the Web access interface section.
These settings define how the Bacula Director host connects back to the Bacularis web interface when starting the Restore Verification workflow. Make sure that the configured protocol, address, and port are reachable from the Director host.

If all settings are correct, click Save.
Note
Because the selected Restore Policy starts the test after a successful
backup, saving the Restore Test also adds a new RunScript entry to the
configuration of the tested backup Job. This RunScript starts the Restore
Test after a successful backup.
You have now created and connected all the required Restore Verification objects and prepared your first Restore Test.

5. Run the Restore Test#
To run the Restore Test, go to the Jobs page and start the backup Job that you configured for testing.
Use:
[Main menu] => [Page: Jobs] => [Button: Run job]
Select the backup Job and click Run job.
On the same page, open Job history to follow the execution:
[Main menu] => [Page: Jobs] => [Tab: Job history] => [Table: Job history]
You should see the following sequence of Jobs running one after another:

Each Job has a different role:
the Backup Job creates the backup,
the Admin Job starts the Restore Verification workflow,
the Restore Job restores the data and performs the verification.
Check the final Job status. A successful status means that all verification checks passed. An error status means that at least one part of the restore or verification workflow failed.
In the Job history table, find the Restore Job and click the monitor icon in the Log column. The opened window contains the complete Restore Test report.
Example test case results may look as follows:
ubuntu-fd JobId 103: ClientAfterJob:
ubuntu-fd JobId 103: ClientAfterJob: [INFO] RUN RESTORE TEST ID: "rt-Zn0HTeOos6fNgB2mqSY57cLVvKhWJpGF"
ubuntu-fd JobId 103: ClientAfterJob: [INFO]
ubuntu-fd JobId 103: ClientAfterJob: [INFO] START CHECKERS RULE SET: "Test BackupClient1 rules"
ubuntu-fd JobId 103: ClientAfterJob: [INFO]
ubuntu-fd JobId 103: ClientAfterJob: [INFO] ===> CHECKER: FileExistsCheck
ubuntu-fd JobId 103: ClientAfterJob: [INFO]        TEST: PASSED
ubuntu-fd JobId 103: ClientAfterJob: [INFO]        PATH: /opt/bacula/bin/btape
ubuntu-fd JobId 103: ClientAfterJob: [INFO]        OPERATOR: ==
ubuntu-fd JobId 103: ClientAfterJob: [INFO]        CURRENT: true
ubuntu-fd JobId 103: ClientAfterJob: [INFO]        EXPECTED: true
ubuntu-fd JobId 103: ClientAfterJob: [INFO]
ubuntu-fd JobId 103: ClientAfterJob: [INFO] ===> CHECKER: FileSizeCheck
ubuntu-fd JobId 103: ClientAfterJob: [INFO]        TEST: PASSED
ubuntu-fd JobId 103: ClientAfterJob: [INFO]        PATH: /opt/bacula/bin/btape
ubuntu-fd JobId 103: ClientAfterJob: [INFO]        OPERATOR: >
ubuntu-fd JobId 103: ClientAfterJob: [INFO]        CURRENT: 382136
ubuntu-fd JobId 103: ClientAfterJob: [INFO]        EXPECTED: 0
Note: CURRENT is the value read from the restored data, while EXPECTED
is the value defined by the Verification Rules.
Congratulations. You have configured and successfully run your first Restore Test.
Pro Tips
You can run a Restore Test at any time without starting a new backup. Run the Admin Job whose name corresponds to the Restore Test.
If a test case fails because its expected values were configured incorrectly, edit the Verification Rules and adjust the values for the corresponding path rules.