Installing Bacularis#
Overview#
Installation process can be performed using binary packages, Docker image, PHP Composer or manually using source archives.
Requirements#
Bacularis uses the following components to work:
Web server that supports URL rewriting,
PHP >= 7.4.0 with modules:
php-bcmath
php-cli
php-curl
php-xml
php-json
php-ldap
php-mysqlnd
php-pdo
php-pgsql
php-intl
Access to local or remote Bacula Catalog database,
Bacula bconsole access,
If you are going to configure Bacula via Bacularis, read/write access to Bacula configuration files for the web server user.
Note
In case installing Bacularis by binary DEB or RPM packages all requirements (web server, PHP modules) are installed automatically as the package dependencies. In case installation by Docker, everything is already installed and ready to use.
Install using RPM packages#
Package repositories#
The binary package repositories with the latest Bacularis are available for the following RPM-based systems:
AlmaLinux 8
AlmaLinux 9
AlmaLinux 10
CentOS 8 / RHEL
CentOS Stream 8 / RHEL
CentOS Stream 9 / RHEL
CentOS Stream 10 / RHEL
Fedora 41
Fedora 42
Fedora 43
Fedora 44
Oracle Linux 8
Oracle Linux 9
Oracle Linux 10
openSUSE 15.6 / SLES
openSUSE 16.0 / SLES
Rocky Linux 8
Rocky Linux 9
Rocky Linux 10
To get the binary packages you need to register in the user panel at Bacularis.com:
After registering you will be able to use the Bacularis package repositories.
Installation (with DNF)#
DNF is the next-generation version of yum package manager for RPM-based distributions.
It is used on CentOS, Red Hat Enterprise Linux (RHEL), Fedora, AlmaLinux, Oracle Linux,
Rocky Linux and many other RPM-based systems.
Using DNF Bacularis can be installed with one of the following web servers:
Apache
Nginx
Lighttpd
Below you can find a list of all rpm packages with a brief description:
bacularis - main Bacularis package with application files,
bacularis-httpd - Apache web server configuration files for Bacularis,
bacularis-nginx - Nginx web server configuration files for Bacularis,
bacularis-lighttpd - Lighttpd web server configuration files for Bacularis.
bacularis-selinux - SELinux policy module for Bacularis.
Note
On some operating systems (CentOS 8, CentOS Stream 8, AlmaLinux 8, Oracle Linux 8,
Rocky Linux 8 default PHP version is 7.2. The minimal PHP version required
by Bacularis is 7.4. So please switch PHP to 7.4 as described here:
The interface displays a blank page with the message “Bacularis API – Missing dependencies”.
Apache web server#
dnf install bacularis bacularis-httpd bacularis-selinux
At the end please restart (or reload) the new Apache web server configuration:
systemctl restart httpd
Nginx web server#
dnf install bacularis bacularis-nginx bacularis-selinux
At the end please restart (or reload) the new Nginx web server configuration:
systemctl restart nginx
Lighttpd web server#
dnf install bacularis bacularis-lighttpd bacularis-selinux
Start PHP-FPM service:
systemctl start php-fpm
At the end please restart (or reload) the new Lighttpd web server configuration:
systemctl restart bacularis-lighttpd
Installation (with ZYPPER)#
Zypper is a command-line interface of the ZYpp package manager available on openSUSE, SUSE Linux Enterprise Server (SLES) and on some other RPM-based systems.
Using Zypper Bacularis can be installed with one of the following web servers:
Apache
Nginx
Lighttpd
Below you can find a list of all rpm packages with a brief description:
bacularis - main Bacularis package with application files,
bacularis-httpd - Apache web server configuration files for Bacularis,
bacularis-nginx - Nginx web server configuration files for Bacularis,
bacularis-lighttpd - Lighttpd web server configuration files for Bacularis.
bacularis-selinux - SELinux policy module for Bacularis.
Apache web server#
zypper in bacularis bacularis-httpd bacularis-selinux
Enable URL rewrite module:
a2enmod rewrite
Please disable ProtectSystem option in PHP-FPM systemd unit:
sed -i -e 's/^ProtectSystem=/#ProtectSystem=/i' /usr/lib/systemd/system/php-fpm.service
systemctl daemon-reload
Enable setting HTTP authentication params if FastCGI module used:
sed -i -e '/<IfModule mod_proxy_fcgi.c>/a \\tSetEnvIfNoCase ^Authorization$ "(.+)" HTTP_AUTHORIZATION=$1' /etc/apache2/conf.d/php8-fpm.conf
At the end please restart PHP-FPM and the Apache web server:
systemctl restart php-fpm
systemctl restart apache2
Nginx web server#
zypper in bacularis bacularis-nginx bacularis-selinux
Please disable ProtectSystem option in PHP-FPM systemd unit:
sed -i -e 's/^ProtectSystem=/#ProtectSystem=/i' /usr/lib/systemd/system/php-fpm.service
systemctl daemon-reload
At the end please restart (or reload) PHP-FPM and the new Nginx web server configuration:
systemctl restart php-fpm
systemctl restart nginx
Lighttpd web server#
zypper in bacularis bacularis-lighttpd bacularis-selinux
Please disable ProtectSystem option in PHP-FPM systemd unit:
sed -i -e 's/^ProtectSystem=/#ProtectSystem=/i' /usr/lib/systemd/system/php-fpm.service
systemctl daemon-reload
Start PHP-FPM service:
systemctl start php-fpm
At the end please restart (or reload) the new Lighttpd web server configuration:
systemctl restart bacularis-lighttpd
Access in web browser#
The Bacularis web interface is available at http://localhost:9097 with default
user admin and password admin.
You should now see the Bacularis install wizard. To learn how to configure it, continue on the Installation wizard page.
Install using DEB packages#
Package repositories#
The binary package repositories with the latest Bacularis are available for the following DEB-based systems:
Debian 11 Bullseye
Debian 12 Bookworm
Debian 13 Trixie
Ubuntu 20.04 Focal
Ubuntu 22.04 Jammy
Ubuntu 24.04 Noble
Ubuntu 24.10 Oracular
Ubuntu 25.04 Plucky
Ubuntu 25.10 Questing
Ubuntu 26.04 Resolute
To get the binary packages you need to register in the user panel at Bacularis.com:
After registering you will be able to use the Bacularis package repositories.
Installation (with APT)#
Bacularis can be installed with one of the following web servers:
Apache
Nginx
Lighttpd
Below you can find a list of all deb packages with a brief description:
bacularis - main Bacularis package with application files,
bacularis-apache2 - Apache web server configuration files for Bacularis,
bacularis-nginx - Nginx web server configuration files for Bacularis,
bacularis-lighttpd - Lighttpd web server configuration files for Bacularis.
Apache web server#
apt install bacularis bacularis-apache2
After installation you must enable the rewrite and the proxy FastCGI Apache modules:
a2enmod rewrite
a2enmod proxy_fcgi
You must enable the Apache PHP-FPM configuration. Please select one of the a2enconf
commands that match your PHP version installed in the system. The PHP version you can
check for example by running PHP cli command: php -v:
For PHP 7.4 it is command:
a2enconf php7.4-fpm
For PHP 8.2 it is command:
a2enconf php8.2-fpm
For PHP 8.3 it is command:
a2enconf php8.3-fpm
For PHP 8.4 it is command:
a2enconf php8.4-fpm
For PHP 8.5 it is command:
a2enconf php8.5-fpm
There is also required to enable the bacularis virtual host site:
a2ensite bacularis
At the end please restart (or reload) the new Apache web server configuration:
systemctl restart apache2
Nginx web server#
apt install bacularis bacularis-nginx
After installation you must enable the bacularis site:
ln -s /etc/nginx/sites-available/bacularis.conf /etc/nginx/sites-enabled/
At the end please restart (or reload) the new Nginx web server configuration:
systemctl restart nginx
Lighttpd web server#
apt install bacularis bacularis-lighttpd
Restart the new Lighttpd web server configuration:
systemctl restart bacularis-lighttpd
Access in web browser#
The Bacularis web interface is available at http://localhost:9097 with default
user admin and password admin.
You should now see the Bacularis install wizard. To learn how to configure it, continue on the Installation wizard page.
Install using Docker#
Installation#
On the Docker Hub service are available Bacularis container images. They are in few variants to use:
bacularis-standalone#
URL: https://hub.docker.com/r/bacularis/bacularis-standalone
It contains fully configured Bacularis webGUI and API with Bacula Director, Storage Daemon and File Daemon and also PostgreSQL database server. The image can be used for example for trying Bacularis in own environment.
The command to run container:
docker run -d -p 9097:9097 bacularis/bacularis-standalone
Alpine image volume paths:
/var/lib/postgresql/data- Bacula database files
/etc/bacula- Bacula configuration files
/var/lib/bacula- Bacula working directory
/var/www/bacularis/protected/vendor/bacularis/bacularis-api/API/Config- Bacularis API configuration files
/var/www/bacularis/protected/vendor/bacularis/bacularis-api/API/Logs- Bacularis API logs
/var/www/bacularis/protected/vendor/bacularis/bacularis-web/Web/Config- Bacularis Web configuration files
/var/www/bacularis/protected/vendor/bacularis/bacularis-web/Web/Logs- Bacularis Web logs
/var/www/bacularis/protected/vendor/bacularis/bacularis-common/Common/Working- Bacularis working directory
Debian image volume paths:
/var/lib/postgresql- Bacula database files
/etc/bacula- Bacula configuration files
/var/lib/bacula- Bacula working directory
/var/www/bacularis/protected/vendor/bacularis/bacularis-api/API/Config- Bacularis API configuration files
/var/www/bacularis/protected/vendor/bacularis/bacularis-api/API/Logs- Bacularis API logs
/var/www/bacularis/protected/vendor/bacularis/bacularis-web/Web/Config- Bacularis Web configuration files
/var/www/bacularis/protected/vendor/bacularis/bacularis-web/Web/Logs- Bacularis Web logs
/var/www/bacularis/protected/vendor/bacularis/bacularis-common/Common/Working- Bacularis working directory
bacularis-web#
URL: https://hub.docker.com/r/bacularis/bacularis-web
It contains a pure the Bacularis web interface without API layer. It can be used to connect external Bacularis API server(s) in containers or outside them.
The command to run container:
docker run -d -p 9097:9097 bacularis/bacularis-web
Alpine and Debian image volume paths:
/var/www/bacularis/protected/vendor/bacularis/bacularis-web/Web/Config- Bacularis Web configuration files
/var/www/bacularis/protected/vendor/bacularis/bacularis-web/Web/Logs- Bacularis Web logs
/var/www/bacularis/protected/vendor/bacularis/bacularis-common/Common/Working- Bacularis working directory
bacularis-api-dir#
URL: https://hub.docker.com/r/bacularis/bacularis-api-dir
It contains installed and configured the Bacularis API with ready to use Bacula Director and PostgreSQL database server. The image can be used to connect to existing Bacularis Web instances running in containers or outside them.
The command to run container:
docker run -d -p 9097:9097 bacularis/bacularis-api-dir
Alpine image volume paths:
/var/lib/postgresql/data- Bacula database files
/etc/bacula- Bacula configuration files
/var/lib/bacula- Bacula working directory
/var/www/bacularis/protected/vendor/bacularis/bacularis-api/API/Config- Bacularis API configuration files
/var/www/bacularis/protected/vendor/bacularis/bacularis-api/API/Logs- Bacularis API logs
/var/www/bacularis/protected/vendor/bacularis/bacularis-common/Common/Working- Bacularis working directory
Debian image volume paths:
/var/lib/postgresql- Bacula database files
/etc/bacula- Bacula configuration files
/var/lib/bacula- Bacula working directory
/var/www/bacularis/protected/vendor/bacularis/bacularis-api/API/Config- Bacularis API configuration files
/var/www/bacularis/protected/vendor/bacularis/bacularis-api/API/Logs- Bacularis API logs
/var/www/bacularis/protected/vendor/bacularis/bacularis-common/Common/Working- Bacularis working directory
bacularis-api-sd#
URL: https://hub.docker.com/r/bacularis/bacularis-api-sd
It contains installed and configured the Bacularis API with ready to use Bacula Storage Daemon. The image can be used to connect to existing Bacularis Web instances running in containers or outside them.
The command to run container:
docker run -d -p 9097:9097 bacularis/bacularis-api-sd
Alpine and Debian image volume paths:
/etc/bacula- Bacula configuration files
/var/lib/bacula- Bacula working directory
/var/www/bacularis/protected/vendor/bacularis/bacularis-api/API/Config- Bacularis API configuration files
/var/www/bacularis/protected/vendor/bacularis/bacularis-api/API/Logs- Bacularis API logs
/var/www/bacularis/protected/vendor/bacularis/bacularis-common/Common/Working- Bacularis working directory
bacularis-api-fd#
URL: https://hub.docker.com/r/bacularis/bacularis-api-fd
It contains installed and configured the Bacularis API with ready to use Bacula File Daemon. The image can be used to connect to existing Bacularis Web instances running in containers or outside them.
The command to run container:
docker run -d -p 9097:9097 bacularis/bacularis-api-fd
Alpine and Debian image volume paths:
/etc/bacula- Bacula configuration files
/var/lib/bacula- Bacula working directory
/var/www/bacularis/protected/vendor/bacularis/bacularis-api/API/Config- Bacularis API configuration files
/var/www/bacularis/protected/vendor/bacularis/bacularis-api/API/Logs- Bacularis API logs
/var/www/bacularis/protected/vendor/bacularis/bacularis-common/Common/Working- Bacularis working directory
Access in web browser#
The Bacularis web interface is available at http://localhost:9097 with default
user admin and password admin.
Install using Composer#
The PHP requirements together with other requirements can be installed by the commands below.
For rpm-based systems
dnf install curl patch php-bcmath php-cli php-curl php-xml php-json php-ldap php-mysqlnd php-pdo php-pgsql php-intl expect
For deb-based systems
apt install curl patch php-bcmath php-cli php-curl php-xml php-json php-ldap php-mysql php-pdo php-pgsql php-intl expect
For apk-based systems
PHP_VER=84; # PHP version
apk add bash curl patch php${PHP_VER} php${PHP_VER}-phar  php${PHP_VER}-iconv php${PHP_VER}-bcmath php${PHP_VER}-curl php${PHP_VER}-dom php${PHP_VER}-json php${PHP_VER}-ldap php${PHP_VER}-pdo php${PHP_VER}-pgsql php${PHP_VER}-pdo_pgsql php${PHP_VER}-mysqlnd php${PHP_VER}-pdo_mysql php${PHP_VER}-intl php${PHP_VER}-ctype php${PHP_VER}-session php${PHP_VER}-fpm php${PHP_VER}-openssl expect
ln -s /usr/bin/php84 /usr/bin/php
To install Bacularis you need to download the Composer phar archive and install it in system. After that, you can install Bacularis.
The Composer installation:
curl -s http://getcomposer.org/installer | php
mv composer.phar /usr/local/bin/composer
Bacularis installation:
composer create-project bacularis/bacularis-app
Once it is done, you need to set proper permissions for specific Bacularis directories. You can do it by executing the install script as the root user:
bacularis-app/protected/tools/install.sh
Note
This is note for using Nginx or Lighttpd web server. On some
operating systems (like DEB-based) where default PHP-FPM socket is
different than /run/php-fpm/www.sock you have to provide the PHP-FPM
socket path to the install.sh script. It can be done by using
an additional -p parameter like below (example for PHP 7.4):
bacularis-app/protected/tools/install.sh -p /var/run/php/php7.4-fpm.sock
If you don’t know the PHP-FPM socket path in your operating system, you can find it using the following command:
find /run/php* -name '*.sock'
This install.sh script also will prepare web server configuration for
popular web servers. The result file will be named bacularis-apache.conf,
bacularis-nginx.conf or bacularis-lighttpd.conf (depending on used
web server) and it will be available in the main Bacularis directory. You
need to provide it to location on the filesystem where it can be used by the
web server. Please write it with name bacularis.conf in the destination
web server directory because Bacularis expects this file name.
Example command for Nginx server configuration file on RPM-based system:
mv bacularis-app/bacularis-nginx.conf /etc/nginx/conf.d/bacularis.conf
NOTE: Please adapt the config move command to your system and web server directory.
Installation using Composer on RPM-based system
Installation using Composer on DEB-based system
Access in web browser#
The Bacularis web interface is available at http://localhost:9097 with default
user admin and password admin.
You should now see the Bacularis install wizard. To learn how to configure it, continue on the Installation wizard page.
Optional commands#
To enable additional Bacularis functions such as:
install Bacula through the Bacularis install wizard
change the web server port in application settings page
create/renew/remove TLS/SSL certificate in application settings page
you also need to execute the following commands below. If you do not want to use the addtional Bacularis functions, these commands are not needed.
mkdir /etc/bacularis
ln -s /var/www/bacularis-app/protected/API/Config /etc/bacularis/API
ln -s /var/www/bacularis-app/protected/Web/Config /etc/bacularis/Web
ln -s /var/www/bacularis-app /usr/share/bacularis
Install manually#
Prepare files#
To install Bacularis manually, you need to download five source archives: four archives that correspond the Bacularis layers and one archive with the external dependencies. They are:
bacularis-api-x.y.z.tar.gz
bacularis-common-x.y.z.tar.gz
bacularis-web-x.y.z.tar.gz
bacularis-app-x.y.z.tar.gz
bacularis-external-x.y.z.tar.gz
You can download all of them to the same directory in the following way (example
for version 4.7.1):
BACULARIS_VER=4.7.1
mkdir -p /var/www/bacularis
cd /var/www/bacularis
wget -O bacularis-api-$BACULARIS_VER.tar.gz https://github.com/bacularis/bacularis-api/archive/refs/tags/$BACULARIS_VER.tar.gz
wget -O bacularis-common-$BACULARIS_VER.tar.gz https://github.com/bacularis/bacularis-common/archive/refs/tags/$BACULARIS_VER.tar.gz
wget -O bacularis-web-$BACULARIS_VER.tar.gz https://github.com/bacularis/bacularis-web/archive/refs/tags/$BACULARIS_VER.tar.gz
wget -O bacularis-app-$BACULARIS_VER.tar.gz https://github.com/bacularis/bacularis-app/archive/refs/tags/$BACULARIS_VER.tar.gz
wget https://bacularis.app/downloads/bacularis-external-$BACULARIS_VER.tar.gz
Once the source archives are downloaded you can extract them and prepare Bacularis files as below:
tar --strip-components 1 -zxvf bacularis-app-$BACULARIS_VER.tar.gz
tar --strip-components 1 -C protected -zxvf bacularis-external-$BACULARIS_VER.tar.gz
mkdir -p protected/vendor/bacularis/bacularis-common
mkdir -p protected/vendor/bacularis/bacularis-api
mkdir -p protected/vendor/bacularis/bacularis-web
tar --strip-components 1 -C protected/vendor/bacularis/bacularis-common -zxvf bacularis-common-$BACULARIS_VER.tar.gz
tar --strip-components 1 -C protected/vendor/bacularis/bacularis-api -zxvf bacularis-api-$BACULARIS_VER.tar.gz
tar --strip-components 1 -C protected/vendor/bacularis/bacularis-web -zxvf bacularis-web-$BACULARIS_VER.tar.gz
# NOTE: this backslash in cp is intentional
\cp -rf protected/vendor/bacularis/bacularis-common/project/* ./
cp protected/vendor/bacularis/bacularis-common/project/protected/samples/webserver/bacularis.users.sample protected/vendor/bacularis/bacularis-api/API/Config/bacularis.users
cp protected/vendor/bacularis/bacularis-common/project/protected/samples/webserver/bacularis.users.sample protected/vendor/bacularis/bacularis-web/Web/Config/bacularis.users
ln -s vendor/bacularis/bacularis-common/Common protected/Common
ln -s vendor/bacularis/bacularis-api/API protected/API
ln -s vendor/bacularis/bacularis-web/Web protected/Web
cp protected/vendor/npm-asset/fortawesome--fontawesome-free/css/all.min.css htdocs/themes/Baculum-v2/fonts/css/fontawesome-all.min.css
cp -r protected/vendor/npm-asset/fortawesome--fontawesome-free/webfonts/* htdocs/themes/Baculum-v2/fonts/webfonts/
cp -r protected/vendor/npm-asset/fontsource--inter/files/* htdocs/themes/Baculum-v2/fonts/webfonts/
Now you can remove the source archives:
rm -f bacularis-common-$BACULARIS_VER.tar.gz \
     bacularis-api-$BACULARIS_VER.tar.gz \
     bacularis-web-$BACULARIS_VER.tar.gz \
     bacularis-app-$BACULARIS_VER.tar.gz \
     bacularis-external-$BACULARIS_VER.tar.gz
After this part there is needed to install Bacularis dependencies.
In this case we used Nginx web server but it can be any other web server as well.
RPM-based Linux distributions#
Installing dependencies on RPM-based Linux distributions looks like below:
dnf install nginx \
              php-fpm \
              php-bcmath \
              php-cli \
              php-curl \
              php-xml \
              php-json \
              php-ldap \
              php-mysqlnd \
              php-pdo \
              php-pgsql \
              php-intl \
              expect
DEB-based Linux distributions#
Installing dependencies on DEB-based Linux distributions looks like below:
apt install nginx \
              php-fpm \
              php-bcmath \
              php-cli \
              php-curl \
              php-xml \
              php-json \
              php-ldap \
              php-mysql \
              php-pdo \
              php-pgsql \
              php-intl \
              expect
APK-based Linux distributions#
Installing dependencies on APK-based Linux distributions looks like below:
PHP_VER=84; # PHP version
apk add bash \
        curl \
        patch \
        php${PHP_VER} \
        php${PHP_VER}-phar  \
        php${PHP_VER}-iconv \
        php${PHP_VER}-bcmath \
        php${PHP_VER}-curl \
        php${PHP_VER}-dom \
        php${PHP_VER}-json \
        php${PHP_VER}-ldap \
        php${PHP_VER}-pdo \
        php${PHP_VER}-pgsql \
        php${PHP_VER}-pdo_pgsql \
        php${PHP_VER}-mysqlnd \
        php${PHP_VER}-pdo_mysql \
        php${PHP_VER}-intl \
        php${PHP_VER}-ctype \
        php${PHP_VER}-session \
        php${PHP_VER}-fpm \
        php${PHP_VER}-openssl \
        expect
SELinux settings#
If you use SELinux in your operating system, you need to prepare the additional steps below to build and install the Bacularis SELinux module. Also we need to set new labels for some Bacularis paths.
First you need to install SELinux dependecies:
dnf install selinux-policy \
            selinux-policy-devel \
            checkpolicy \
            make
Next please run the following commands:
make -C protected/samples/selinux/ -f /usr/share/selinux/devel/Makefile bacularis.pp
install -D -m 644 protected/samples/selinux/bacularis.pp /usr/share/selinux/packages/bacularis/bacularis.pp
semanage fcontext -a -t httpd_sys_content_t '/var/www/bacularis(/.*)?'
semanage fcontext -a -t httpd_sys_rw_content_t '/var/www/bacularis/protected/vendor/bacularis/bacularis-api/API/Config(/.*)?'
semanage fcontext -a -t httpd_sys_rw_content_t '/var/www/bacularis/protected/vendor/bacularis/bacularis-api/API/Logs(/.*)?'
semanage fcontext -a -t httpd_sys_rw_content_t '/var/www/bacularis/protected/vendor/bacularis/bacularis-web/Web/Config(/.*)?'
semanage fcontext -a -t httpd_sys_rw_content_t '/var/www/bacularis/protected/vendor/bacularis/bacularis-web/Web/Logs(/.*)?'
semanage fcontext -a -t httpd_cache_t '/var/www/bacularis/htdocs/assets(/.*)?'
semanage fcontext -a -t httpd_cache_t '/var/www/bacularis/protected/runtime(/.*)?'
restorecon -i -R '/var/www/bacularis'
semodule -i /usr/share/selinux/packages/bacularis/bacularis.pp
Optional commands#
To enable additional Bacularis functions such as:
install Bacula through the Bacularis install wizard
change the web server port in application settings page
create/renew/remove TLS/SSL certificate in application settings page
you also need to execute the following commands below. If you do not want to use the addtional Bacularis functions, these commands are not needed.
mkdir /etc/bacularis
ln -s /var/www/bacularis/protected/API/Config /etc/bacularis/API
ln -s /var/www/bacularis/protected/Web/Config /etc/bacularis/Web
ln -s /var/www/bacularis /usr/share/bacularis
Prepare to run#
Now you ned to run install script to set Bacularis files permissions and to prepare the web server configuration file.
Example for RPM-based systems
protected/tools/install.sh -p /run/php-fpm/www.sock
Example for DEB-based systems
protected/tools/install.sh -p /run/php/php-fpm.sock
Note
The -p parameter is for providing PHP-FPM socket to preparing
the web server configuration. You need to make sure what is name of
the default PHP-FPM socket in your operating system. You can do it
using for example this command: find /run/php* -name '*.sock'
After starting the install.sh script we should see the following output
where we can answer on two questions:
+===================================================+
|      Welcome in the Bacularis install script      |
+---------------------------------------------------+
|  This script will help you to adjust privileges   |
|  for Bacularis files and it will prepare          |
|  configuration files for popular web servers.     |
+---------------------------------------------------+


What is your web server type?
1 Apache (default)
2 Nginx
3 Lighttpd
4 Other
Please type number between 1-4 [1]: 2

What is your web server user? [www-data]: apache
[INFO] Web server config file you can find in /var/www/bacularis/bacularis-nginx.conf
[INFO] Please move it to appropriate location.
[INFO] End.
Now you need to provide the prepared web server config to the web server configuration files directory:
mv /var/www/bacularis/bacularis-nginx.conf /etc/nginx/conf.d/bacularis.conf
Please write it with name bacularis.conf (as above) in the destination web server
directory because Bacularis expects this file name.
Note
If you use SELinux, you have to now run restorecon -i -R '/etc/nginx/conf.d'
At the end we restart the web server.
systemctl restart nginx
Access in web browser#
The Bacularis web interface is available at http://localhost:9097 with default
user admin and password admin.
You should now see the Bacularis install wizard. To learn how to configure it, continue on the Installation wizard page.
Bacularis and Baculum#
Bacularis installation on host with Baculum#
Bacularis uses different system paths than Baculum, so both web interfaces can coexist independently on the same host. From the web perspective, they run on separate ports.
If both Baculum and Bacularis on the same host are configured to manage the same Bacula instance, do not edit Bacula configuration files using both interfaces simultaneously, as this may result in configuration conflicts – where Baculum and Bacularis overwrite each other’s changes.
However, for administrative tasks such as running backups, restores, or monitoring statuses, there are no additional limitations.
Enable SSL#
This section explains how to enable encrypted HTTPS connections in Bacularis using an SSL/TLS certificate.
Starting with version 4.6.0, you can generate and install a certificate directly
from the Bacularis web interface.
If you’re using an older version, you can still install a certificate manually. Both automatic and manual methods are described below.
Self-signed certificate#
A self-signed certificate is the simplest way to enable encryption in Bacularis.
It doesn’t require a trusted Certificate Authority (CA) and can be automatically renewed after a specified number of days (e.g., renew 30 days before expiration).
Requirements#
Bacularis version
4.6.0or greater.Web server with SSL module (mod ssl) enabled
OpenSSL binary
Automatic installation#
This method is available from Bacularis 4.6.0. On the Application Settings
page (gear wheel icon at the top left) on the SSL certs tab please select
Self-signed certificate, fill certificate desired properties and click
the create certificate button.
Here you can see a video guide about automatic installing self-signed certificate.
Automatic renew#
To configure the automatic certificate renew, please put in the system scheduler
(cron, systemd timer …others) in daily execution as the root user the following
command (for Bacularis installed in /usr/share/bacularis):
/usr/share/bacularis/protected/Common/Bin/task cert/renew --type=self-signed --days=30
Parameters
type- it provides the certificate type to refresh. Available values:self-signedorlets-encrypt.
days- number of days before expiration time when the certificate will be renewed (ex.30days). If this parameter is not provided the renewing try occurs immediately on the command execution.
Manual installation#
If from any reason you can’t use the automatic certificate installation, here you can find instruction about how to install self-signed certificate manually.
1. Create private key and self-signed certificate
openssl req -new -x509 -keyout /etc/bacularis/bacularis_key.pem -out /etc/bacularis/bacularis_cert.pem -days 365 -nodes
2. Set secure permissions for the key file
chmod 400 /etc/bacularis/bacularis_key.pem
Apache web server#
1. Enable Apache SSL module
RPM-based operating systems:
dnf install mod_ssl
DEB-based operating systems:
a2enmod ssl
2. Find the Bacularis Apache configuration file
The Bacularis Apache configuration file can be located in various paths depending on the operating system you are using.
RPM-based systems:
/etc/httpd/conf.d/bacularis.conf
DEB-based systems:
/etc/apache2/sites-available/bacularis.conf
3. Add the following lines to the Bacularis Apache config in the VirtualHost section
SSLEngine on
SSLCertificateFile "/etc/bacularis/bacularis_cert.pem"
SSLCertificateKeyFile "/etc/bacularis/bacularis_key.pem"
4. Restart the web server
RPM-based systems:
systemctl restart httpd
DEB-based systems:
systemctl restart apache2
5. Enable HTTPS in Bacularis
To set HTTPS connection between Web -> API you have to change the Bacularis
configuration as described here:
Nginx web server#
1. Find the Bacularis Nginx configuration file
The Bacularis Nginx configuration file can be located in various paths depending on the operating system you are using.
RPM-based systems:
/etc/nginx/conf.d/bacularis.conf
DEB-based systems:
/etc/nginx/sites-available/bacularis.conf
2. Modify line in the Bacularis Nginx configuration file
From:
listen 9097;
To:
listen 9097 ssl;
3. Add the following lines to the Bacularis Nginx config in the server section
ssl_certificate /etc/bacularis/bacularis_cert.pem;
ssl_certificate_key /etc/bacularis/bacularis_key.pem;
4. Restart the web server
systemctl restart nginx
5. Enable HTTPS in Bacularis
To set HTTPS connection between Web -> API you have to change the Bacularis
configuration as described here:
Lighttpd web server#
1. Add the following lines to /etc/bacularis/bacularis-lighttpd.conf file
server.modules += ( "mod_openssl" )
ssl.engine = "enable"
ssl.pemfile = "/etc/bacularis/bacularis_cert.pem"
ssl.privkey = "/etc/bacularis/bacularis_key.pem"
2. Restart the web server
systemctl restart bacularis-lighttpd
3. Enable HTTPS in Bacularis
To set HTTPS connection between Web -> API you have to change the Bacularis
configuration as described here:
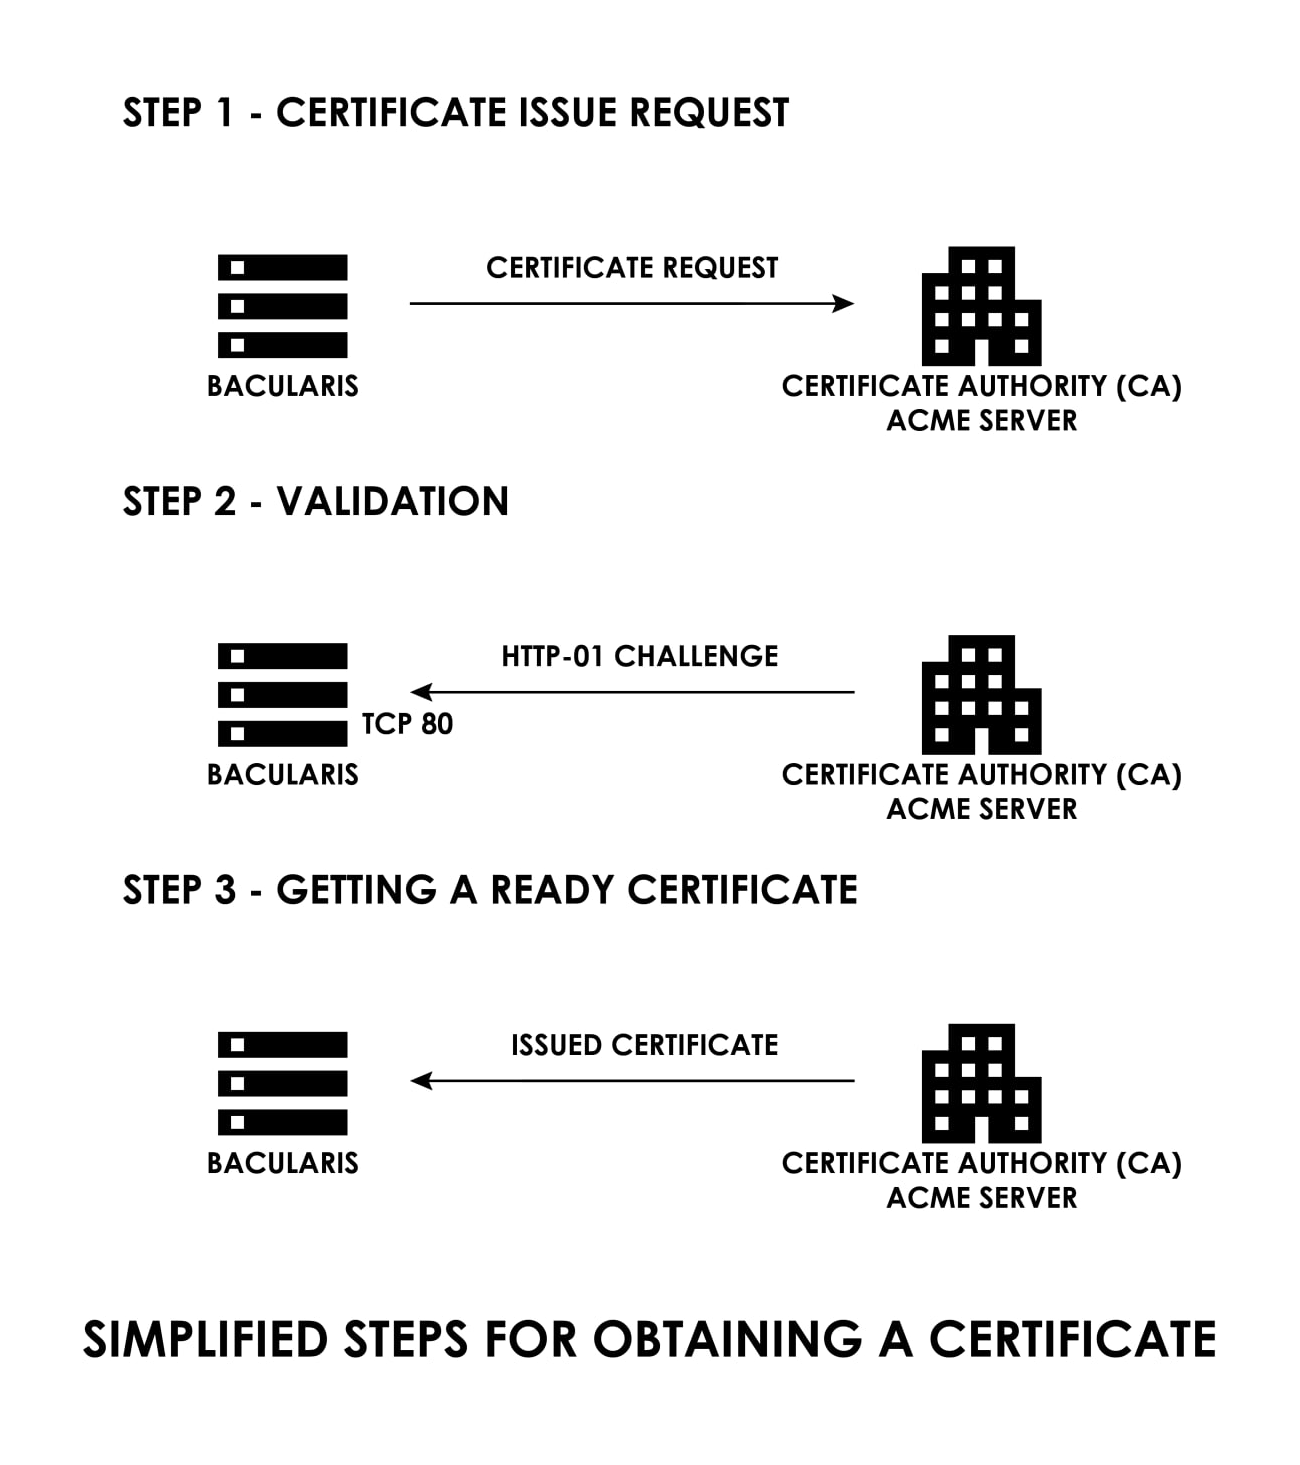
Let’s Encrypt certificate#
A Let’s Encrypt certificate is ideal if you plan to access Bacularis from outside your local network – though it can also be used internally.
It’s issued by the Let’s Encrypt nonprofit Certificate Authority (CA) using the ACME protocol (RFC 8555).
Requirements#
Bacularis version
4.6.0or greater.Web server with SSL module (mod ssl) enabled
Bacularis interface available on public HTTP port
80(on certificate install and renew time).OpenSSL binary
Automatic installation#
This method is available from Bacularis 4.6.0. On the Application Settings
page (gear wheel icon at the top left) on the SSL certs tab please select
Let's Encrypt certificate, fill certificate desired properties and click
the create certificate button.
Here you can see a video guide about automatic installing Let’s Encrypt certificate.
Automatic renew#
To configure the automatic certificate renew, please put in the system scheduler
(cron, systemd timer …others) in daily execution as the root user the following
command (for Bacularis installed in /usr/share/bacularis):
/usr/share/bacularis/protected/Common/Bin/task cert/renew --type=lets-encrypt --days=30
Parameters
type- it provides the certificate type to refresh. Available values:self-signedorlets-encrypt.
days- number of days before expiration time when the certificate will be renewed (ex.30days). If this parameter is not provided the renewing try occurs immediately on the command execution.
Note
We would like to ask you about not scheduling the certificate renew on the full hour but use random time. This helps the CA to avoid heavy spikes in traffic. More details you can read here: Why should I set certificate renew run at a random time
You also need to make sure that Bacularis web interface is available on HTTP port 80.
This is required for the validation purpose. We suggest to open port 80 and do a
redirection from HTTP port 80 to HTTPS port 443 or any other port where Bacularis
is available through encrypted HTTPS connection.
Below you can find examples of this type of the HTTP to HTTPS redirection for supported web servers.
Note
Before adding the web server config samples, please disable default listening the web
server on port 80. If your web server besides of Bacularis serves also other web
services, please use appropriate server name directives in the examples below.
Nginx#
Assuming that Bacularis is available through the encrypted HTTPS connection on the
default 443 port, please add to Bacularis Nginx configuration one more server block
at the end of file:
server {
   server_name _;
   listen 80;
   return 301 https://$host$request_uri;
}
Apache#
Assuming that Bacularis is available through the encrypted HTTPS connection on the
default 443 port, please add to Bacularis Apache configuration add one more VirtualHost
block at the end of file:
Listen 0.0.0.0:80
<VirtualHost *:80>
    RewriteEngine On
    RewriteCond %{HTTPS} !=on
    RewriteRule ^ https://%{SERVER_NAME}%{REQUEST_URI} [R=301,L]
</VirtualHost>
General installation notes#
Please note that once a certificate is installed, the protocol used to access the
web interface changes from HTTP to HTTPS – and in some cases, the port may change
as well. This affects the internal Web -> API connection on the host where the
Bacularis web interface is running, because communication between the web interface
and API occurs over HTTP(S).
After the certificate is installed and the protocol changes, Bacularis automatically
updates the Web -> API connection parameters (protocol and port) – but only if
the API host address is localhost.
If your setup includes multiple API host connections (not just the local one), you’ll need to manually update their protocol and port settings under the Security page in the API Hosts tab.
Note
Multiple local API hosts are usually configured when you use more than one Bacularis web user with restricted access. If you have only one user and a single local API host, no manual update is needed – Bacularis will handle it automatically after certificate installation.
If API host parameters (protocol and port) are not updated after switching from HTTP to HTTPS, Error 100 may occur as described here:
Web server config paths#
To modify the Bacularis web server configuration file we assume the following path in system:
Web server configuration files on the RPM-based systems:
Apache
/etc/httpd/conf.d/bacularis.conf
Nginx
/etc/nginx/conf.d/bacularis.conf
Lighttpd
/etc/bacularis/bacularis-lighttpd.conf
Web server configuration files on the DEB-based systems:
Apache
/etc/apache2/sites-available/bacularis.conf
Nginx
/etc/nginx/sites-available/bacularis.conf
Lighttpd
/etc/bacularis/bacularis-lighttpd.conf
If your Bacularis web server configuration file name is different and you would like to use the SSL certificate and web server network settings functions, please rename your web server config file name to appropriate file name listed above.
PGP verification key#
All DEB and RPM packages are signed.
The PGP key parameters:
Userid     : "Marcin Haba <marcin.haba@bacula.pl>"
Fingerprint: 546E 19BB E5BD D219 644C 0851 E72D 44EC 5C3D BD51
From       : https://packages.bacularis.app/bacularis.pub
Algorithm  : RSA
Size:      : 2048 bit
The key block:
-----BEGIN PGP PUBLIC KEY BLOCK-----

mQENBFT7ZjUBCACxlKVk+x7buPpqgwwluHU/CkIsT6uYsoqpSLbep3b9T59FQchI
aE3F0F5uupO3VOVUQhbg/1UGKh2g6Nuz0CpuAWqDF9BaBsxWyBLZjxfnGD0KOeCg
setFq2LiOtlUmeCpLp1wBWPKuvxHvkB1IYC/3yjMfZayrBJNtig07yHowmikfweX
HD6cnpZLcbM/LZ6mpNPwqEknGJ+vXryJZQaMn9RWsdOLG2siEmCtxzZXaidGsydB
EZdvpVV1i9HpUVQfO67w0xUJpUjuKgoYL9CQ+hZNX/OOhGzG4ynR43qOXTaYGnAl
dE7L8no7tupG+GGJxX3zJkc6vFFrjzmlxKrNABEBAAG0I01hcmNpbiBIYWJhIDxt
YXJjaW4uaGFiYUBiYWN1bGEucGw+iQFVBBMBCgA/AhsDBgsJCAcDAgYVCAIJCgsE
FgIDAQIeAQIXgBYhBFRuGbvlvdIZZEwIUectROxcPb1RBQJjL8CkBQkzzGBvAAoJ
EOctROxcPb1Rm4QIAIPjkN2G+5vWxxb+ijpbmoucOer98r5R5QTQRZB3t38VxK0z
bc/elchCQZ7+nVbNjdELkHB0Vyo0Y/6r2JulgpTxIGtAzwX8KqxrZyTWviIGNUSD
tjE57/wf7KcosuRDe5FG+9A035Pmyw+1WeIYawirMy/vOPHP5Xy2m0YEWi10J52L
/0bnh0IWamL/rZ+6OFaieBe0Q+HEVjNaA7GKVor3t4OcAlpvr3kyOxOo4RbO4+cp
KuFKl4xRDZ04KXaQ2xPpSCgveWw7cWX48oi8uQjyvbObYU/uKWUnEJFRoAtpCOdR
zauFZVFBxZnvgbNeU/AIx4ppkZoC6iFN2CVCTWS5AQ0EVPtmNQEIALs35BQrh7QU
y6AGOfwhsxXD+a1bvV1PR2icJbJdloIzTIN36TkLEvYMbPxcddSlQn3ZyDD9HqB7
0o4B8NtLt1WfF+3Ymmg2UgUscReOuJy8IrssZ89gm6908+29MPaX+6RQmegf+MAw
KlsCSfQZb9aydlDTPMJcx891UKtDL/QeJSEzTYUwEimHYNr21urcBTY1KT4ds1QH
E5YBdMkWv7uuf4Zdq9Z5o0fE4VVx4Upf6ZMY0TCAFQeZahuPGIBlwoyp+vFUT/LO
F2gpD2JWtYhgVyvm2fLE/T/pZBUV5Tp6figP+KGPlTiXXN7hXbO8bDcffApqGrMm
KI4EZTm33akAEQEAAYkBPAQYAQoAJgIbDBYhBFRuGbvlvdIZZEwIUectROxcPb1R
BQJjL8DFBQkzzGCQAAoJEOctROxcPb1RieIIAI/xnXqtah0ntaJbfasFYOWjuuRS
lrXd5PHCG/rNJUwxh9jtGQicVUQJzcYfUaTWd5U01Mbh80LKYqFuiS4cRlRWWlIC
g6tl7YxQU8957epyBlwA4jArUeWiCrPIO2yudD8KC4zZ53ZltHMTX5mrCpzt9iMv
iIfBKPyax3LXw7Zw/1A9VdWUyDFtPjY4KHbvjcBz3IteJaLyz5KuG7QvNK/q0NRZ
ozAPrq7Osy9WYz2f39FFcviMtyOhbiwqsgFvQnunw9x9kHrEIQGr6su2oStMFsFE
XJZa89Su67ep/X/FBWkc3+AF+yFIn9+4nrM+k0AuxQHCb3gCq06iJFxZ+2o=
=Qi1m
-----END PGP PUBLIC KEY BLOCK-----