PostgreSQL backup plugin#
This Bacularis plugin enables backup and restore of PostgreSQL databases.
Core features#
The Bacularis PostgreSQL backup plugin provides the following functionality:
SQL logical backups
Binary physical online backups
Backup for Point-in-Time Recovery (PITR)
Database system data backups (roles, tablespaces …)
WAL (Write-Ahead Log) backups
Backup of special database server files
Backup methods#
The plugin supports four PostgreSQL backup methods:
Dump backup method - it is also called logical database backup method. This method creates SQL dump files. Three variants are available:
All databases in one dump - stores all databases in a single, consistent dump file.
All databases in separate dumps - creates an individual SQL dump file for each database, allowing selective restore.
Selected databases dumps - the administrator specifies which databases to back up, enabling selective restore.
Binary backup method - it is also called physical online backup method. Creates a full backup of all databases at the file system level.
WAL backup method - backs up the database Write-Ahead Log (WAL) files. The log files are flushed, consistent, and taken from the WAL archive directory.
File backup method - allows including additional files in the backup, such as PostgreSQL configuration files or other critical files needed for a full database server recovery.
Backup methods can be used independently or in combination. For example:
A single job can run only the dump backup method.
A job can combine multiple methods, such as dump, binary, and file backups together.
General requirements#
The PostgreSQL database backup plugin is available in Bacularis since version 5.6.0.
To use it there is required to have:
Bacularis used as the web interface in version
5.6.0or greater.Bacularis used as API in version
5.6.0or greater installed on the Bacula file daemon host where is the database server to backup.The PostgreSQL tools on the host with the Bacula file daemon:
pg_dump
pg_dumpall
psql
pg_restore
pg_basebackupBacula file daemon with the Bacula
bpipeplugin installed. In most cases it is installed by default with the Bacula file daemon.
If the Bacularis web interface is used on the same host as the database server to backup then only this one Bacularis instance is needed (API and web interface are together)
Bacula BPIPE plugin#
Please check if your Bacula client that will back up the databases has the bpipe plugin installed.
It can be done by the status client=xxx Bconsole command or directly in the Bacularis as below:
*status client=ubuntu-fd
Connecting to Client ubuntu-fd at localhost:9102

ubuntu-fd Version: 13.0.4 (12 February 2024)  x86_64-pc-linux-gnu ubuntu 25.04
Daemon started 22-Aug-25 06:34. Jobs: run=81 running=0.
 Heap: heap=557,056 smbytes=211,090 max_bytes=1,065,894 bufs=130 max_bufs=196
 Sizes: boffset_t=8 size_t=8 debug=0 trace=0 mode=0,0 bwlimit=0kB/s
 Crypto: fips=N/A crypto=OpenSSL 3.4.0 22 Oct 2024
 Plugin: bpipe-fd.so(2)
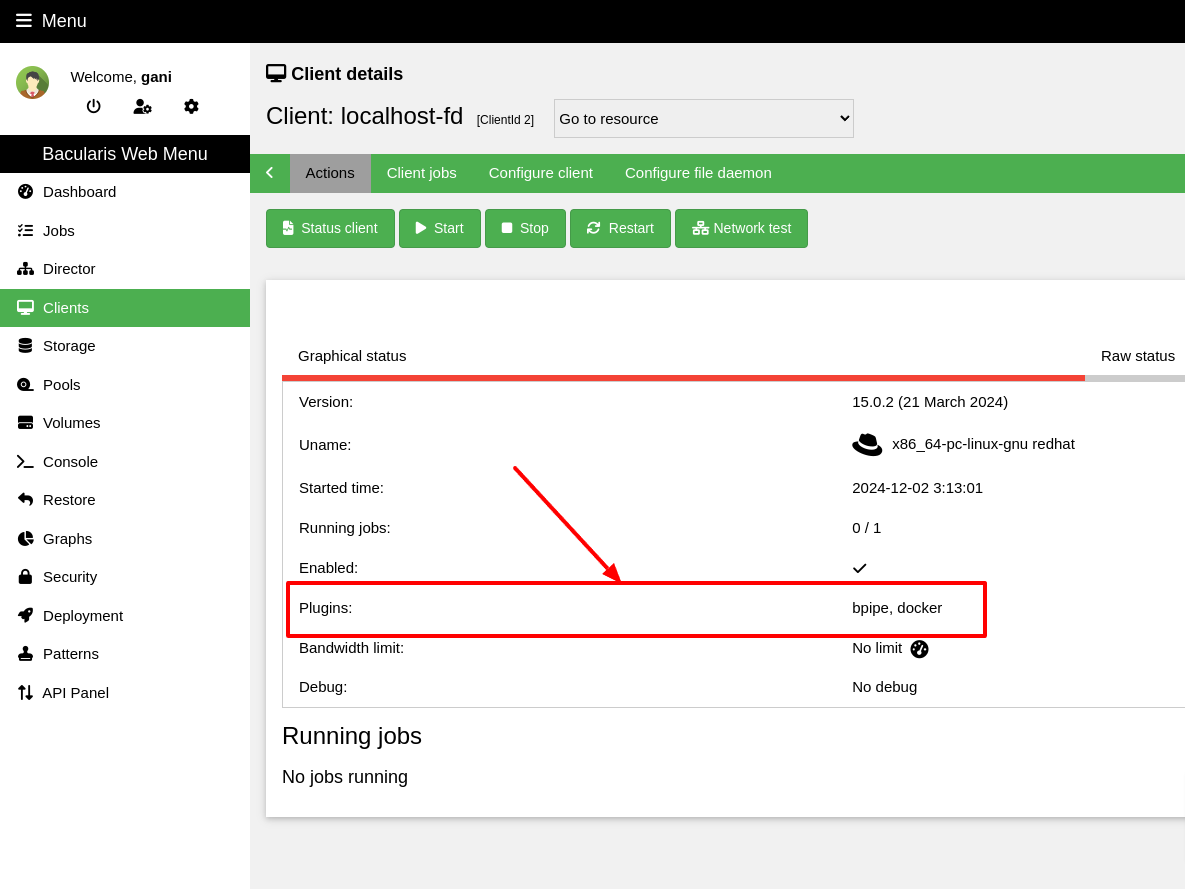
IMPORTANT NOTE: In Bacula version 15.0.0 - 15.0.2 the bpipe plugin has a bug that causes
after finishing backup the Bacula file daemon crash with the segfault error. Read here
how to solve it: File daemon crashes after running Bacularis plugins (MySQL, MariaDB, PostgreSQL, MSSQL…).
Database connection#
By default and if not specified differently the PostgreSQL plugin uses local
connection to the database server. This means that if you experience plugin
authentication error, first to check is the local connection configuration
lines in the pg_hba.conf.
For example, if you use the scram-sha-256 authentication method, you will need
to create .pgpass file with password for that (see: Database password):
local all all scram-sha-256
If you use peer authentication method, you will need to define in the plugin configuration the system user that will be used for this method:
local all all peer
If you use trust method, usually you don’t need to do anything else.
local all all trust
Note
For physical binary backup is used different connection from that is used for
the dump backup methods. In this case, this is local replication connection
in pg_hba.conf.
Database password#
If to access database server your database user requires providing password, you can
create a .pgpass file in your system user home directory (usually /root/.pgpass)
and put there your database access credentials in form:
hostname:port:database:username:password
In this line you can use * asterisk character if you want to provide password
e.g. for all databases or all hostnames …etc. For example:
*:*:*:mystrongdbuser:strongpass1234
After creating the .pgpass file, don’t forget to set the proper file permissions,
for example:
chmod 600 /root/.pgpass
More details about .pgpass file you can find here:
Video guide#
Backup#
Before using the PostgreSQL plugin there is needed to prepare the plugin command in the FileSet
resource. This action consists of two smaller actions:
create PostgreSQL backup plugin configuration
use this configuration in the Bacula
FileSetPlugindirective
Creating the plugin configuration can be done in the same form and place as all other Bacularis
plugin configurations. On the Bacularis web interface it is in the Add-ons page on the Plugins
tab. It can be also done directly in the FileSet resource configuration at the
Add plugin link. In the second case creating plugin configuration and using it in the Bacula
FileSet happens in one step.
The window to create plugin configuration and to use it you see after clicking at the Add plugin
menu item as you can see on the image below.

After clickcing the Add plugin item a new window will appear (as below) where you will be able
to configure and use PostgreSQL plugin. Please choose option second or third depending on your needs.
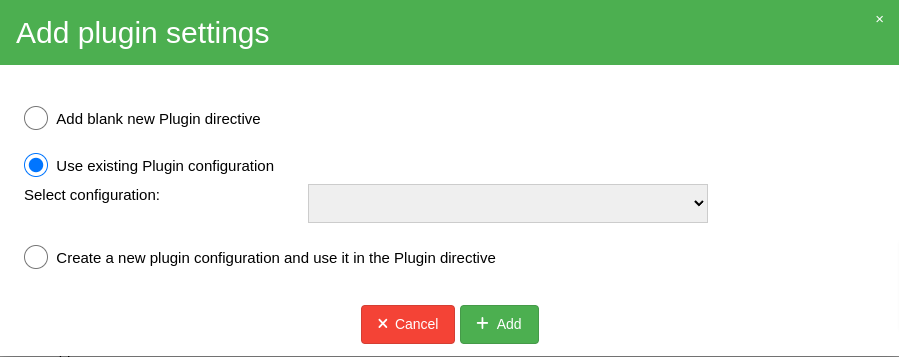
NOTE: After preparing the Plugin directive please don’t forget to save the FileSet
resource.
Restore#
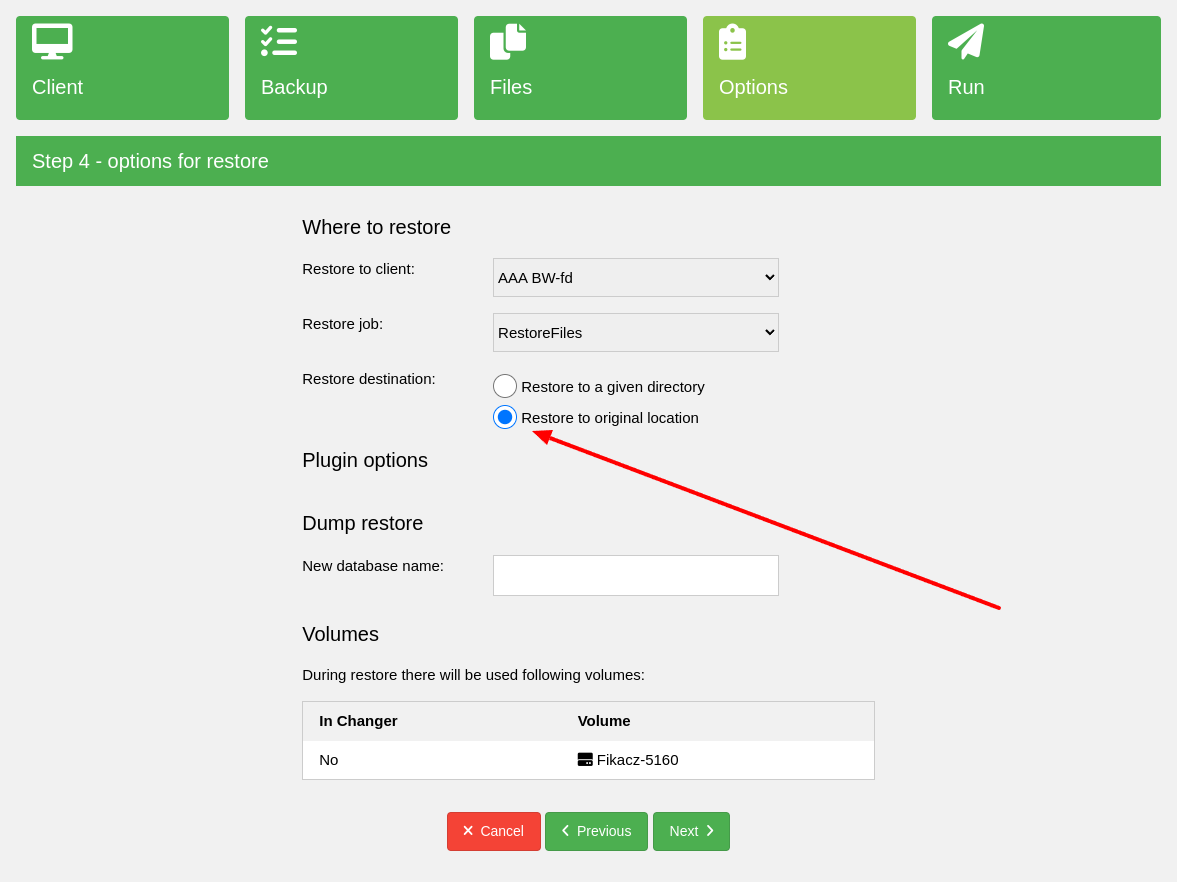
Restore to database server#
To restore the plugin backup data directly to the database server, on
the restore wizard step is needed to choose option Restore to original location
as shown on the image below. Restore to the database server works for
the dump method backups.
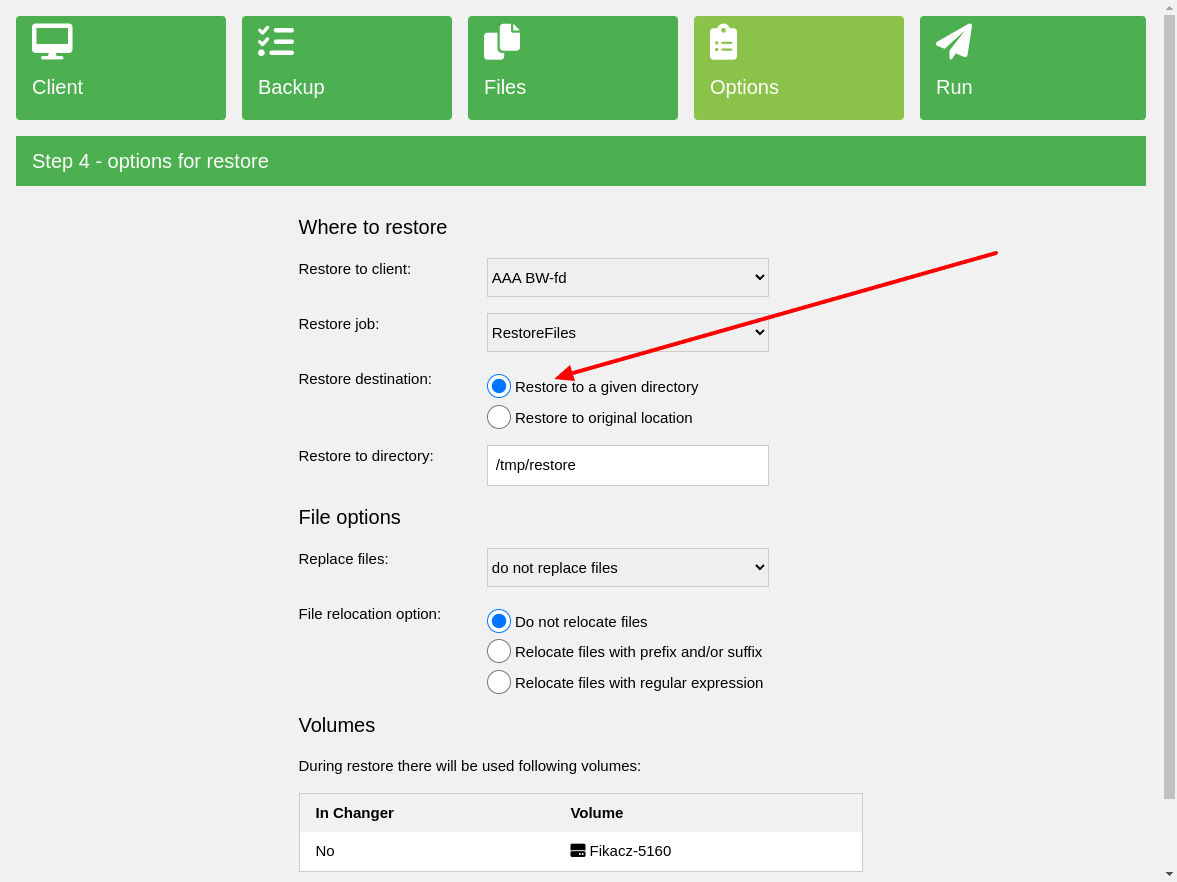
Restore in file form#
To restore the plugin backup data in the file form, on the restore wizard step is
needed to choose option Restore to a given directory that is selected by default.
Dump backup method#
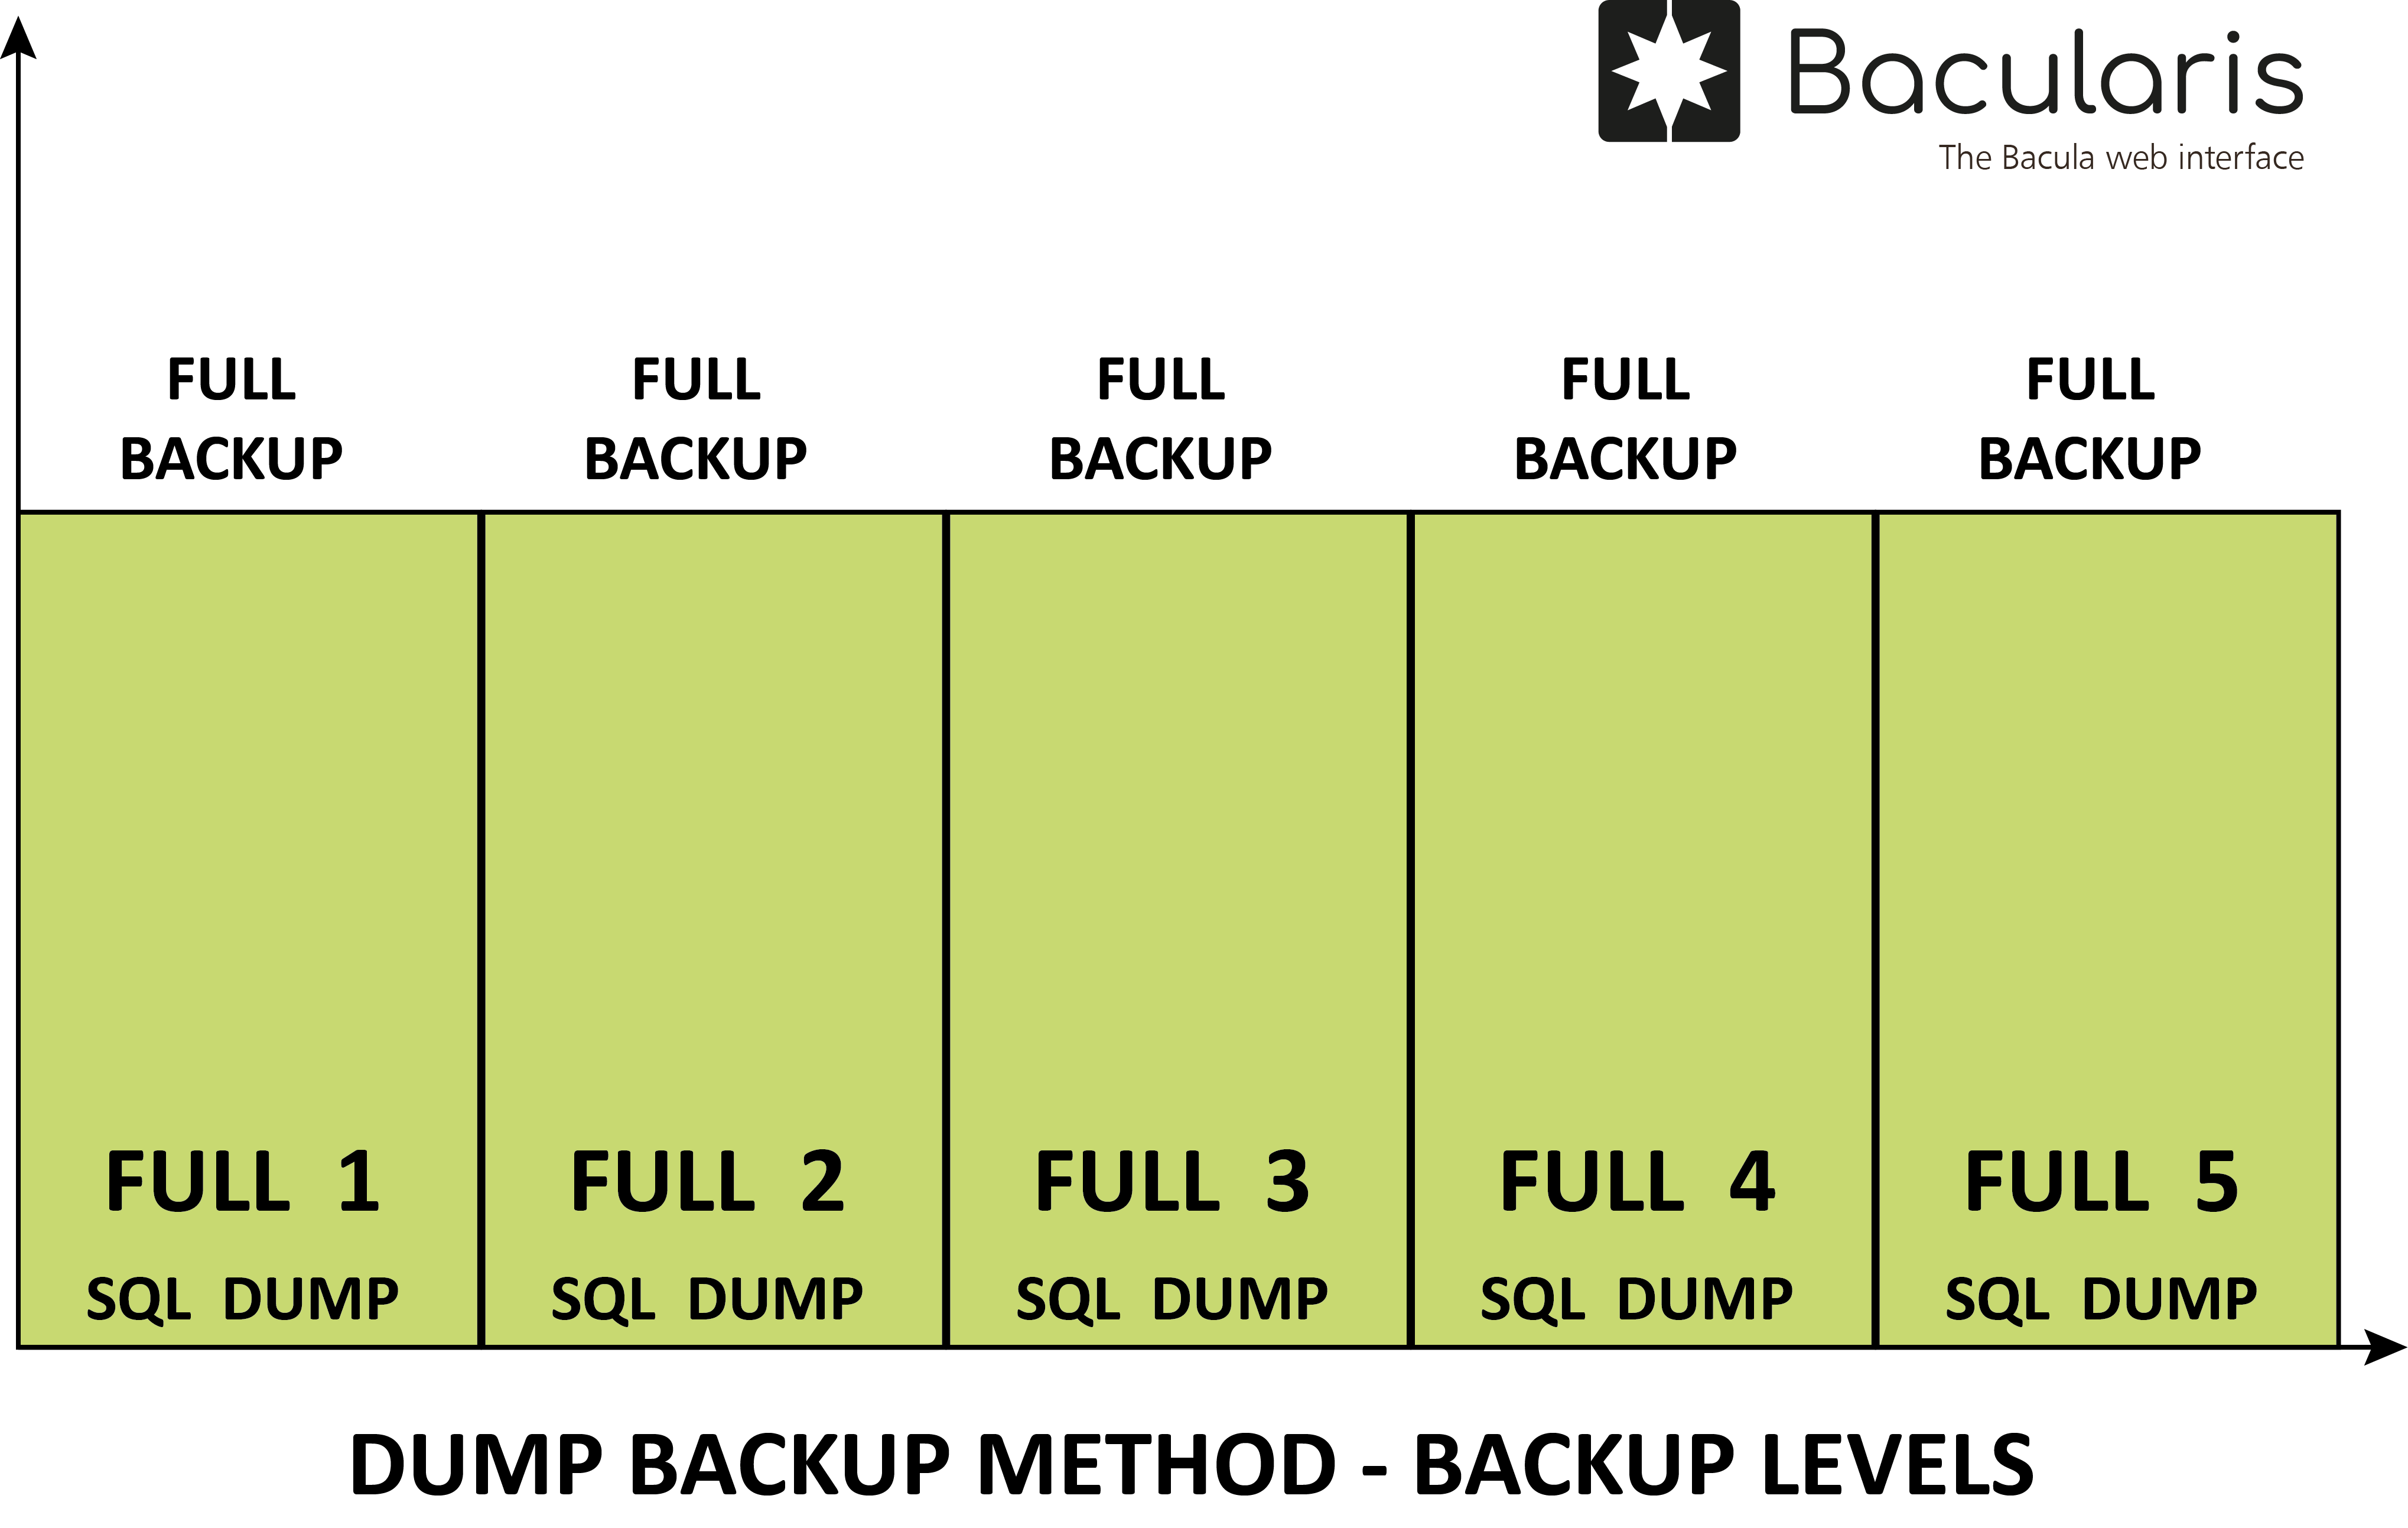
Levels#
In this PostgreSQL database backup method there are supported the following backup levels:
Full- it backs up all data
Requirements#
Before using this method please make sure that on the host with the file daemon you have the following tools installed:
Bacularis version
5.6.0or greater
pg_dump
pg_dumpallPostgreSQL CLI tool
psql
pg_restoreBacula
bpipeplugin in the Bacula file daemon
Prepare environment#
Before using the PostgreSQL backup plugin please make sure that your environment meets all requirements.
Dump all databases separately#
Description#
This dump backup type gets all the database list from the PostgreSQL database server and backs them up separately. Each database is in a separate SQL dump file. This backup provides data consistency in each database but not between databases because databases are not backed up in single transaction but one by one.
The main advantage of this backup type is capability doing single database restore without any need to restoring all databases. The restore can be done directly to the database server (with the same or a new database name) or to local filesystem as file restore.
On full backup to the backed up databases are added also dumps with the PostgreSQL system data like roles and tablespaces. The system information can be useful on restoring all the database server from scratch or for preparing another database server instance (like a clone) that bases on the original one.
Backup data structure#
Below you can see example data structure for this dump backup type that can be restored to the database server or in form of the file restore.
/
/#PostgreSQLBackup
/#PostgreSQLBackup/SERVER1
/#PostgreSQLBackup/SERVER1/main
/#PostgreSQLBackup/SERVER1/main/.SYSTEM
/#PostgreSQLBackup/SERVER1/main/.SYSTEM/tablespaces.sql
/#PostgreSQLBackup/SERVER1/main/.SYSTEM/roles.sql
/#PostgreSQLBackup/SERVER1/main/databaseAAA
/#PostgreSQLBackup/SERVER1/main/databaseAAA/schema.sql
/#PostgreSQLBackup/SERVER1/main/databaseAAA/sql-data-261-2025-08-21_112015-Full.sql
/#PostgreSQLBackup/SERVER1/main/databaseBBB
/#PostgreSQLBackup/SERVER1/main/databaseBBB/schema.sql
/#PostgreSQLBackup/SERVER1/main/databaseBBB/sql-data-261-2025-08-21_112015-Full.sql
The file descriptions are the following:
schema.sql- is created on full backup and contains the database table schema without database data. With this schema file each backed up database structure can be recreated. In case restore, theschema.sqlis automatically restored first both for restoring directly to the database and for restoring on the local file system.
sql-data-*-Full.sql- it contains the full backup database data (without schema). It is restored after restorngschema.sqlto newly recreated database tables.
.SYSTEM- directory contains the database system information. It can be restored in whole or in parts depending what system data needs to be restored.
roles.sql- system user roles
tablespaces.sql- tablespace settings
Configuration#
Name |
Parameter |
Description |
Required |
|---|---|---|---|
Enable logical dump backup method |
|
This is an option to enable dump backup method at all. Without this option enabled none of dump backup types works. |
Yes |
Dump all databases separately |
|
Enable dumping all databases, each in a separate dump |
Yes |
Data output format |
|
Set output format ( |
No |
Compression |
|
Compression type and level ( |
No |
Add DROP (DATABASE|TABLE|ROLE) before each CREATE (DATABASE|TABLE|ROLE) statement |
|
Add to the schema.sql DROP command before creating each database, table and role command |
No |
Additional dump program option (comma separated) |
|
Pass to pg_dump program additional options |
No |
Dump all databases in one dump#
Description#
This dump backup type creates one dump file with all databases. Having single dump with “everything” may be useful for case restoring all databases at once (ex. disaster recovery) or if there is needed to create a new PostgreSQL environment with the same data (clone).
On full backup to the backed up databases are added also dumps with the PostgreSQL system data like roles and tablespaces. The system information can be useful on restoring all the database server from scratch or for preparing another database server instance that bases on the original one.
Restoring data can be done directly to the database server or to local filesystem as file restore.
Backup data structure#
Below you can see example data structure for this dump backup type that can be restored to the database server or in form of the file restore.
/
/#PostgreSQLBackup
/#PostgreSQLBackup/SERVER1
/#PostgreSQLBackup/SERVER1/main
/#PostgreSQLBackup/SERVER1/main/.SYSTEM
/#PostgreSQLBackup/SERVER1/main/.SYSTEM/tablespaces.sql
/#PostgreSQLBackup/SERVER1/main/.SYSTEM/roles.sql
/#PostgreSQLBackup/SERVER1/main/all-databases
/#PostgreSQLBackup/SERVER1/main/all-databases/sql-all-databases-267-2025-08-21_131949-Full.sql
The file descriptions are the following:
all-databases-*-Full.sql- it contains the full backup database data with schema and system information.
.SYSTEM- directory contains the database system information. It can be restored in whole or in parts depending what system data needs to be restored.
roles.sql- system user roles
tablespaces.sql- tablespace settings
Configuration#
Name |
Parameter |
Description |
Required |
|---|---|---|---|
Enable logical dump backup method |
|
This is an option to enable dump backup method at all. Without this option enabled none of dump backup types works. |
Yes |
Dump all databases in one dump |
|
Enable dumping all databases in one dump file |
Yes |
Add DROP (DATABASE|TABLE|ROLE) before each CREATE (DATABASE|TABLE|ROLE) statement |
|
Add to the schema.sql DROP command before creating each database, table and role command |
No |
Additional dump program option (comma separated) |
|
Pass to pg_dumpall program additional options |
No |
Dump only selected databases#
Description#
This backup type enables selecting databases to backup. It can be useful if there is needed to backup only some databases. This way enables restoring the single databases as well.
The PostgreSQL system data (roles, tablespaces) is not added to the backup.
Restoring data can be done directly to the database server or to local filesystem as file restore.
Backup data structure#
Below you can see example data structure for this dump backup type that can be restored to the database server or in form of the file restore.
/
/#PostgreSQLBackup
/#PostgreSQLBackup/SERVER1
/#PostgreSQLBackup/SERVER1/main
/#PostgreSQLBackup/SERVER1/main/databaseAAA
/#PostgreSQLBackup/SERVER1/main/databaseAAA/schema.sql
/#PostgreSQLBackup/SERVER1/main/databaseAAA/sql-data-261-2025-08-21_112015-Full.sql
/#PostgreSQLBackup/SERVER1/main/databaseBBB
/#PostgreSQLBackup/SERVER1/main/databaseBBB/schema.sql
/#PostgreSQLBackup/SERVER1/main/databaseBBB/sql-data-261-2025-08-21_112015-Full.sql
The file descriptions are the following:
schema.sql- is created on full backup and contains the database table schema without database data. With this schema file each backed up database structure can be recreated. In case restore theschema.sqlis automatically restored first both for restoring directly to the database and for restoring on the local file system.
sql-data-*-Full.sql- it contains the full backup database data (without schema). It is restored after restorngschema.sqlto newly recreated database tables.
Configuration#
Name |
Parameter |
Description |
Required |
|---|---|---|---|
Enable logical dump backup method |
|
This is an option to enable dump backup method at all. Without this option enabled none of dump backup types works. |
Yes |
Databases to backup (comma separated) |
|
Enable dumping selected databases each in a separate dump. |
Yes |
Data output format |
|
Set output format ( |
No |
Compression |
|
Compression type and level ( |
No |
Add DROP (DATABASE|TABLE|ROLE) before each CREATE (DATABASE|TABLE|ROLE) statement |
|
Add to the schema.sql DROP command before creating each database, table and role command |
No |
Additional dump program option (comma separated) |
|
Pass to pg_dump program additional options |
No |
Binary backup method#
Description#
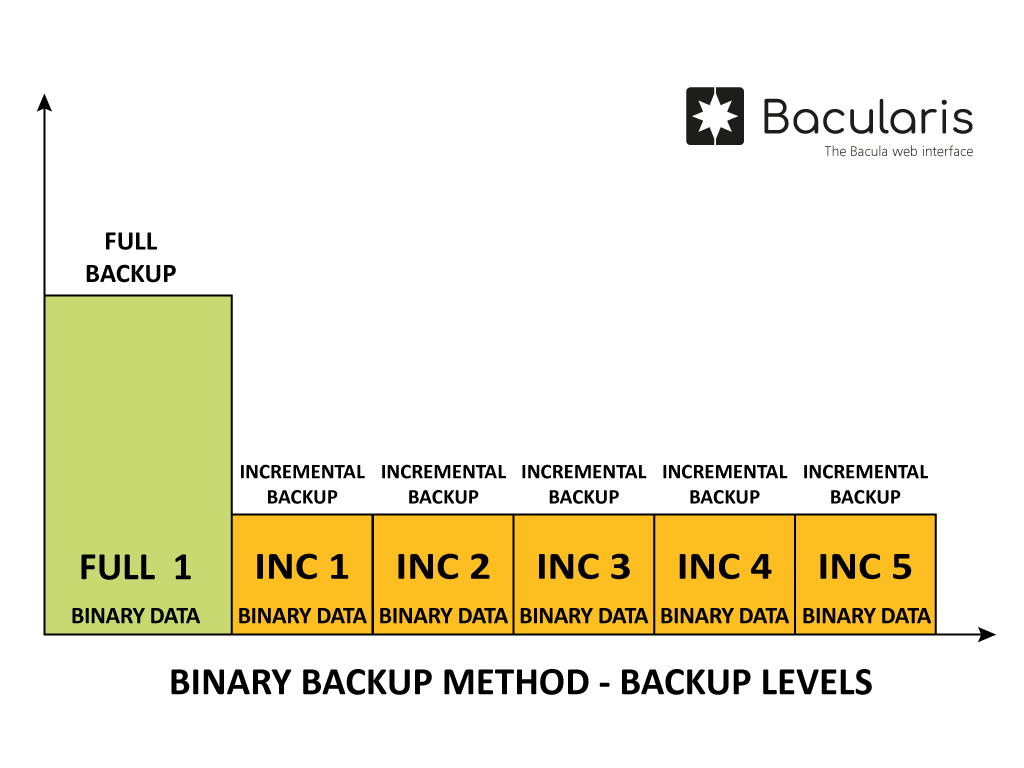
The binary backup method does consistent online backup all the PostgreSQL database server. It is fast both for backup and restore but it takes more space than the dump backup.
Because of the nature of this backup method, it makes unavailable restoring single databases. There can be backed up all the database server in the safe physical way.
More details about this method you can find in the PostgreSQL documentation: https://www.postgresql.org/docs/current/app-pgbasebackup.html
The Bacularis PostgreSQL plugin during backup does the online full or incremental (from PostgreSQL 17) backup to the selected directory and it sends it using the Bacula file daemon to storing by the storage daemon. The backup files on the file daemon side stored locally can be kept or they can be removed after finishing backup job except the last backup. The latest backup local files have to be preserved if you use incremental backup function to be able to take next incremental backup.
Levels#
In this PostgreSQL database backup method there are supported the following two backup levels:
Full- it backs up all data
Incremental- (from PostgreSQL 17) it backs up changes since the last full or last incremental backup.
Requirements#
Before using this method please make sure that on the host with the file daemon you have the following tools installed:
Bacularis version
5.6.0or greater
pg_basebackup- PostgreSQL backup tool
pg_combinebackup- PostgreSQL manual restore tool for physical backups
tar- file archiver toolWAL summarizer enabled in
postgresql.confBacula
bpipeplugin in the Bacula file daemon
Prepare environment#
Before using the PostgreSQL backup plugin please make sure that your environment meets all requirements.
Incremental backups
If you plan to use binary backup incremental backups (available from PostgreSQL 17) you have
to enable WAL summarizer in the PostgreSQL configurationf file. The following postgresql.conf
option is responsible for that:
summarize_wal = on
Replication connection
Please note, that in this binary backup method the PostgreSQL server uses the replication
connection that is defined in the pg_hba.conf file separatelly from normal local
connections (used for example for SQL file dump). You can see the difference as below:
Example local connection line:
# TYPE  DATABASE        USER            ADDRESS                 METHOD
local   all             all                                     trust
Example replication connection line:
# TYPE  DATABASE        USER            ADDRESS                 METHOD
local   replication     all                                     trust
You need to adapt the replication connection line to match your authentication method and other connection parameters.
Binary backup path
The binary backup method for plain and tar data formats uses a separate directory
to store backup files locally on the file daemon side before sending them to the storage daemon.
This is the path defined in the option Directory path to store backup data (parameter
--binary-backup-path). This path does not need to be created before backup (it will be
created automatically if it does not exist), but please make sure that you have enough space
on the file daemon host to store the backup files. For example if directory with your database
files take 50GB, then this directory should be able to store about 50GB for the full backup.
After finishing the binary backup, backup files in this directory can be removed but if you use
incremental backups, the latest backup files should be preserved until you run next backup.
This is because to determine next incremental backup, having the previous backup is necessary.
If you use only full binary backup, the local backup files can be removed for example in the
Bacula Job Runscript configured with option RunsWhen = After. Here you can see a
sample:
Job {
   Name = "Binary backup ABC"
   ...other directives.
   Runscript {
       RunsWhen = After
       RunsOnClient = Yes
       Command = "command_or_script_to_cleanup"
    }
}
Backup data structure#
Below you can see example data structure for this binary backup method that can be restored in form of the file restore.
/
/#PostgreSQLBackup
/#PostgreSQLBackup/SERVER1
/#PostgreSQLBackup/SERVER1/binary-data-285-2025-08-22_075143-Full.tar
/#PostgreSQLBackup/SERVER1/binary-data-286-2025-08-22_075209-Incremental.tar
/#PostgreSQLBackup/SERVER1/binary-data-287-2025-08-22_075224-Incremental.tar
The file descriptions are the following:
binary-data-*-Full.tar- it contains the full binary backup data in the TAR format. Before running restore, data form these archives need to be extracted manually
binary-data-*-Incremental.tar- it contains the incremental binary backup data in the TAR format. The incremental data is taken from the position where the latest full or incremental backup finished working.
Configuration#
Name |
Parameter |
Description |
Required |
|---|---|---|---|
Enable physical binary backup method |
|
This is an option to enable binary backup method at all. Without this option enabled binary backup will not work. |
Yes |
Physical binary backup base path |
|
It defines a directory inside which will be stored backup files on the file daemon host before sending them to the storage daemon |
Yes |
Data output format |
|
Set output format ( |
No |
Compression |
|
Compression type and level ( |
No |
Enable incremental backups |
|
The incremental binary backup level is supported from PostgreSQL 17. For every earlier PostgreSQL version this function will not work. |
No |
Performing restore#
To restore the binary backup data there is needed to do a file restore the backed up files to a place on the destination host. In Bacularis restore wizard there can be choosen for that the latest incremental backup (or full backup if incremental backup was not used).
In this example the file restore is done to the directory /dir/restore:
/dir/restore/
/dir/restore/#PostgreSQLBackup
/dir/restore/#PostgreSQLBackup/SERVER2
/dir/restore/#PostgreSQLBackup/SERVER2/binary-data-285-2025-08-22_075143-Full.tar
/dir/restore/#PostgreSQLBackup/SERVER2/binary-data-286-2025-08-22_075209-Incremental.tar
/dir/restore/#PostgreSQLBackup/SERVER2/binary-data-287-2025-08-22_075224-Incremental.tar
The restore prodcedure can look as following for particular data formats:
PLAIN backup data format
# Go to restore directory
cd /dir/restore/#PostgreSQLBackup/SERVER2

# Extract TAR files
for f in *.tar; do tar xf $f; done

# Prepare restored files by joining full and incremental backups in consistent database files
# NOTE: parameter order has meaning, directories with backups should be provided from oldest (full) to neweset (incrementals)
pg_combinebackup \
    -o ready_dbs \
    backup/files/path/your_job_name-285-Full \
    backup/files/path/your_job_name-286-Incremental \
    backup/files/path/your_job_name-287-Incremental

# Stop the PostgreSQL server if it is running
systemctl stop postgresql

# Move the original database files somehwere.
mv /var/lib/postgresql /var/lib/postgresql-old

# Move ready files from backup to destination location
# NOTE: On different systems this destination path is different (ex. Ubuntu: /var/lib/postgresql/17/main, Oracle Linux: /var/lib/pgsql/data ...etc.)
mv ready_dbs /var/lib/postgresql

# Set proper ownership and permissions to PostgreSQL data directory
chown -R postgres:postgres /var/lib/postgresql
chmod 700 /var/lib/postgresql

# NOTE: If you use SELinux, please make sure that files have the correct SELinux context settings

# Run the PostgreSQL server
systemctl start postgresql
TAR backup data format
# Go to restore directory
cd /dir/restore/#PostgreSQLBackup/SERVER2

# Extract TAR files
for f in *.tar; do tar xf $f; done

# Extract backup files from each TAR backup
tar xf backup/files/path/your_job_name-290-Full/base.tar -C backup/files/path/your_job_name-290-Full
rm backup/files/path/your_job_name-290-Full/base.tar
tar xf backup/files/path/your_job_name-290-Full/pg_wal.tar -C backup/files/path/your_job_name-290-Full/pg_wal
rm backup/files/path/your_job_name-290-Full/pg_wal.tar

tar xf backup/files/path/your_job_name-291-Incremental/base.tar -C backup/files/path/your_job_name-291-Incremental
rm backup/files/path/your_job_name-291-Incremental/base.tar
tar xf backup/files/path/your_job_name-291-Incremental/pg_wal.tar -C backup/files/path/your_job_name-291-Incremental/pg_wal
rm backup/files/path/your_job_name-291-Incremental/pg_wal.tar

tar xf backup/files/path/your_job_name-292-Incremental/base.tar -C backup/files/path/your_job_name-292-Incremental
rm backup/files/path/your_job_name-292-Incremental/base.tar
tar xf backup/files/path/your_job_name-292-Incremental/pg_wal.tar -C backup/files/path/your_job_name-292-Incremental/pg_wal
rm backup/files/path/your_job_name-292-Incremental/pg_wal.tar

# Prepare restored files by joining full and incremental backups in consistent database files
# NOTE: parameter order has meaning, directories with backups should be provided from oldest (full) to neweset (incrementals)
pg_combinebackup \
    -o ready_dbs \
    backup/files/path/your_job_name-290-Full \
    backup/files/path/your_job_name-291-Incremental \
    backup/files/path/your_job_name-292-Incremental

# Stop the PostgreSQL server if it is running
systemctl stop postgresql

# Move the original database files somehwere.
mv /var/lib/postgresql /var/lib/postgresql-old

# Move ready files from backup to destination location
# NOTE: On different systems this destination path is different (ex. Ubuntu: /var/lib/postgresql/17/main, Oracle Linux: /var/lib/pgsql/data ...etc.)
mv ready_dbs /var/lib/postgresql

# Set proper ownership and permissions to PostgreSQL data directory
chown -R postgres:postgres /var/lib/postgresql
chmod 700 /var/lib/postgresql

# NOTE: If you use SELinux, please make sure that files have the correct SELinux context settings

# Run the PostgreSQL server
systemctl start postgresql
TAR-stream backup data format (Full backup only)
# Go to restore directory
cd /dir/restore/#PostgreSQLBackup/SERVER2

# Extract TAR files
tar xf binary-data-293-2025-08-22_100121-Full.tar
rm binary-data-293-2025-08-22_100121-Full.tar
cd ..

# Stop the PostgreSQL server if it is running
systemctl stop postgresql

# Move the original database files somehwere.
mv /var/lib/postgresql /var/lib/postgresql-old

# Move ready files from backup to destination location
# NOTE: On different systems this destination path is different (ex. Ubuntu: /var/lib/postgresql/17/main, Oracle Linux: /var/lib/pgsql/data ...etc.)
cd ..
mv SERVER2 /var/lib/postgresql

# Set proper ownership and permissions to PostgreSQL data directory
chown -R postgres:postgres /var/lib/postgresql
chmod 700 /var/lib/postgresql

# NOTE: If you use SELinux, please make sure that files have the correct SELinux context settings

# Run the PostgreSQL server
systemctl start postgresql
WAL backup method#
Description#
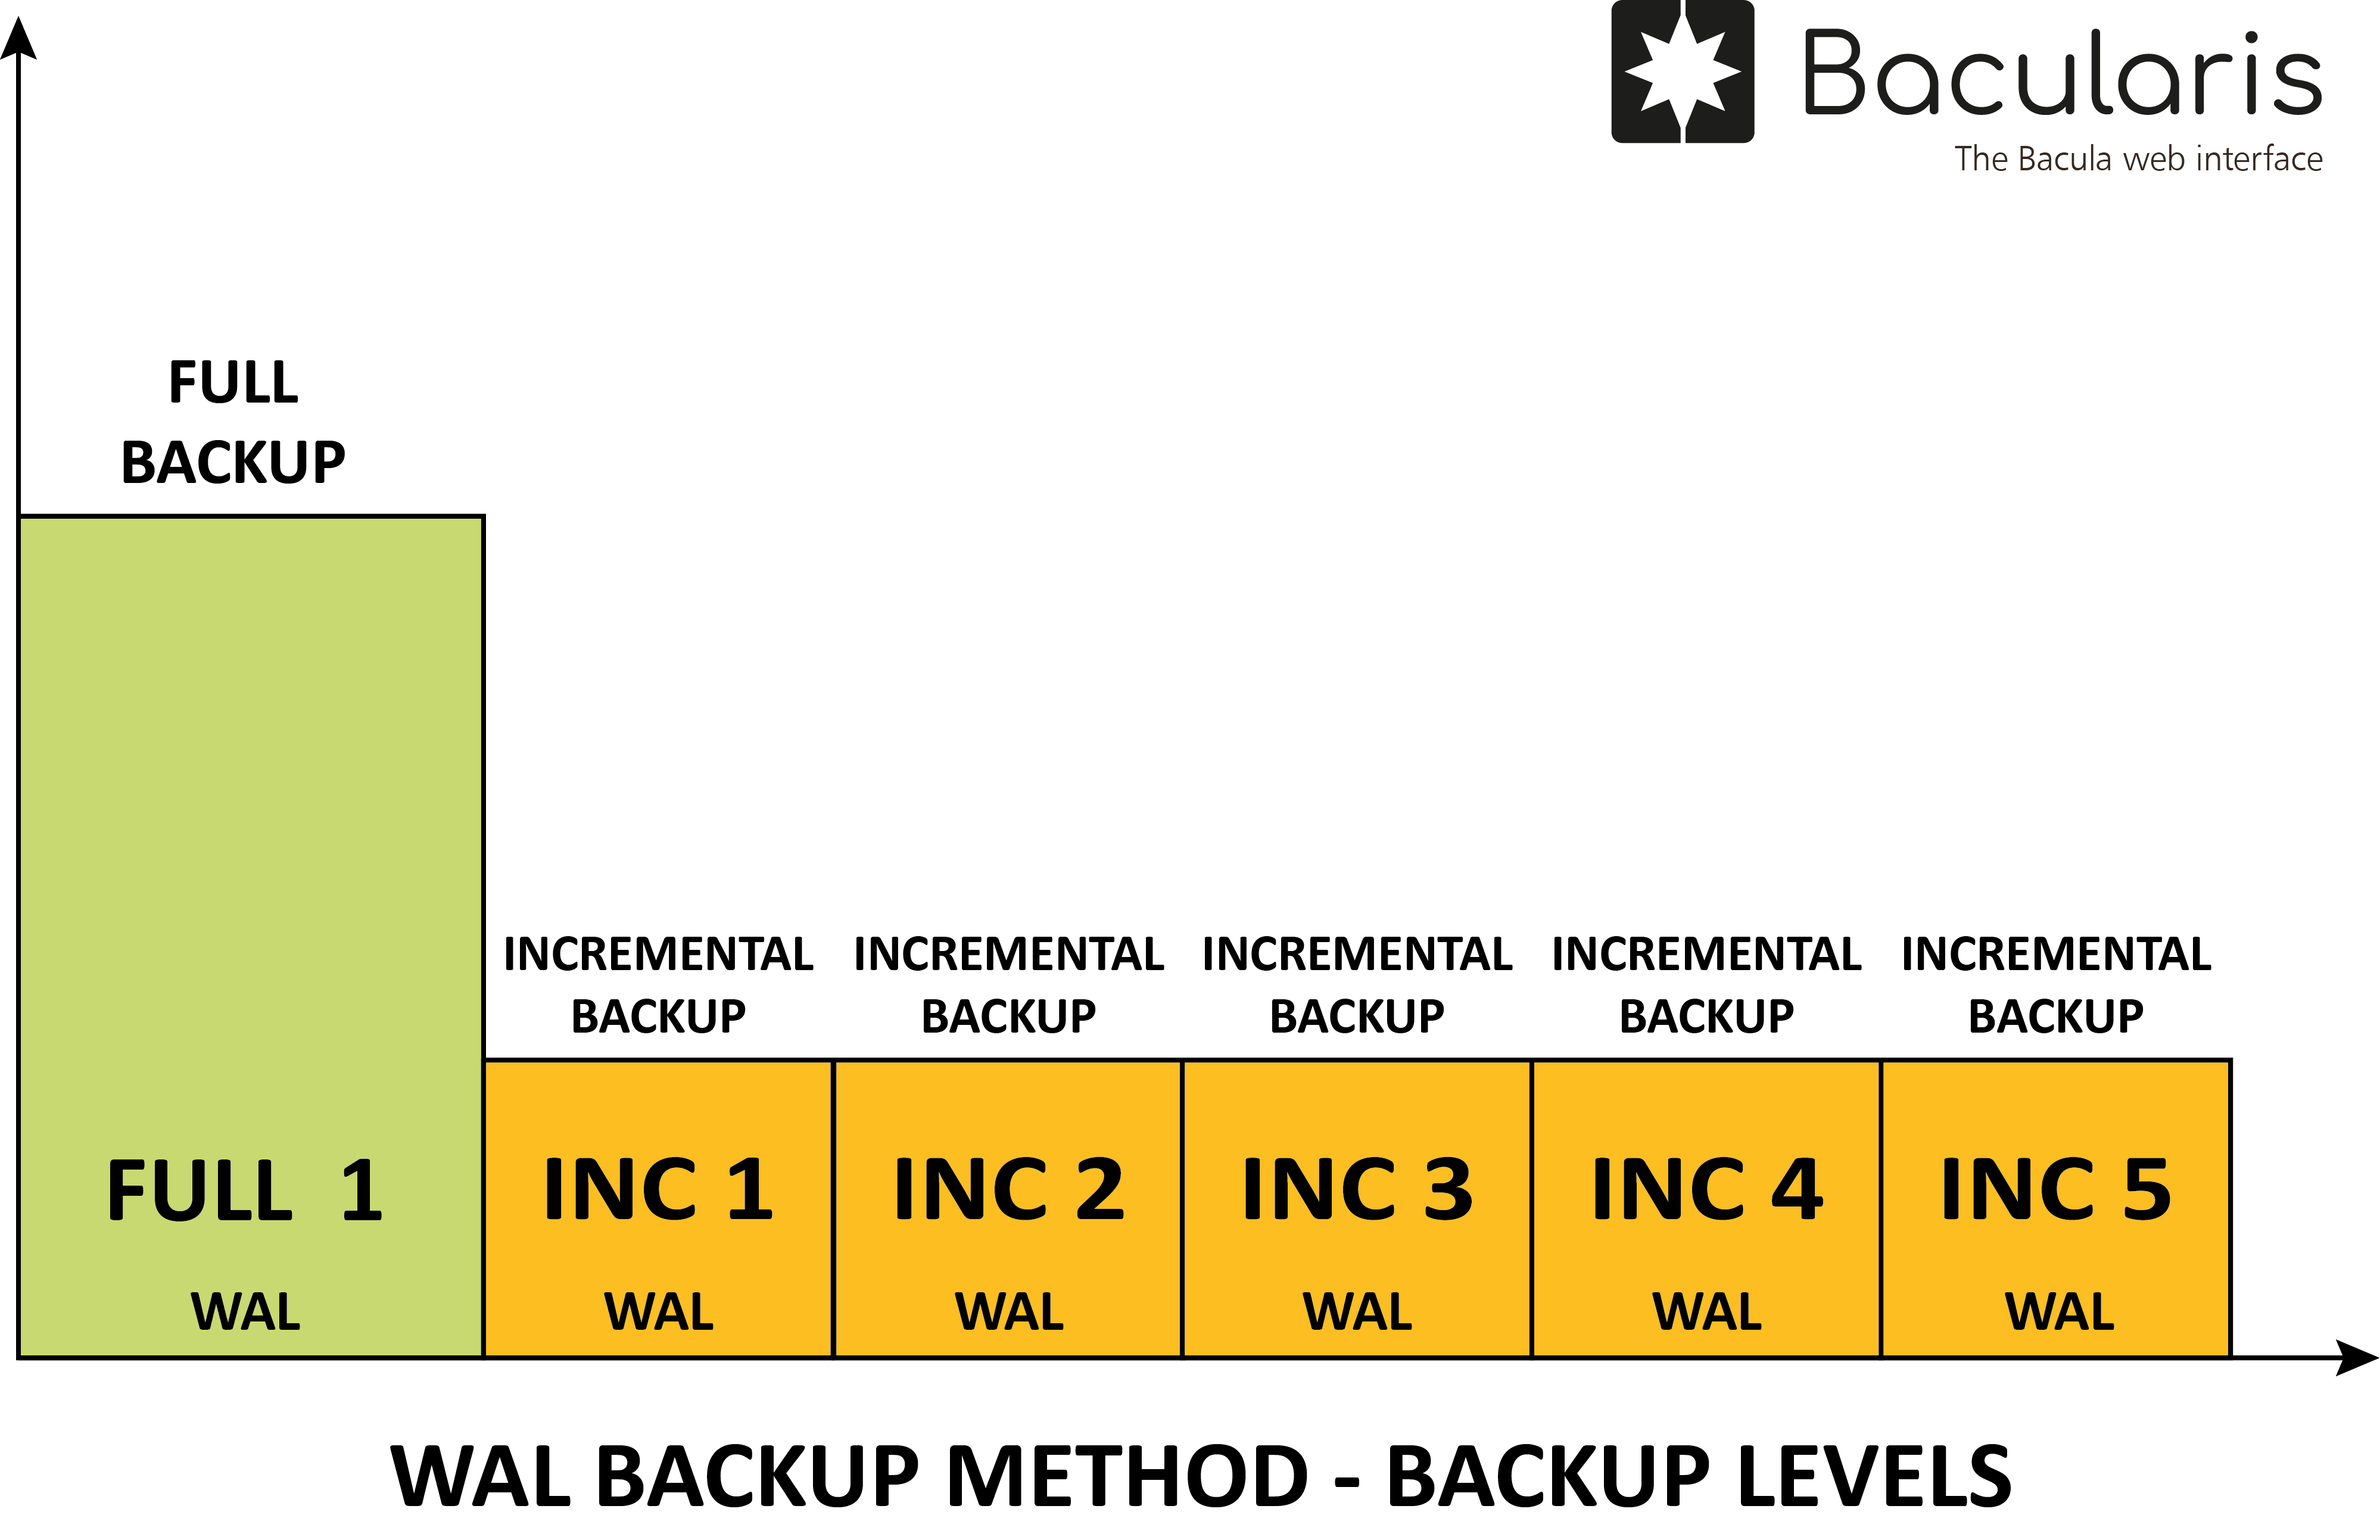
With this backup method are backed up the WAL (Write-Ahead Log) files.
This method is useful if there is needed to have a WAL backup for the Point-in-Time Recovery (PITR).
This method supports backup the WAL files from the dedicated archiving directory.
Levels#
In this backup method there are supported the following two backup levels:
Full- it backs up all archived WAL data
Incremental- it backs up WAL segments since the last full or last incremental backup
Requirements#
Before using this method please make sure that on the host with the file daemon you have the following tools installed:
Bacularis version
5.6.0or greater
psql- PostgreSQL CLI tool
tar- archiving utilityBacula
bpipeplugin in the Bacula file daemon
Prepare environment#
Before using the PostgreSQL backup plugin please make sure that your environment meets all requirements.
Because this method expects that the PostgreSQL stores WAL files copy in a separate archiving directory, you need to know this directory path to provide it to the Bacularis PostgreSQL plugin configuration.
If you do not use WAL archiving, you can enable it by defining archive_mode and
archive_command in your postgresql.conf configuration file, for example:
archive_mode = on
archive_command = 'test ! -f /mnt/server/archivedir/%f && cp %p /mnt/server/archivedir/%f'
More details about WAL archiving you can find here:
https://www.postgresql.org/docs/current/continuous-archiving.html
Backup data structure#
Below you can see example data structure for this WAL backup method that can be restored
in form of the file restore. In this example the WAL files are stored in /my/path/archivedir/
directory.
/
/my
/my/path
/my/path/archivedir-365-2025-08-23_011313-Full
/my/path/archivedir-366-2025-08-23_011331-Incremental
/my/path/archivedir-367-2025-08-23_024507-Incremental
The file descriptions are the following:
archivedir-*-Full- it contains the flushed all WAL files.
archivedir-*-Incremental- it contains the flushed WAL files since time last full or incremental backup.
Please note that during restoring the file structure is automatically unpacked to form like below:
/
/my
/my/path
/my/path/archivedir
/my/path/archivedir/0000000200000000000000DA.00000028.backup
/my/path/archivedir/0000000200000000000000DB
/my/path/archivedir/0000000200000000000000DC
/my/path/archivedir/0000000200000000000000DD
/my/path/archivedir/0000000200000000000000DD.00000028.backup
/my/path/archivedir/0000000200000000000000DE
/my/path/archivedir/0000000200000000000000DF
/my/path/archivedir/0000000200000000000000E0
The file descriptions are the following:
00000*- they contains the WAL backup files. With using them there is possible to perform the Point-in-Time Recovery (PITR) if we have a consistent base databases backup.
NOTE: In the Bacularis restore wizard the single WAL files are not displayed but there are displayed in the full and incremental archives form. They become listed after restoring backup data to the file system.
Configuration#
Name |
Parameter |
Description |
Required |
|---|---|---|---|
Enable WAL backup method |
|
This is an option to enable WAL backup method at all. Without this option enabled the WAL backup will not work. |
Yes |
WAL archive directory path to backup |
|
The WAL files path to backup |
Yes |
Performing restore#
Restoring the WAL files is realized in the same way as every file restore to a directory.
Point-in-Time Recovery (PITR)#
Once the files are restored, there can be performed the Point-in-Time Recovery (PITR). In the example below we assume that the full base backup has been already restored. Now there is needed to prepare the database server to start with the restored database server to state point where we would like to finish the recovery.
Here you can see example steps, how to do PITR recovery:
# Full base backup files are in /my/path/full.
# WAL files (from full and incrementals) are in /my/path/wals

# Stop database server
systemctl stop postgresql

# Move old database files somewhere
# NOTE: On different systems this path is different (ex. Ubuntu: /var/lib/postgresql/17/main, Oracle Linux: /var/lib/pgsql/data ...etc.)
mv /var/lib/postgresql /var/lib/postgresql-old

# Prepare directory for restored database files
mkdir -m 0700 /var/lib/postgresql

# Unpack full base backup files
tar \
    -xf /my/path/full/#PostgreSQLBackup/SERVER2/binary-data-364-2025-08-23_011247-Full.tar \
    -C /var/lib/postgresql \
    --strip-components=3

# Set database files proper ownership
chown -R postgres:postgres /var/lib/postgresql

# Move old WAL archive directory somewhere
mv /wal/dir/path/archivedir /wal/dir/path/archivedir-old

# Prepare directory for archived WAL files
mkdir -m 0700 /wal/dir/path/archivedir

# Copy WAL files from backup to new WAL archive directory
cp /my/path/wals/wal/dir/path/archivedir/* /wal/dir/path/archivedir

# Set WAL files proper ownership
chown -R postgres:postgres /wal/dir/path/archivedir

# Set point in time to restore and other PITR (Point-in-Time Recovery) directives
# Edit postgresql.conf file for that and add it there:

restore_command = 'cp /wal/dir/path/archivedir/%f %p' # restore command
recovery_target_time = '2025-08-23 01:14:11'          # point in time to recovery
recovery_target_action = 'promote'                    # action to take when recovery target is reached

# Set the recovery flag
touch /var/lib/postgresql/recovery.signal

# Start PostgreSQL database server and the same start the Point-in-Time Recovery
systemctl start postgresql
File backup method#
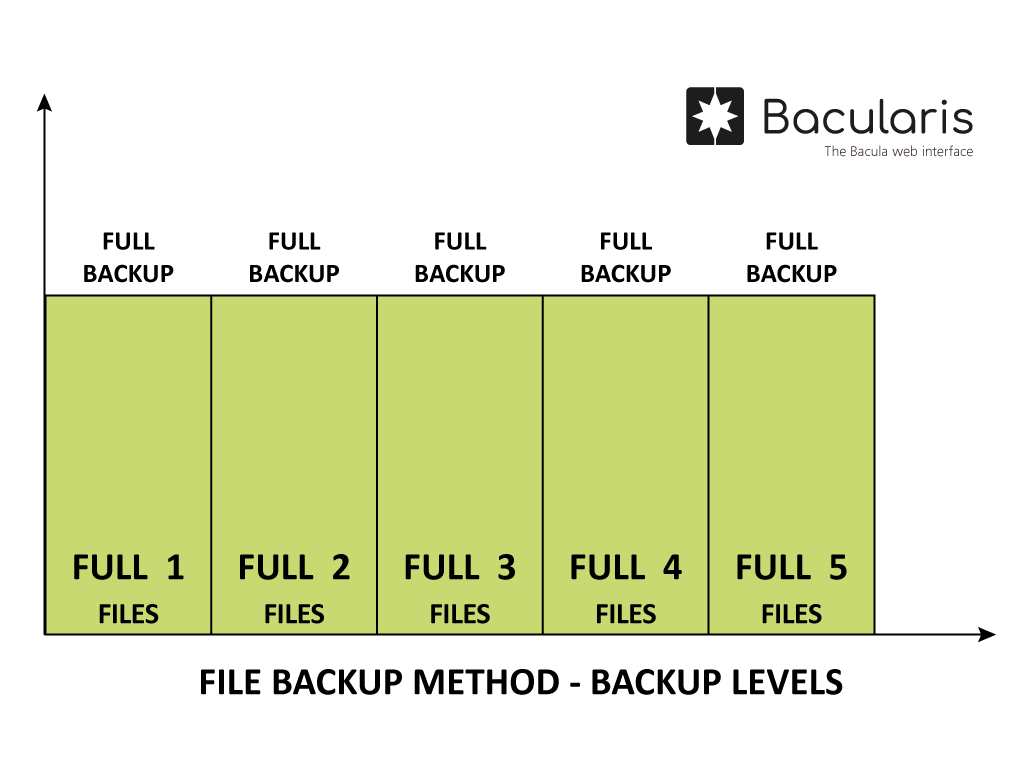
Description#
This backup method is for including in the backups realized by other backup methods important files for the PostgreSQL server that can be crucial in the restore (disaster recovery). Using the file backup method there can be included for example the PostgreSQL configuration files.
Levels#
In this backup method there is supported only the Full backup level that backs up
all the files in the Full backup:
Full- it backs up all data
Requirements#
Before using this method please make sure that on the host with the file daemon you have the following tools installed:
Bacularis version
5.6.0or greater
tar- archiving utilityBacula
bpipeplugin in the Bacula file daemon
Backup data structure#
Below you can see example data structure for this file backup method that can be restored
in form of the file restore. In this example backed up are: /etc/postgresql directory and
/etc/postgresql-common file.
/
/etc/
/etc/postgresql-451-2025-08-23_112145-Full
/etc/postgresql-common-451-2025-08-23_112145-Full
The file descriptions are the following:
postgresql-*-Full- it contains the/etc/postgresqlfile.
postgresql-common-*-Full- it contains the/etc/postgresql-commondirectory content
Please note that during restoring the file structure is automatically unpacked to form like below:
/
/etc
/etc/postgresql-common
/etc/postgresql-common/createcluster.conf
/etc/postgresql-common/root.crt
/etc/postgresql-common/user_clusters
/etc/postgresql-common/pg_upgradecluster.d
/etc/postgresql-common/pg_upgradecluster.d/analyze
/etc/postgresql
/etc/postgresql/17
/etc/postgresql/17/main
/etc/postgresql/17/main/postgresql.conf
/etc/postgresql/17/main/pg_hba.conf
/etc/postgresql/17/main/environment
/etc/postgresql/17/main/pg_ident.conf
/etc/postgresql/17/main/conf.d
/etc/postgresql/17/main/pg_ctl.conf
/etc/postgresql/17/main/start.conf