
Amazon AWS EC2 backup plugin#
This plugin allows you to create and restore backups of AWS EC2 virtual servers.
Main features#
The Amazon EC2 plugin provides the following features:
Backup of entire EC2 instances
Backup of individual EBS volumes
Backup and restore of EC2 virtual machine data and metadata
Full and incremental block-level backup
Backup from EBS snapshots
Direct backup (without intermediate storage) from AWS cloud to Bacula
Direct restore (without intermediate storage) from Bacula to AWS cloud
Ability to perform local restore to files
Restore EC2 instances to the same or different Availability Zone
Restore EBS volumes to the same or different AWS Region
Consistent point-in-time snapshots across multiple EBS volumes
Support for backing up multiple EC2 instances or EBS volumes in a single job
Modern parallel communication with AWS using a worker pool pattern
Secure authentication with AWS using STS assume role or static credentials
Ability to override EC2 instance properties during restore
Backup methods#
The Amazon EC2 plugin supports two backup modes:
EC2 instance backup – automatically includes data from all EBS volumes attached to the instance, along with their metadata and EC2 instance metadata. After restoration, the newly created virtual machine remains consistent with the original EC2 instance from which the backup was created.
EBS volume backup – creates backups of selected EBS volumes. This is useful when you do not want to back up entire EC2 instances or when you want to protect only specific volumes. EBS volume backups store both volume data and metadata, ensuring full compatibility between restored and original volumes.
Both EC2 instance backups and individual EBS volume backups are performed using EBS snapshots.
Architecture#
The following diagrams present the three operating modes of Bacularis with Amazon EC2.
Mode 1: Configuration#
Before running the first backup, Bacularis must be configured to work with AWS. Communication with AWS cloud services is handled by Bacularis API, while the EC2 plugin configuration is managed by Bacularis Web. Bacularis Web communicates with the API to collect all information required for configuring the EC2 plugin.

Mode 2: Backup#
During backup operations, Bacularis API together with the EC2 plugin communicates directly with AWS, creates EBS snapshots, and retrieves data and metadata required to create the backup.

Mode 3: Restore#
During restore operations, Bacularis API and the EC2 plugin retrieve volume data and metadata from backups, create EC2 snapshots, restore data to snapshots, and create a new EC2 instance.

Video tutorial#
How the Amazon EC2 plugin works#
EC2 instance backup#
Plugin tasks:
Collects information about EC2 instance EBS volumes
Saves EC2 instance metadata into the backup
Saves EBS volume metadata into the backup
Creates EBS volume snapshots
Saves EBS volume data from snapshots into the backup
EC2 instance restore#
Plugin tasks:
Restores EC2 instance EBS volume metadata
Creates EBS snapshots for restored volumes
Restores EBS volume data to snapshots
Creates an AMI (Amazon Machine Image) from EC2 instance metadata
Launches a new instance from the AMI with all required volumes attached
Removes the AMI
Restores volume metadata
Selected EBS volume backup#
Plugin tasks:
Collects information about EBS volumes
Saves EBS volume metadata into the backup
Creates EBS volume snapshots
Saves EBS volume data from snapshots into the backup
Selected EBS volume restore#
Plugin tasks:
Restores EBS volume metadata
Creates EBS snapshots for restored volumes
Restores EBS volume data to snapshots
Restores volume metadata
The user manually creates volumes from restored snapshots
Snapshots#
Both backup and restore operations in the Bacularis AWS EC2 plugin use EBS snapshots as a core mechanism.
During backup, EBS snapshots provide a safe and modern method for protecting data by creating backups from a consistent point-in-time view of the EBS volumes. This ensures that backup data remains consistent even if the original EC2 instance continues running during the backup process.
During restore, EBS snapshots act as intermediate resources used to recreate EBS volumes and restore EC2 instances.
Restored snapshots and volumes can also be reused for additional AWS workflows, such as creating custom AMIs and launching multiple EC2 instances using the same underlying volume data.
Important
When backing up EC2 instances with multiple attached EBS volumes, the Bacularis AWS EC2 plugin creates snapshots for all instance volumes at the same point in time.
This ensures that all snapshots used in the backup are time-consistent with each other and represent a single, synchronized view of the EC2 instance state during backup creation.
Consistent multi-volume snapshots are particularly important for workloads that store related data across multiple volumes, such as databases, transactional systems, or applications using separate data and log volumes.
This approach helps preserve data consistency and reduces the risk of restoring volumes captured at different points in time.
HTTP worker pool#
By using the worker pool design pattern, read and write operations to AWS are performed in parallel. This significantly improves both backup and restore performance when transferring data between AWS and Bacula.
The number of active workers can be configured separately for backup and restore tasks. This allows the worker count to be adjusted according to available network bandwidth for optimal performance.
The following diagram presents a simplified overview of how the worker pool operates:

Environment preparation#
General requirements#
The AWS EC2 plugin is available starting from Bacularis version 6.2.0.
To use it, the following components are required:
Bacularis Web Interface version
6.2.0or laterBacularis API version
6.2.0or later with the Amazon EC2 plugin installedAWS account credentials (either static credentials or STS assume role authentication)
AWS CLI v2 or later installed on the Bacularis API host
Bacula File Daemon on Bacularis API host with the Bacula BPIPE plugin installed. In most cases, BPIPE plugin is installed by default and delivered together with the Bacula File Daemon.
API host address should be the same as File Daemon address defined in Director Client resource in Address directive
Bacula BPIPE plugin#
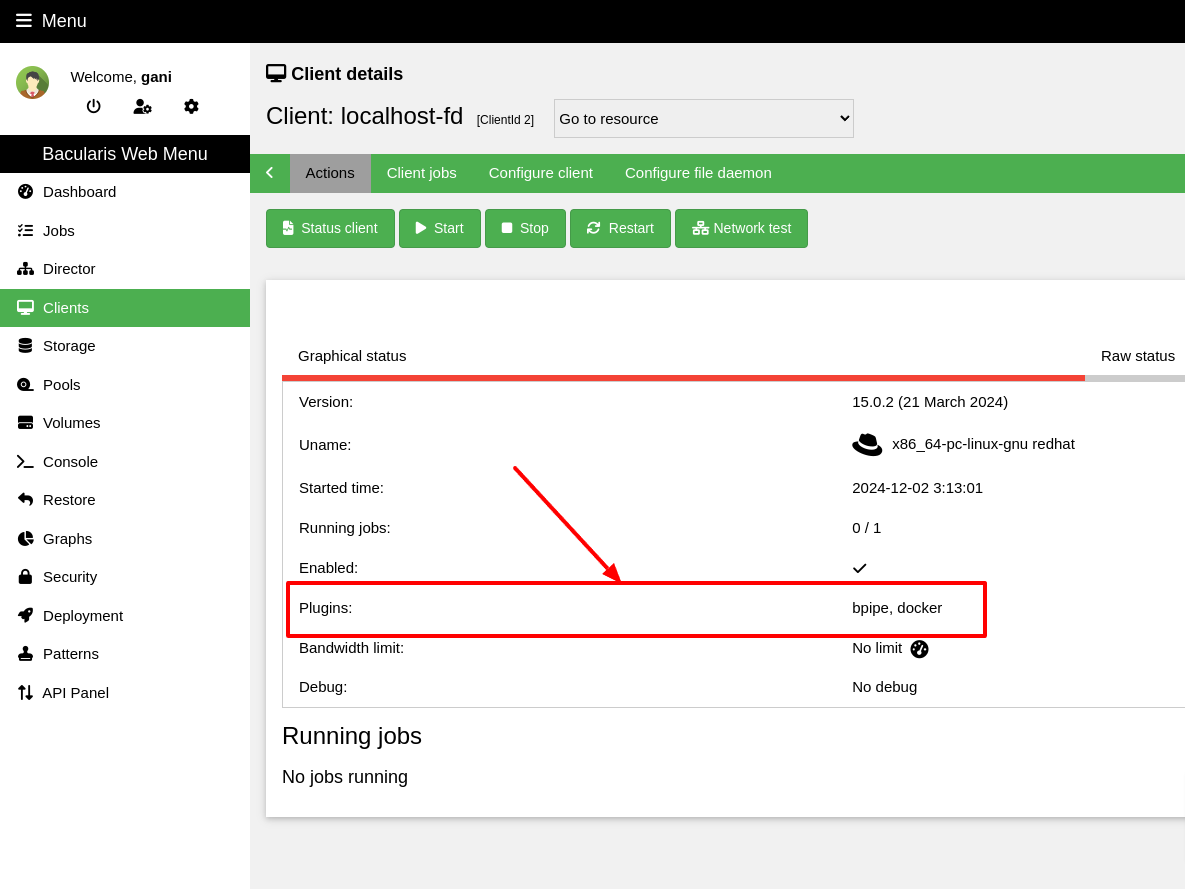
Verify that the Bacula client responsible for backing up the EC2 instance
has the Bacula BPIPE plugin installed. You can check this using the status
client=xxx command or directly from the Bacularis interface as shown below:
*status client=darkstar-fd
Connecting to Client darkstar-fd at 192.168.1.2:9112

darkstar-fd Version: 15.0.3 (25 March 2025)  x86_64-redhat-linux-gnu redhat
Daemon started 17-maj-26 17:56. Jobs: run=0 running=0 max=10.
Heap: heap=565,248 smbytes=200,502 max_bytes=200,503 bufs=111 max_bufs=111
Sizes: boffset_t=8 size_t=8 debug=0 trace=0 mode=0,0 bwlimit=0kB/s
Crypto: fips=N/A crypto=OpenSSL 3.5.1 1 Jul 2025
Plugin: bpipe(2)
Install AWS CLI v2#
AWS CLI is a command-line tool used for communication with AWS cloud services. It provides a unified interface for managing AWS resources and is available in repositories for many major Linux distributions.
Bacularis uses AWS CLI for EC2 backup and restore operations. For this plugin, AWS CLI must be installed on the host where Bacularis API with the Bacula client are running.
You can install AWS CLI as follows:
On RPM-based systems:
dnf install awscli2
On DEB-based systems:
apt install awscli
Configure AWS credentials#
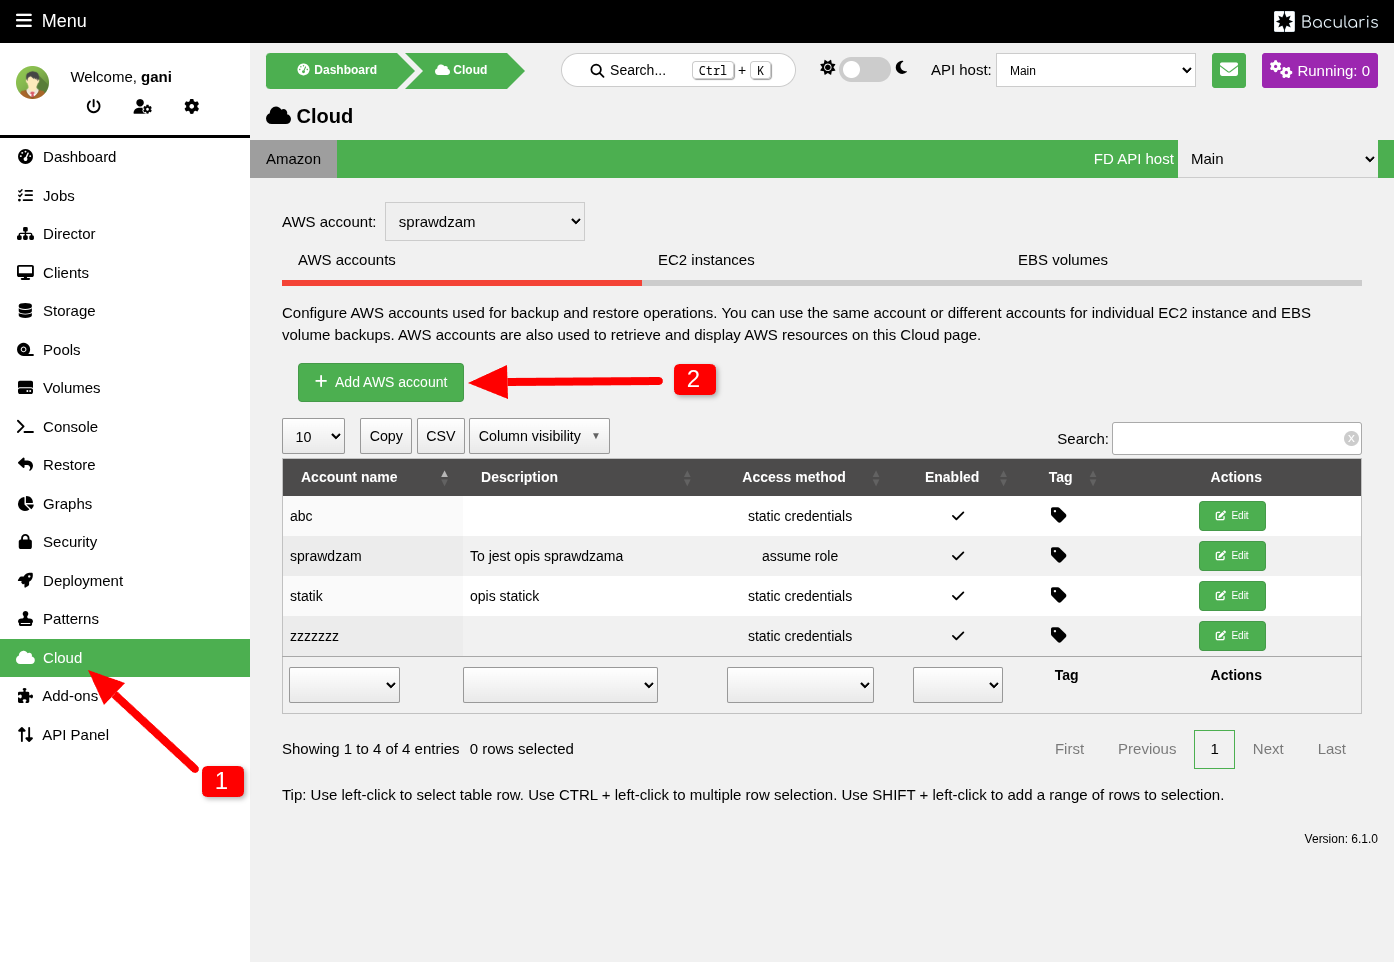
On the Cloud page, you can configure credentials for your AWS cloud environment. These credentials allow the Bacularis plugin to perform backup and restore operations.
Bacularis allows you to configure multiple AWS credentials. They can be shared across all operations or separated by environment (test, pre-production, production, etc.) or by individual backup configurations. For example, one set of credentials can be used to back up EC2 instances in one AWS region, while another set can be used for instances located in a different region. Additionally, credentials can be changed dynamically in the AWS plugin configuration and during restore operations.
Bacularis supports two authentication methods for AWS:
Method |
Recommended usage |
Notes |
|---|---|---|
Static credentials |
Testing and small environments |
Simpler configuration |
STS assume role |
Production |
Higher security level |
Note
For production environments, it is recommended to use STS assume role instead of static credentials.
Both methods can be configured in two different ways depending on the source of the credentials:
Access keys
Instance role
Scenario |
Recommended usage |
|---|---|
Static credentials + Access keys |
Testing environments and small installations |
Static credentials + Instance role |
Bacularis running on EC2 with a dedicated IAM role |
STS assume role + Access keys |
Bacularis running outside AWS |
STS assume role + Instance role |
Bacularis running on EC2 with an existing IAM role |
Access Method: Static Credentials#
The Static credentials access method means that credentials are used exactly as provided, without obtaining temporary credentials (as is the case with STS assume role). These credentials must directly provide permissions for all AWS operations supported by the Bacularis EC2 plugin.
The credential source option specifies where the credentials are stored.
Credential Source: Access Keys#
This is the typical configuration when Bacularis runs outside AWS. This option requires both an Access Key and Secret Key, which are used by Bacularis to access AWS services. User credentials are stored in the Bacularis configuration.
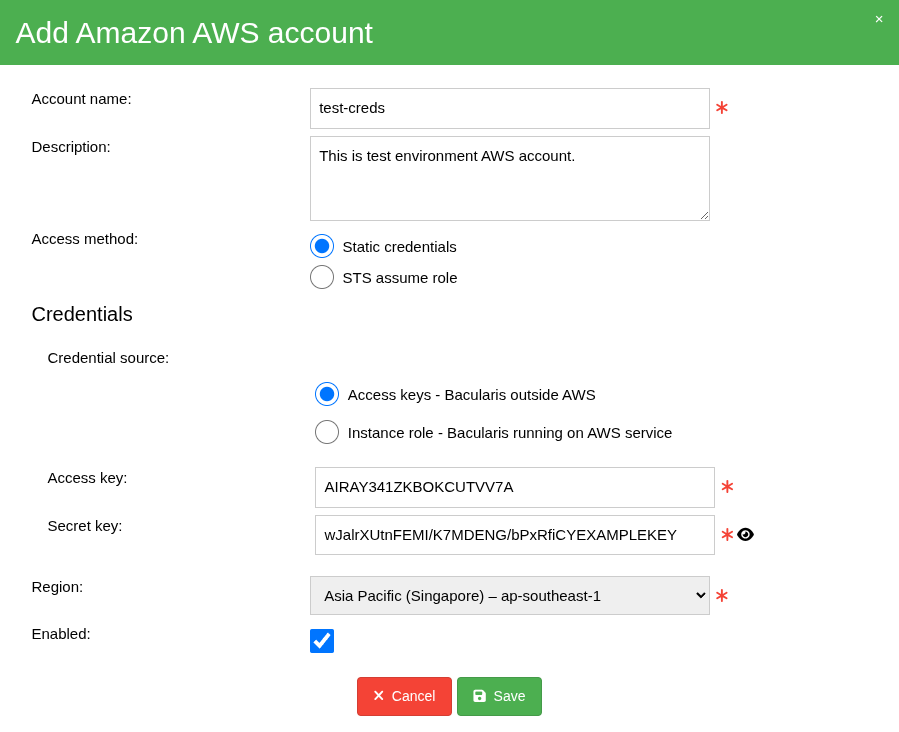
When to use#
This access method is suitable when Bacularis runs outside AWS infrastructure. Since the credentials (Access Key and Secret Key) are static and not rotated automatically, this method is recommended mainly for testing purposes or small installations. For production environments, one of the other access methods is recommended.
Access preparation#
Policy definition file: bacularis-ec2-policy.json
{
    "Version": "2012-10-17",
    "Statement": [
        {
            "Effect": "Allow",
            "Action": [
                "ec2:DescribeInstances",
                "ec2:DescribeInstanceAttribute",
                "ec2:RegisterImage",
                "ec2:DeregisterImage",
                "ec2:CreateTags",
                "ec2:DescribeVolumes",
                "ec2:CreateSnapshot",
                "ec2:CreateSnapshots",
                "ec2:DescribeSnapshots",
                "ec2:DescribeImages",
                "ec2:RunInstances",
                "ebs:ListSnapshotBlocks",
                "ebs:ListChangedBlocks",
                "ebs:GetSnapshotBlock",
                "ebs:PutSnapshotBlock",
                "ebs:StartSnapshot",
                "ebs:CompleteSnapshot"
            ],
            "Resource": "*"
        }
    ]
}
Create the policy:
aws iam create-policy \
  --policy-name BacularisEC2Policy \
  --policy-document file://bacularis-ec2-policy.json
Attach the policy to the user:
aws iam attach-user-policy \
  --user-name bacularis-user \
  --policy-arn arn:aws:iam::123456789012:policy/BacularisEC2Policy
Configuration form#
In the Bacularis AWS account configuration field you need to provide:
Access method: Static credentials
Credential source: Access keys - Bacularis outside AWS
Access key for user
bacularis-userSecret key for user
bacularis-userRegion
Credential Source: Instance Role#
This option works only when Bacularis is running inside an EC2 instance. It assumes that the user attaches an IAM role to the EC2 instance profile. Credentials are stored in the EC2 instance metadata and are used transparently by Bacularis.
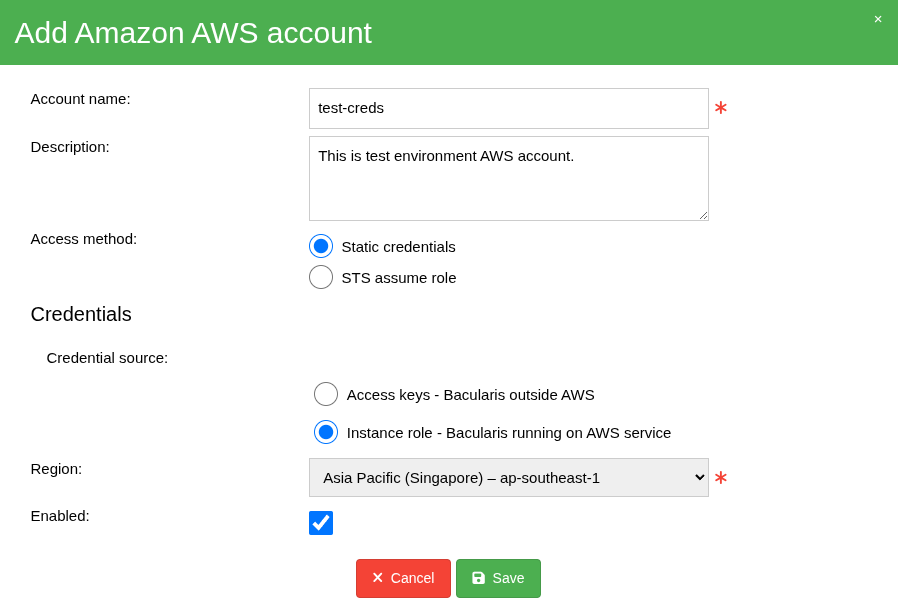
When to use#
Use this method when Bacularis runs inside an EC2 instance and you want to use credentials automatically provided by an IAM role attached to the EC2 instance profile. If the EC2 instance does not yet have the appropriate IAM role attached, it can be created and assigned according to the procedure below.
Access preparation#
Policy definition file: bacularis-ec2-policy.json
{
    "Version": "2012-10-17",
    "Statement": [
        {
            "Effect": "Allow",
            "Action": [
                "ec2:DescribeInstances",
                "ec2:DescribeInstanceAttribute",
                "ec2:RegisterImage",
                "ec2:DeregisterImage",
                "ec2:CreateTags",
                "ec2:DescribeVolumes",
                "ec2:CreateSnapshot",
                "ec2:CreateSnapshots",
                "ec2:DescribeSnapshots",
                "ec2:DescribeImages",
                "ec2:RunInstances",
                "ebs:ListSnapshotBlocks",
                "ebs:ListChangedBlocks",
                "ebs:GetSnapshotBlock",
                "ebs:PutSnapshotBlock",
                "ebs:StartSnapshot",
                "ebs:CompleteSnapshot"
            ],
            "Resource": "*"
        }
    ]
}
Create the access policy:
aws iam create-policy \
  --policy-name BacularisEC2Policy \
  --policy-document file://bacularis-ec2-policy.json
Role trust policy definition file trust-policy-role.json that allows EC2 service:
{
  "Version": "2012-10-17",
  "Statement": [
    {
      "Effect": "Allow",
      "Principal": {
        "Service": "ec2.amazonaws.com"
      },
      "Action": "sts:AssumeRole"
    }
  ]
}
Create the IAM role:
aws iam create-role \
  --role-name BacularisEC2Role \
  --assume-role-policy-document file://trust-policy-role.json
Attach the policy to the role:
aws iam attach-role-policy \
  --role-name BacularisEC2Role \
  --policy-arn arn:aws:iam::123456789012:policy/BacularisEC2Policy
Create the instance profile:
aws iam create-instance-profile \
  --instance-profile-name BacularisEC2Profile
Attach the role to the instance profile:
aws iam add-role-to-instance-profile \
  --instance-profile-name BacularisEC2Profile \
  --role-name BacularisEC2Role
Attach the IAM profile to the EC2 instance:
aws ec2 associate-iam-instance-profile \
    --instance-id i-0123456789abcdef0 \
    --iam-instance-profile Name=BacularisEC2Profile
Configuration form#
In the Bacularis AWS account configuration field you need to provide:
Access method: Static credentials
Credential source: Instance role - Bacularis running on AWS service
Region
Access Method: STS Assume Role#
The STS assume role access method uses a defined AWS IAM role together with the provided AWS credentials in order to obtain temporary AWS credentials. These temporary credentials are then used for all AWS operations performed by the Bacularis EC2 plugin.
STS assume role creates temporary credentials based on the permissions assigned to the specified IAM role. Bacularis uses these temporary credentials to perform AWS operations.
STS assume role credentials expire after a specified period of time and are automatically refreshed when needed. This is a more secure method than using static credentials because it provides temporary access with permissions defined by the IAM role.
The credential source option specifies where the credentials used to obtain temporary credentials are stored.
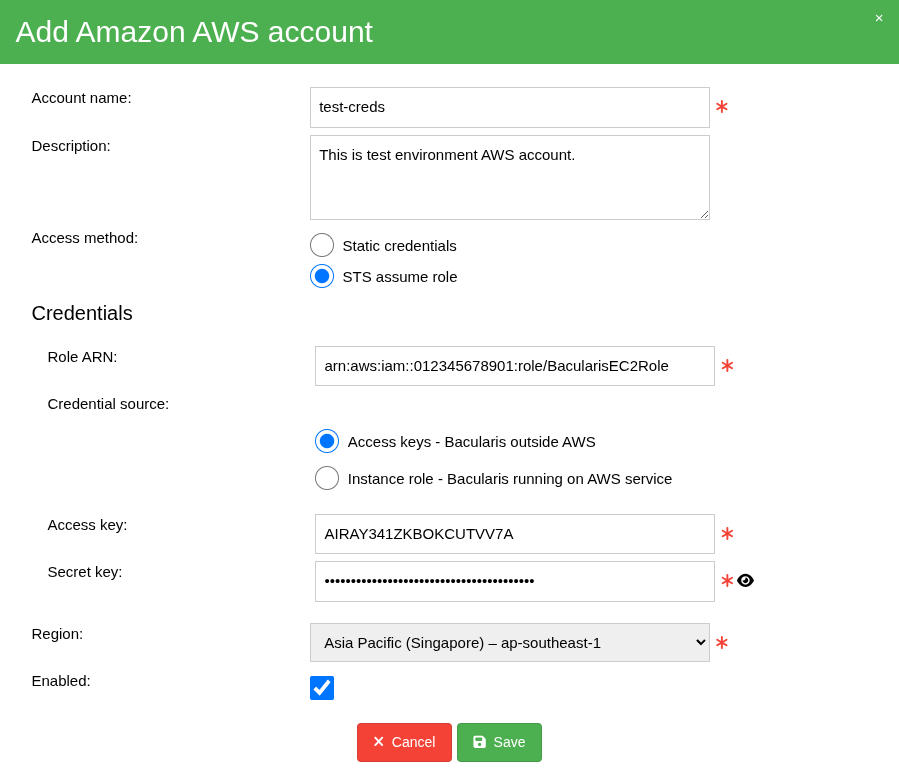
Credential Source: Access Keys#
This is the typical configuration when Bacularis runs outside AWS. The AWS user’s Access Key and Secret Key are used only to obtain temporary credentials. Once temporary credentials are available, the original Access Key and Secret Key are no longer used.
User credentials are stored in the Bacularis configuration. By default, STS temporary credentials are valid for one hour, although this period can be modified in the IAM role configuration. After expiration, new temporary credentials are generated automatically.
When to use#
This is the most recommended access method when Bacularis runs outside AWS infrastructure. It allows maintaining minimal permissions for the AWS user while granting temporary permissions required by the Bacularis EC2 plugin.
Access preparation#
Policy definition file: bacularis-ec2-policy.json
{
    "Version": "2012-10-17",
    "Statement": [
        {
            "Effect": "Allow",
            "Action": [
                "ec2:DescribeInstances",
                "ec2:DescribeInstanceAttribute",
                "ec2:RegisterImage",
                "ec2:DeregisterImage",
                "ec2:CreateTags",
                "ec2:DescribeVolumes",
                "ec2:CreateSnapshot",
                "ec2:CreateSnapshots",
                "ec2:DescribeSnapshots",
                "ec2:DescribeImages",
                "ec2:RunInstances",
                "ebs:ListSnapshotBlocks",
                "ebs:ListChangedBlocks",
                "ebs:GetSnapshotBlock",
                "ebs:PutSnapshotBlock",
                "ebs:StartSnapshot",
                "ebs:CompleteSnapshot"
            ],
            "Resource": "*"
        }
    ]
}
Create the access policy:
aws iam create-policy \
  --policy-name BacularisEC2Policy \
  --policy-document file://bacularis-ec2-policy.json
Role trust policy definition file trust-policy-role.json that allows bacularis user:
{
  "Version": "2012-10-17",
  "Statement": [
    {
      "Effect": "Allow",
      "Principal": {
        "AWS": "arn:aws:iam::123456789012:user/bacularis"
      },
      "Action": "sts:AssumeRole"
    }
  ]
}
Create the IAM role:
aws iam create-role \
  --role-name BacularisEC2Role \
  --assume-role-policy-document file://trust-policy-role.json
Attach the policy to the role:
aws iam attach-role-policy \
  --role-name BacularisEC2Role \
  --policy-arn arn:aws:iam::123456789012:policy/BacularisEC2Policy
Configuration form#
In the Bacularis AWS account configuration field you need to provide:
Access method: STS assume role
Credential source: Access keys - Bacularis outside AWS
ARN of role
BacularisEC2RoleAWS user Access Key
AWS user Secret Key
Region
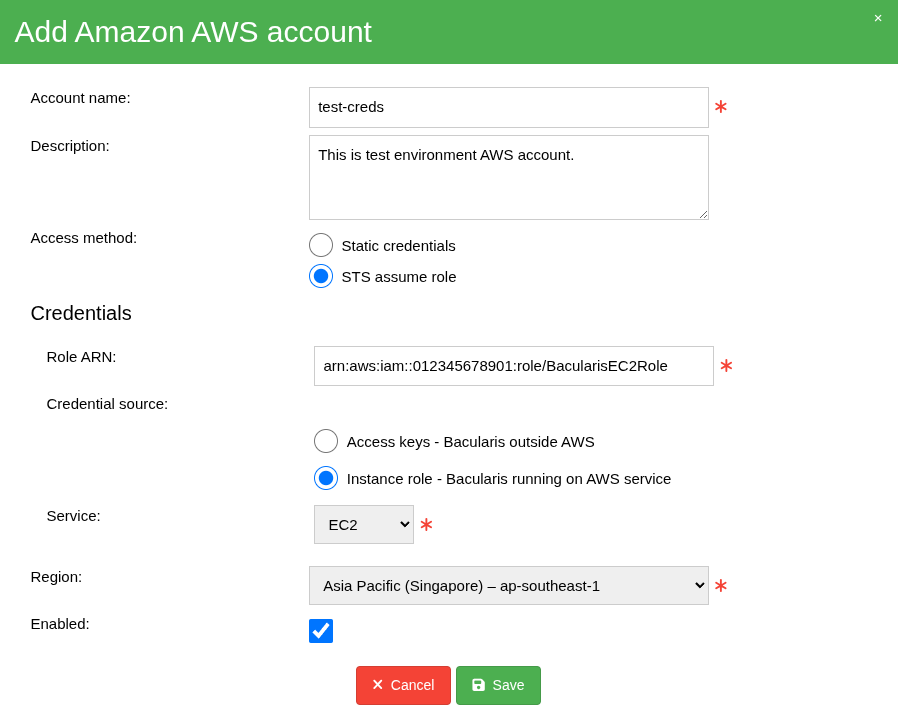
Credential Source: Instance Role#
This option works only when Bacularis runs inside an AWS EC2 instance that already uses an IAM role attached to the EC2 instance profile. Thanks to assume role, Bacularis can switch to another IAM role that provides the permissions required by the Bacularis EC2 plugin.
In this model there are two different IAM roles:
An IAM role used to switch (through assume role) to another IAM role providing all permissions required by the Bacularis EC2 plugin. This role is attached to the EC2 instance profile.
An IAM role providing all permissions required by the Bacularis EC2 plugin. This role is configured in the Bacularis account form and is the role assumed by Bacularis to obtain temporary credentials.
When to use#
This access method is useful when Bacularis runs inside an EC2 instance that already has an IAM role assigned to the EC2 instance profile. Thanks to assume role, you do not need to replace the existing role. Instead, Bacularis can temporarily switch to another role that provides the permissions required by the Bacularis EC2 plugin.
Access preparation#
Policy definition file: bacularis-ec2-policy.json
{
    "Version": "2012-10-17",
    "Statement": [
        {
            "Effect": "Allow",
            "Action": [
                "ec2:DescribeInstances",
                "ec2:DescribeInstanceAttribute",
                "ec2:RegisterImage",
                "ec2:DeregisterImage",
                "ec2:CreateTags",
                "ec2:DescribeVolumes",
                "ec2:CreateSnapshot",
                "ec2:CreateSnapshots",
                "ec2:DescribeSnapshots",
                "ec2:DescribeImages",
                "ec2:RunInstances",
                "ebs:ListSnapshotBlocks",
                "ebs:ListChangedBlocks",
                "ebs:GetSnapshotBlock",
                "ebs:PutSnapshotBlock",
                "ebs:StartSnapshot",
                "ebs:CompleteSnapshot"
            ],
            "Resource": "*"
        }
    ]
}
Create the policy:
aws iam create-policy \
  --policy-name BacularisEC2Policy \
  --policy-document file://bacularis-ec2-policy.json
Role trust policy definition file trust-policy-role.json that allows EC2InstanceRole role:
{
  "Version":"2012-10-17",
  "Statement":[
    {
      "Effect":"Allow",
      "Principal":{
        "AWS":"arn:aws:iam::123456789012:role/EC2InstanceRole"
      },
      "Action":"sts:AssumeRole"
    }
  ]
}
Create the IAM role:
aws iam create-role \
  --role-name BacularisEC2Role \
  --assume-role-policy-document file://trust-policy-role.json
Attach the policy to the role:
aws iam attach-role-policy \
  --role-name BacularisEC2Role \
  --policy-arn arn:aws:iam::123456789012:policy/BacularisEC2Policy
Create the assume role policy definition file assume-role-policy.json:
{
  "Version":"2012-10-17",
  "Statement":[
    {
      "Effect":"Allow",
      "Action":"sts:AssumeRole",
      "Resource":"arn:aws:iam::123456789012:role/BacularisEC2Role"
    }
  ]
}
Create the assume role policy:
aws iam create-policy \
  --policy-name BacularisAssumeRolePolicy \
  --policy-document file://assume-role-policy.json
Attach the policy to the role currently attached to EC2:
aws iam attach-role-policy \
  --role-name EC2InstanceRole \
  --policy-arn arn:aws:iam::123456789012:policy/BacularisAssumeRolePolicy
Note
IAM role, policy, and instance profile changes may require several minutes before becoming effective. AWS temporary credentials provided through EC2 Instance Metadata Service (IMDS) and STS are refreshed automatically, so authentication-related errors immediately after configuration changes can often be resolved by waiting a few minutes.
Configuration form#
In the Bacularis AWS account configuration field you need to provide:
Access method: STS assume role
Credential source: Instance role - Bacularis running on AWS service
ARN of role
BacularisEC2RoleService
Region
Backup#
Before creating a backup job, make sure that:
AWS credentials have been configured correctly
The connection to AWS is working properly
EC2 instances and EBS volumes are visible on the Cloud page
Backup levels#
The Bacularis AWS EC2 plugin supports the following backup levels:
Full – full backup containing all data required to restore EC2 instances or EBS volumes. To run this backup level, the backup job must be executed with
Level=Full.Incremental – incremental backup containing only data blocks changed since the last full or incremental backup. The Bacularis AWS EC2 plugin retrieves and stores only the differences between the data blocks from the snapshot created during the previous backup operation and the current snapshot. To run this backup level, the backup job must be executed with
Level=Incremental.
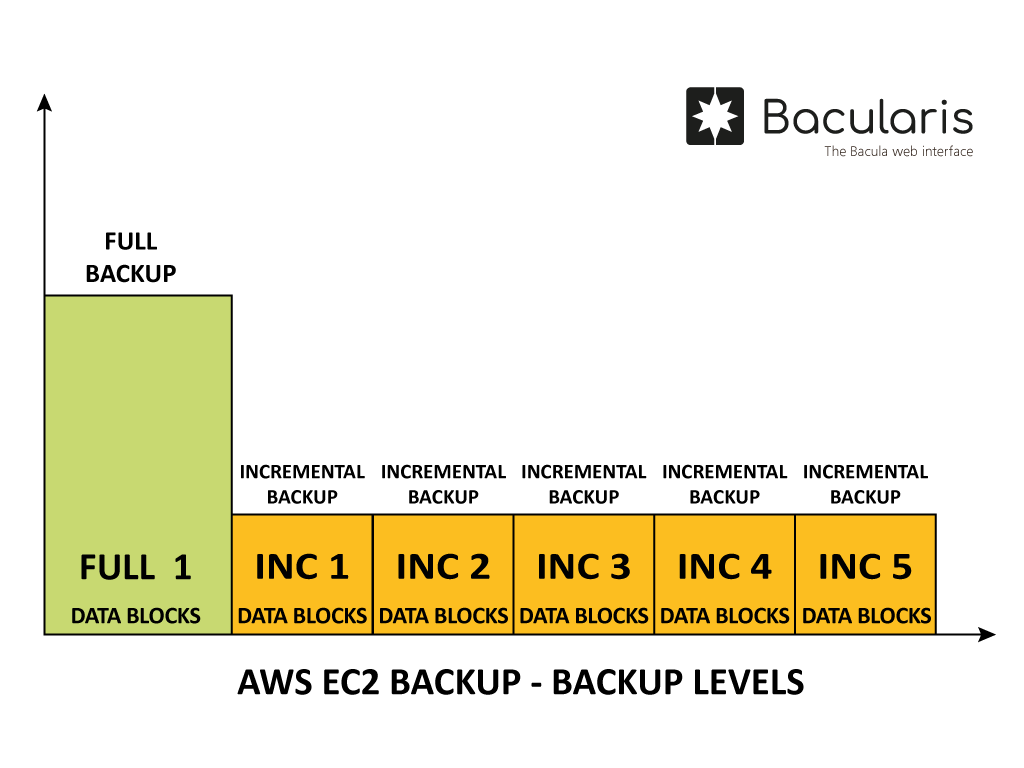
Since backups are created from EBS snapshots, when using incremental backups it is necessary to retain at least one snapshot from the previous backup operation. This is required so that the EC2 plugin can retrieve the differences accumulated between the previous backup snapshot and the current backup snapshot.
Cloud page structure#
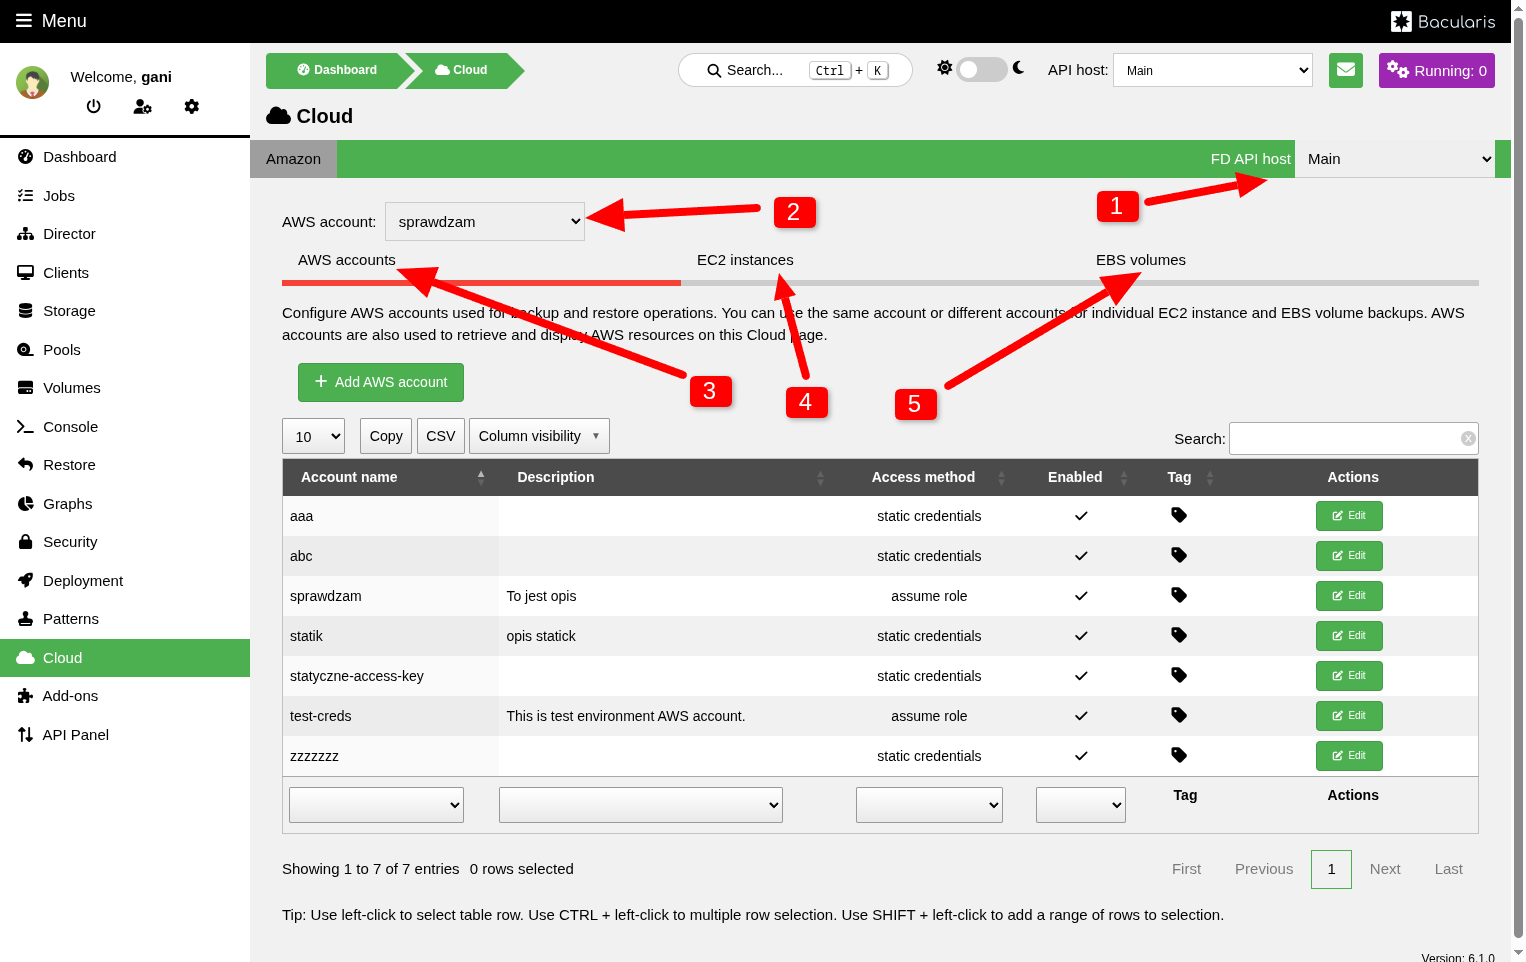
1 – Selection of the Bacularis API host used for communication with AWS. This host runs the Bacula client and the AWS CLI tool.
2 – Selection of AWS credentials used to retrieve data displayed on the Cloud page.
3 – AWS accounts tab. The Bacularis EC2 plugin supports multiple AWS accounts that can be used for different backup configurations. For example, you can use separate accounts for test, pre-production, and production environments.
4 – EC2 instances tab. This tab allows you to configure backups of entire EC2 instances.
5 – EBS volumes tab. This tab allows you to configure backups of individual EBS volumes.
Backup plugin options#
The following options are available when configuring a backup using the Bacularis AWS EC2 plugin. To access them, expand the EC2 plugin options section in the backup configuration window.
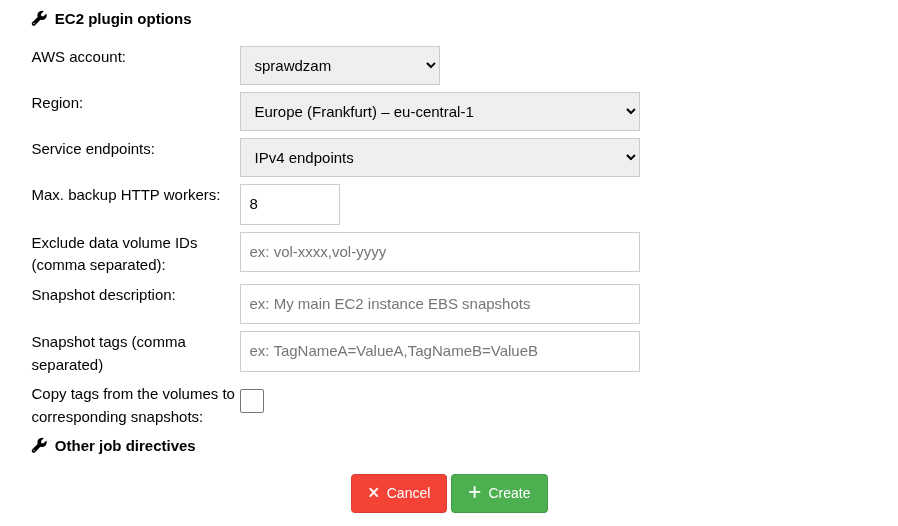
AWS account – configured AWS account used for backup operations. The account should have all permissions required to perform backups using the Bacularis AWS EC2 plugin.
Region – AWS region containing the resources that will be included in the backup.
Service endpoint – EBS API endpoint type (IPv4, IPv6, IPv4 & IPv6, etc.). This option allows communication with EBS services to be adjusted according to the network configuration of the environment.
Max. backup HTTP workers – maximum number of HTTP workers used for parallel communication with AWS.
Exclude data volume IDs – comma-separated volume identifiers that should be excluded from the backup. Use this option with caution, as excluding required volumes may result in a restored system that cannot boot correctly or may cause applications to fail. This is not an AWS limitation but an operating system or application-level issue that should be handled accordingly.
-
Snapshot description – description added to all snapshots created as part of the backup process. For example:
Backup created by Bacularis - Production environment -
Snapshot tags – comma-separated tags in the following format:
TagName1=TagValue1,TagName2=TagValue2Example:
Environment=Production,CreatedBy=BacularisThese tags are attached to all snapshots created during the backup process. Tags can be used for filtering, automation, or snapshot lifecycle policies.
Copy tags from the volumes to corresponding snapshots – when enabled, tags from EBS volumes are copied to the corresponding snapshots created during the backup process.
Note
Changes to plugin settings affect only the backup operation itself and do not modify EC2 or EBS resources, except for creating snapshots required for the backup process.
EC2 instance backup#
On the EC2 instances tab of the Cloud page, you can configure backups of EC2 instances.
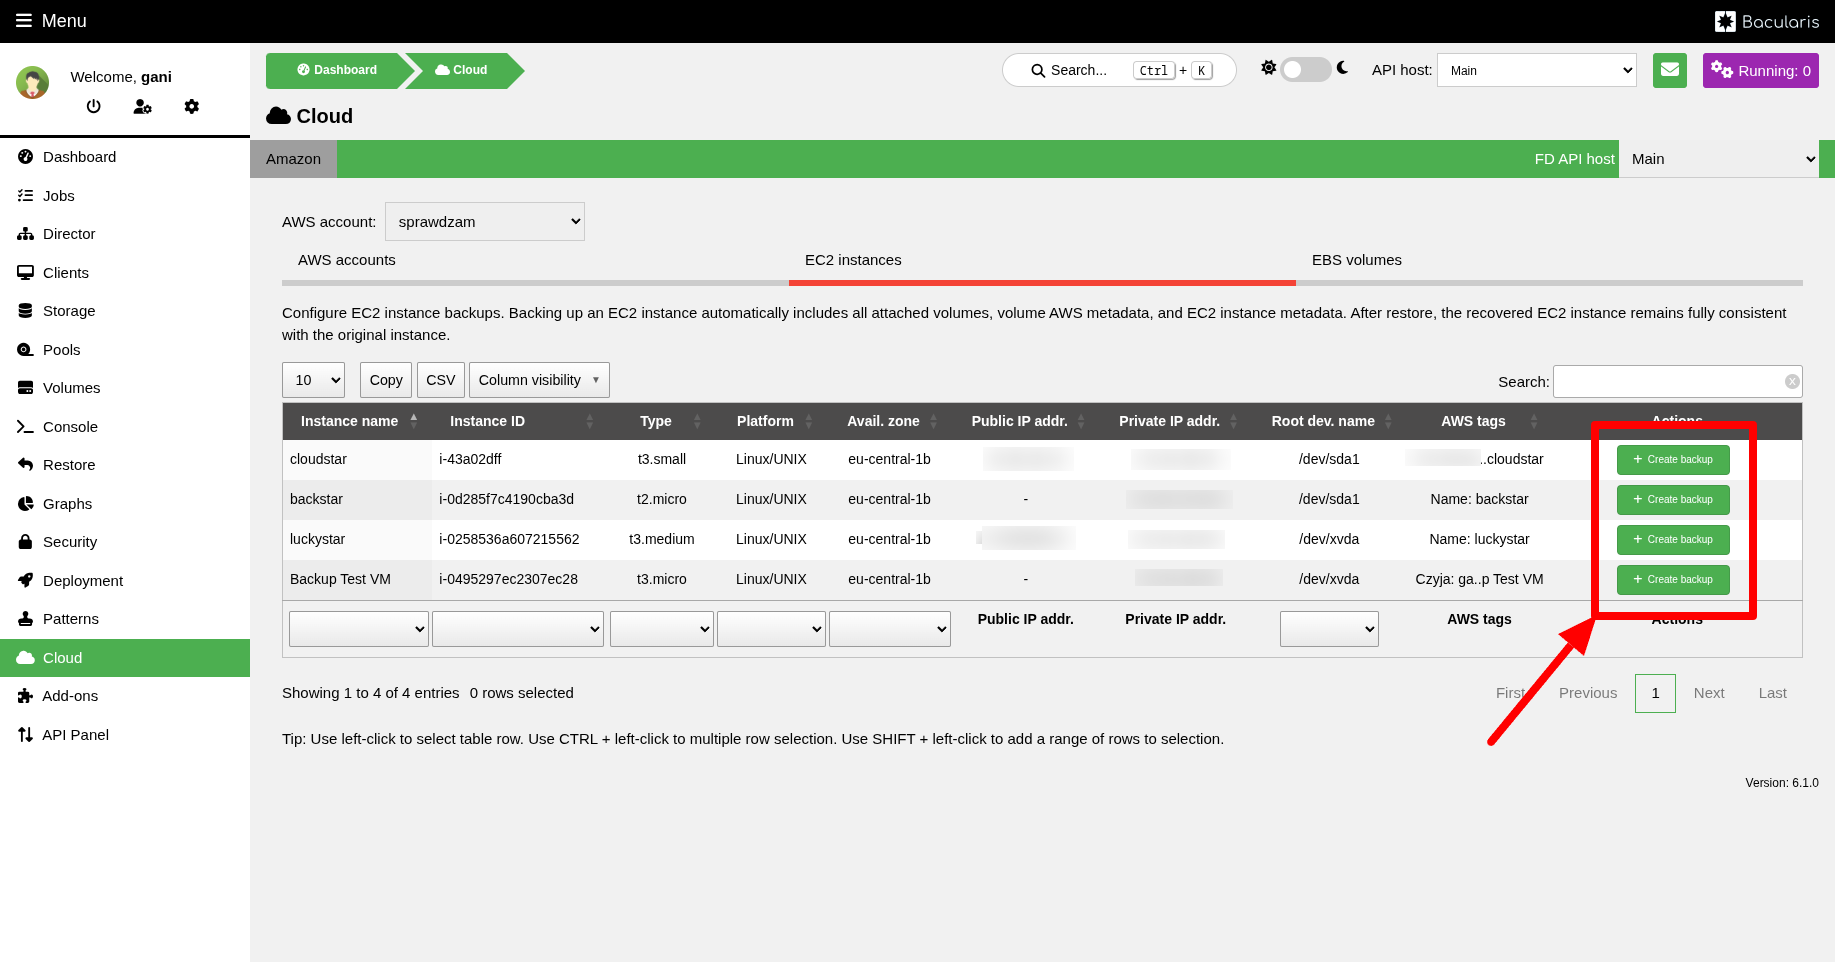
EC2 instance backups protect entire EC2 virtual servers, including data and metadata from all EBS volumes attached to the EC2 instance, as well as EC2 instance metadata. This allows restoring a virtual machine that accurately reproduces the original machine from which the backup was created.
The EC2 instance metadata stored in the backup includes, among others:
Instance type
Subnet ID
Security groups
Key pair name
Region
Availability Zone ID
Placement group ID
Placement partition number
Root device name
Virtualization type
Core count
Threads per core
Boot mode
TPM support
EBS optimized flag
CPU architecture
Instance tags
IAM instance profile
-
Metadata options
HTTP tokens
HTTP PUT response hop limit
HTTP endpoint
IPv6 protocol
Instance metadata tags
SR-IOV network support
User data (instance initialization scripts)
EBS volume mappings
-
EC2 instance EBS volume metadata
Volume type
Volume tags
KMS key ID
EBS card index
IOPS
Throughput
All of these EC2 instance properties are automatically applied to the restored instance during the restore process. Some of these properties can also be modified or overridden during restore configuration in the Restore Wizard.
To create an EC2 instance backup:
Go to the Cloud page
Open the EC2 instances tab
-
In the row of the selected virtual machine, click the Create backup button
Selecting Create backup does not start the backup immediately. Instead, it creates a Bacula job configuration that can later be run manually or according to a schedule.
-
Alternatively, select one or more EC2 instances in the table and choose the Create backup action from the menu above the table
If multiple instances are selected, they will be included in a single backup job.
In the newly opened window, configure the Bacula job
Configure additional EC2 plugin settings in the EC2 plugin options section if required
Configure additional Bacula job settings in the Other job directives section if required
Click the Create button to save the configuration
After this action, the following resources will be created:
Bacula Job – defines the backup job
Bacula FileSet – defines the data included in the backup
EC2 plugin configuration – contains Amazon EC2 plugin settings
The backup configuration is now ready for its first execution.
EBS volume backup#
EBS volume backup allows you to protect individual volumes without creating a backup of the entire EC2 instance. This is useful when you only need to protect specific data or selected volumes.
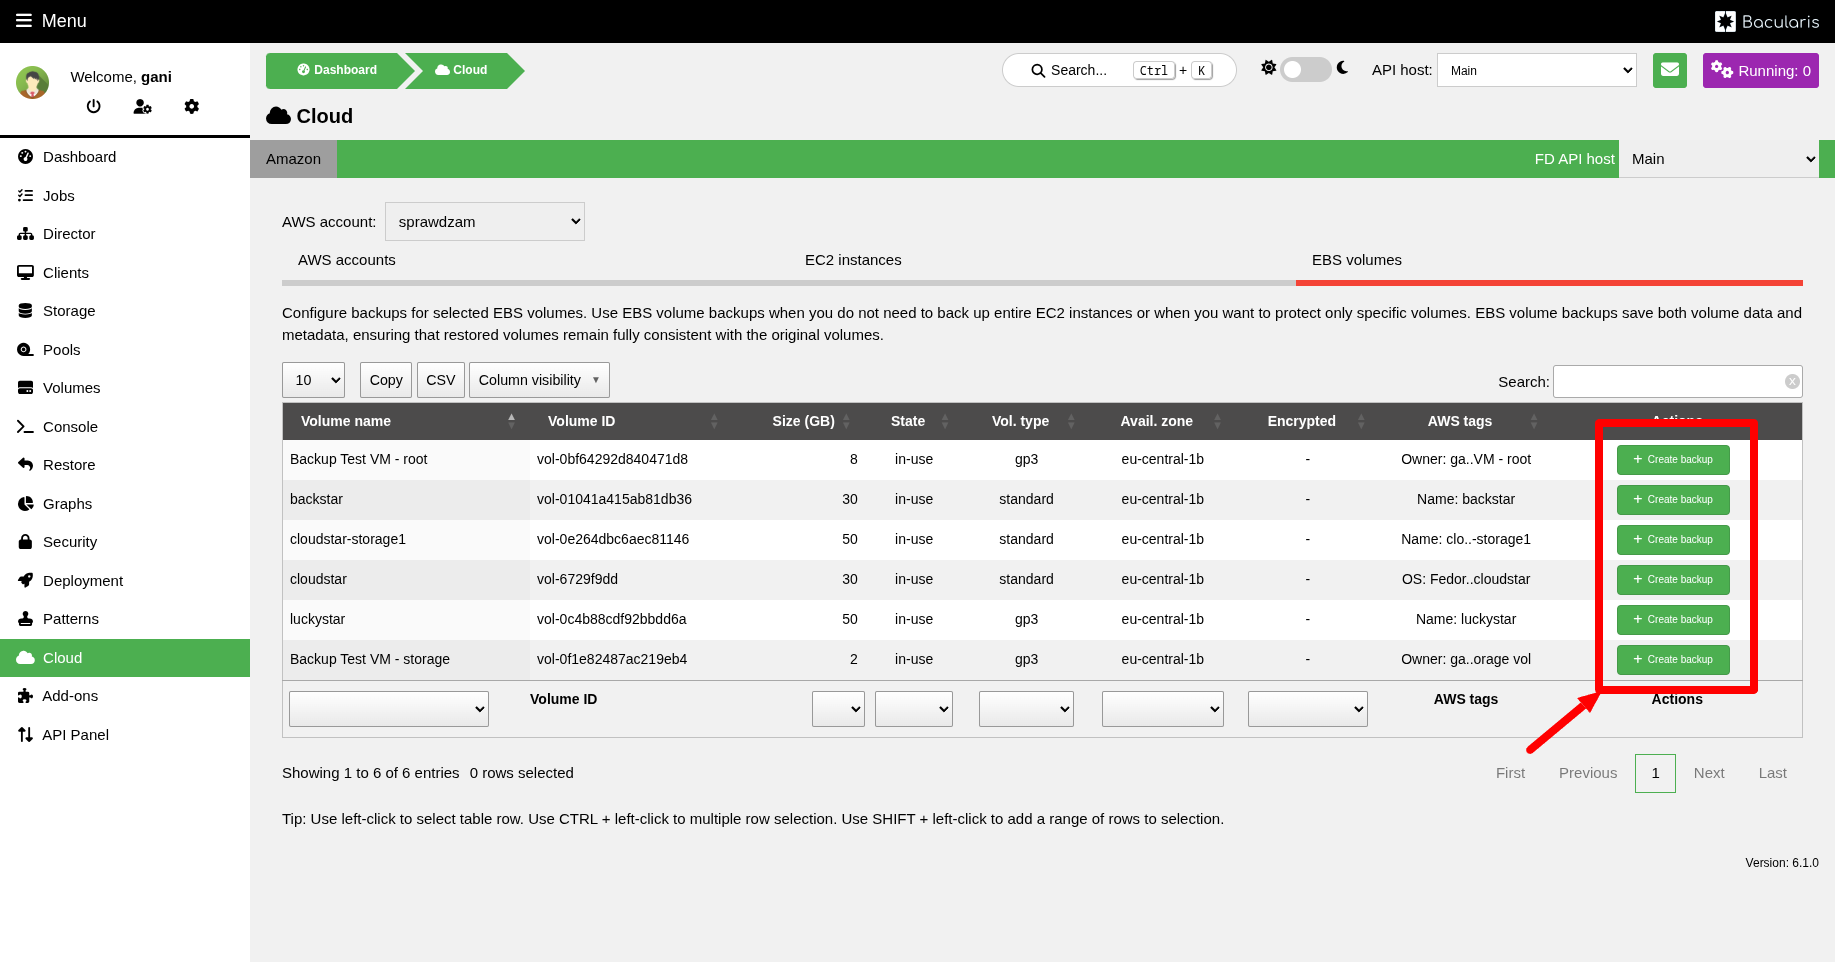
To create an EBS volume backup:
Open the EBS volumes tab
-
In the row of the selected volume, click the Create backup button
Selecting Create backup does not start the backup immediately. Instead, it creates a Bacula job configuration that can later be run manually or according to a schedule.
-
Alternatively, select one or more EBS volumes in the table and choose the Create backup action from the menu above the table
If multiple volumes are selected, they will be included in a single backup job.
In the newly opened window, configure the Bacula job
Configure additional EC2 plugin settings in the EC2 plugin options section if required
Configure additional Bacula job settings in the Other job directives section if required
Click the Create button to save the configuration
After this action, the following resources will be created:
Bacula Job – defines the backup job
Bacula FileSet – defines the data included in the backup
EC2 plugin configuration – contains Amazon EC2 plugin settings
After the configuration has been created, the backup job can be started manually or assigned to a Bacula schedule.
You can also enable the Run the new job now option, which starts the backup immediately after the backup job is created.
Restore#
Before starting a restore operation, make sure that:
An EC2 or EBS backup exists in Bacula
AWS credentials are configured correctly
The AWS account has the required permissions for restore operations
Required AWS resources (subnets, security groups, etc.) are available
The same Restore Wizard used for traditional Bacula file backups is also used for restoring EC2 backups.
Restore types#
Both EC2 instance backups and EBS volume backups can be restored in two different ways.
Restore type |
Description |
|---|---|
Restore to AWS |
Creates new EC2 resources in AWS |
Restore to files |
Restores raw backup data to local storage |
The image below shows which restore option should be selected for each restore type:
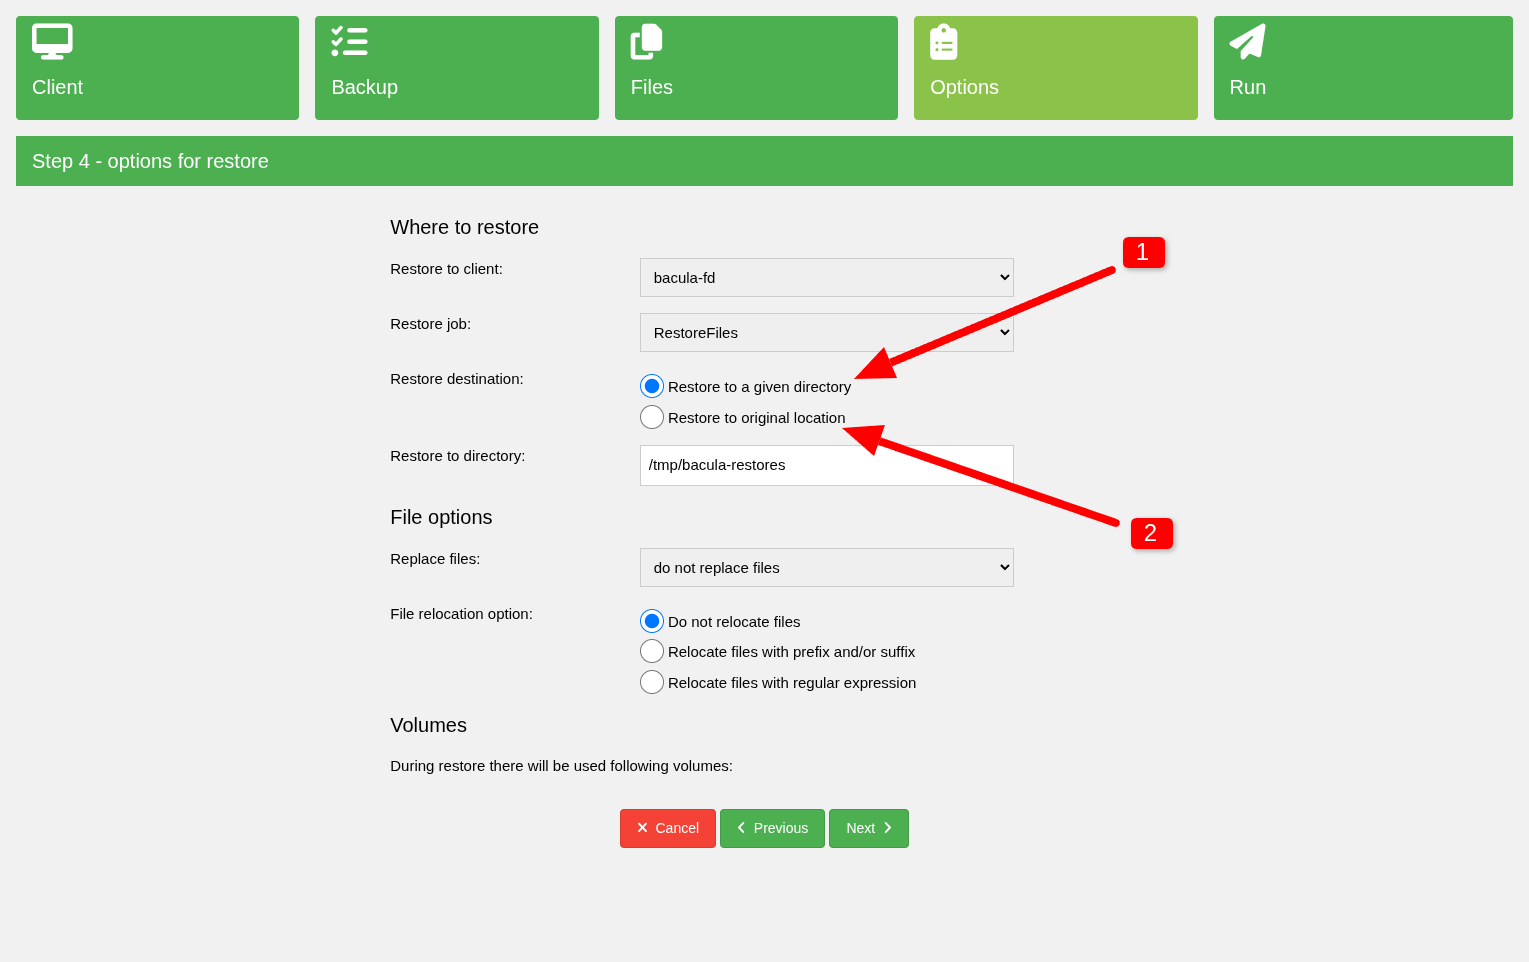
1 – restore locally to files in the Bacula File Daemon file system
2 – restore directly to AWS infrastructure
Restore to AWS#
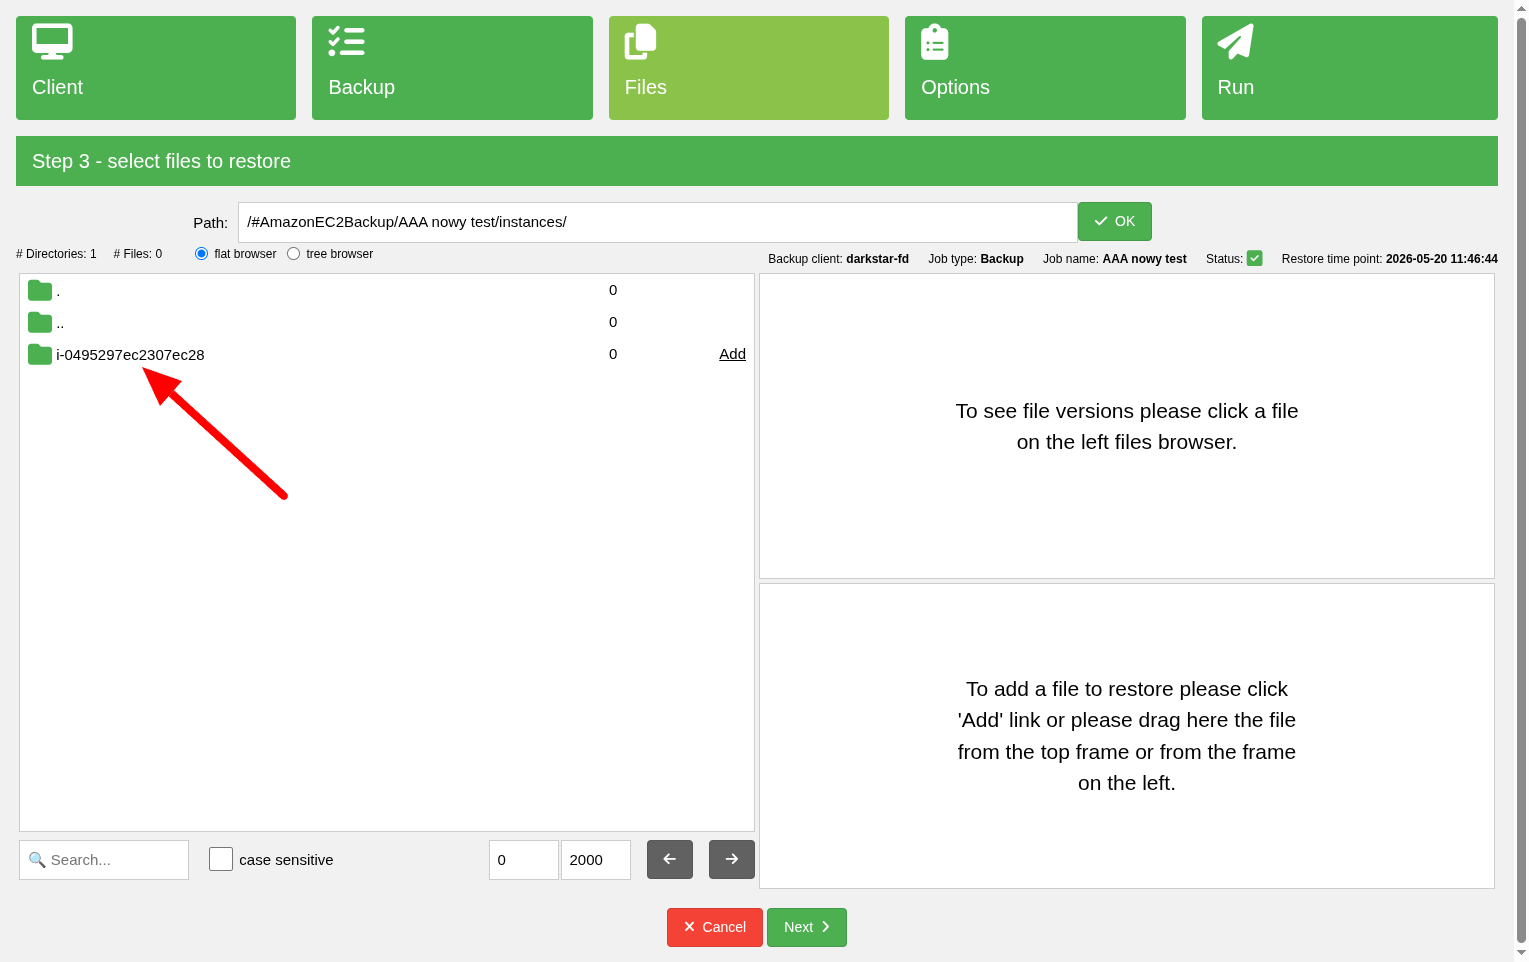
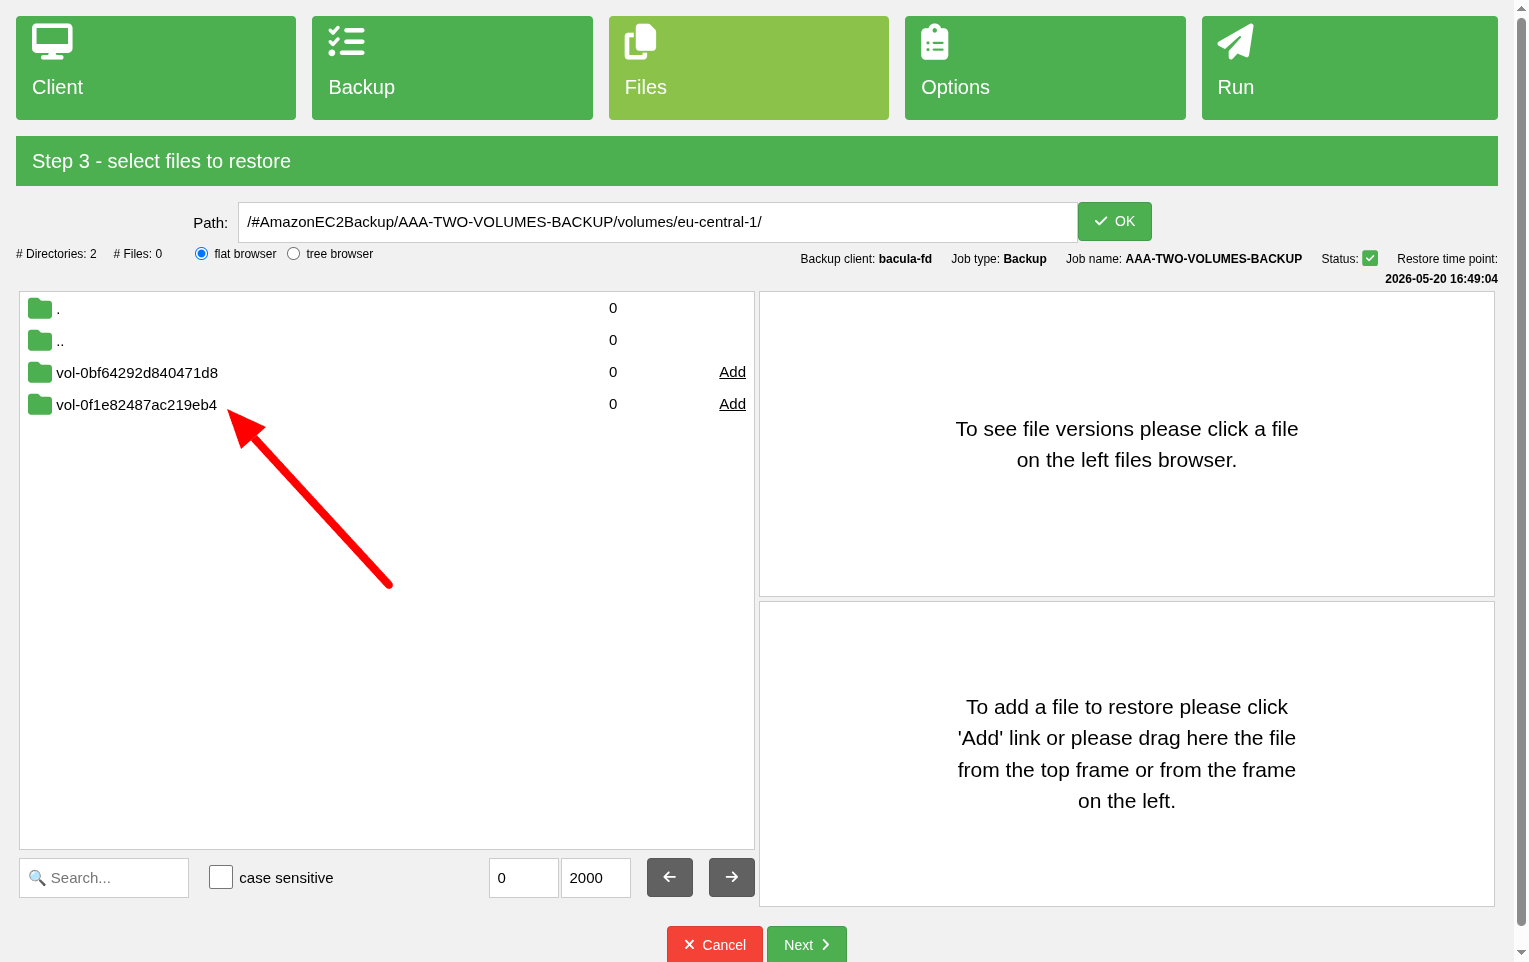
To restore an entire EC2 instance or individual EBS volumes to AWS, select the appropriate items in the Restore Wizard file browser in the same way files are selected in a traditional Bacula backup.
When selecting EC2 instances or EBS volumes, it is important to restore directories that use AWS resource identifiers.
For example, to restore an EC2 instance with ID i-xxyyzz, locate the
directory named i-xxyyzz in the file browser and select it for restore.
The same applies to EBS volume restore operations - select directories corresponding to the volume identifiers.
Important
During restore, select AWS resource directories (EC2 instance IDs or EBS volume IDs), not individual backup files.
Restore options#
In step four of the Restore Wizard (Options), you can override the original EC2 instance properties.
Changes made in Restore options affect only the current restore operation and do not modify the stored backup data.
If you want to restore an EC2 instance exactly as it was backed up, leave all restore options unchanged and do not add additional parameters. In this case, the restore operation will remain fully consistent with the original EC2 instance captured during backup.
If you want to modify specific EC2 virtual machine properties, you can do so
using Restore options. For example, if the original backed-up instance type
was t3.small and you want to restore it as t3.medium, you can override
the instance type during restore. The same approach can be used for other
available EC2 instance properties.
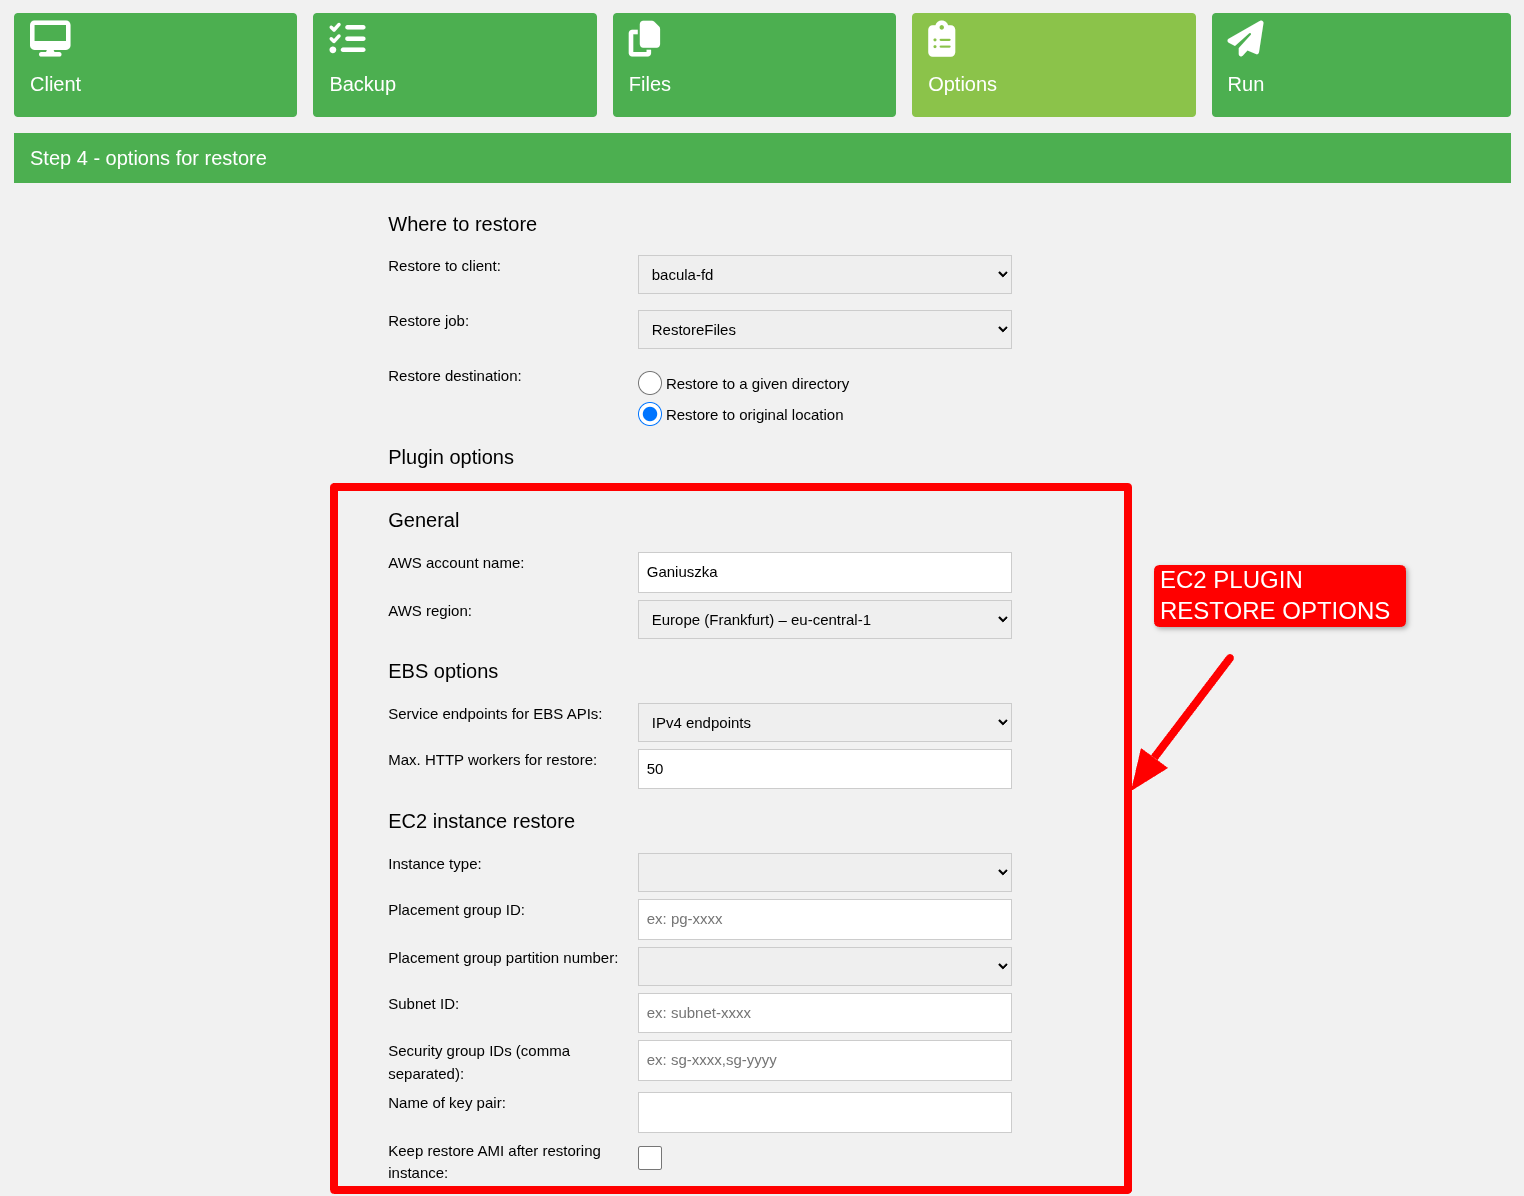
The following restore options are supported by the Bacularis AWS EC2 plugin:
General
AWS account name – AWS account used for restore operations. By default, the account used during backup is selected.
AWS region – AWS region used for restore operations.
EBS options
Service endpoints for EBS APIs – specifies the EBS API endpoint type (IPv4, IPv6, IPv4 & IPv6, etc.).
Max. HTTP workers for restore – maximum number of HTTP workers used for parallel communication with AWS.
EC2 instance restore
Instance type – target instance type used for the restored backup. If not specified, the original instance type used during backup will be applied.
Placement group ID - placement group identifier.
Placement group partition number – partition number for Partition-type placement groups.
Subnet ID – VPC subnet identifier. This option is useful when restoring an instance to a different Availability Zone than the original EC2 instance. Specify a subnet associated with the target Availability Zone. If left empty, the restored instance will be created in the original subnet and Availability Zone used during backup.
Security group IDs – comma-separated list of security groups. Leave this option empty to use the original security groups stored in the backup. If specified, the provided security groups will replace the original security groups.
Name of key pair – specifies the EC2 key pair used during instance creation. The selected key pair is passed to AWS during restore and is typically added to the restored instance through the operating system initialization process. If this option is left empty, only the keys available in the original instance at backup time will be used.
Keep restore AMI after restoring instance – when enabled, the AMI created during restore is preserved after the restore operation completes. This allows creating multiple identical EC2 instances from the same restored image. For example, a single backup can be used to launch multiple new instances with identical instance properties and attached volume data. If this option is disabled, the temporary AMI will be removed automatically after the new EC2 instance is successfully launched.
Note
Both EC2 instance restore and EBS volume restore operations create EBS snapshots used during the restore process. These snapshots are not deleted automatically after restore completion.
The Bacularis AWS EC2 plugin does not remove these snapshots automatically. If they are no longer required, they must be deleted manually or through custom automation.
EC2 instance restore#
EBS volume restore#
Cross-Availability Zone restore#
The Bacularis AWS EC2 plugin supports restoring EC2 instances to a different AWS Availability Zone than the original instance.
To restore an EC2 instance to another Availability Zone, specify a Subnet ID associated with the target Availability Zone in the Restore Wizard.
During restore, the selected subnet determines the Availability Zone where the new EC2 instance will be created.
This functionality can be useful for:
disaster recovery scenarios
migrating workloads between Availability Zones
testing restored systems in isolated environments
improving infrastructure availability
If the Subnet ID option is left empty, the restored EC2 instance will be created in the original subnet and Availability Zone stored in the backup metadata.
Cross-Region restore#
The Bacularis AWS EC2 plugin also supports cross-region restore for EBS volumes.
This allows EBS volume backups to be restored into a different AWS region than the region where the original backup was created.
Cross-region restore is currently supported only for EBS volumes and is not available for complete EC2 instance restore operations.
Important
Cross-region restore of KMS-encrypted EBS volumes is currently not supported by the Bacularis AWS EC2 plugin.
Restore to files#
This restore type restores raw backup data to a specified local directory in the file system.
This allows viewing the complete backup structure, including both data and metadata.
This method may be useful when transferring volume data to another virtual environment. The restored files contain two file types:
*.ebs– complete data images from EBS volumes*.json– backup metadata files used by Bacularis
Restore to files can also be useful for debugging purposes, as it provides access to all backup data.
After the restore operation completes, the restored EC2 instance or restored EBS resources will be available in the AWS infrastructure.
Advanced topics#
Optimizing backup and restore performance#
When configuring an EC2 backup or running a restore operation, you can specify the maximum number of HTTP workers used by the HTTP worker pool algorithm. Properly estimating the number of workers can significantly improve backup and restore performance and help fully utilize the available network bandwidth.
The main factor determining the maximum number of workers that can be used is network bandwidth, both upload and download speed.
During backup operations, the Bacularis host primarily receives data from AWS (download), while during restore operations it primarily sends data to AWS (upload). This is particularly important when Bacularis is running outside AWS and communicates with AWS cloud services over the Internet.
Assume that Bacularis is running outside AWS and the available network bandwidth is:
150 Mbit download / 20 Mbit upload
A single worker transfers data blocks of 512 KiB.
The Bacularis AWS EC2 plugin uses 512 KiB data blocks according to EBS Direct API requirements.
Converted to megabytes, the available bandwidth becomes:
150 Mbit/s ÷ 8 = 18.75 MB/s ≈ 17.88 MiB/s (download)
20 Mbit/s ÷ 8 = 2.5 MB/s ≈ 2.38 MiB/s (upload)
General rule#
The following formula can be used to estimate the number of workers:
Number of workers = Available bandwidth (MiB/s) / Block size (MiB)
Backup#
During backup operations, download bandwidth is used most heavily.
To estimate the number of workers for optimal bandwidth utilization:
17.88 MiB/s ÷ 0.5 MiB = ~35.76
Result:
36 workers
Restore#
During restore operations, upload bandwidth is used most heavily.
To estimate the number of workers for optimal bandwidth utilization:
2.38 MiB/s ÷ 0.5 MiB = ~4.76
Result:
5 workers
These calculations assume that the entire network connection is dedicated to Bacularis backup and restore operations.
In real-world environments, this may differ because the available bandwidth is usually shared with other workloads. It is therefore recommended to start with values approximately 10–20% lower than the calculated result and gradually increase them.
Note
Bandwidth is not the only factor affecting performance. Network latency, host performance, and AWS API limits can also influence the optimal number of workers.
Important
Using too few or too many workers can negatively affect performance.
Setting the number of workers too low may result in slow backup and restore operations.
On the other hand, setting the number of workers too high may cause EBS Direct API limits to be reached. This can result in increased retries, higher latency, and reduced performance instead of improved throughput.
By default, 8 workers are configured for both backup and restore operations. However, adjusting this value may significantly improve performance.
When Bacularis runs inside AWS, network bandwidth is typically much higher, allowing a larger number of workers to be used.